Embroider a spaceship
Embroider a spaceship using fabric, embroidery hoop, needle, and colorful thread with adult help, learning basic stitches, following a simple pattern, and personalizing your design.


Step-by-step guide to embroider a spaceship
Step 1
Gather all your materials and set up a clean comfy workspace near a table.
Step 2
Loosen the hoop screw and place the fabric over the inner hoop then press the outer hoop down and tighten the screw so the fabric is taut like a drum.
Step 3
Lay your spaceship pattern on the fabric and trace the spaceship outline lightly with the fabric marker.
Step 4
Pick which thread colors you want for the ship body windows and flames and set them beside you.
Step 5
Cut a single length of embroidery floss about 18 inches long for your first color.
Step 6
Thread the needle with the cut floss and tie a small knot at the end of the thread.
Step 7
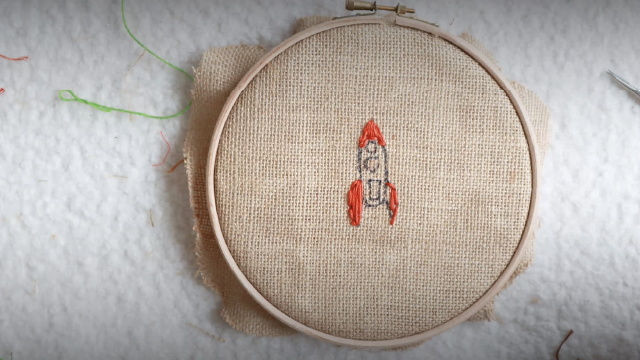
Outline the spaceship using backstitch by bringing the needle up at the start line then inserting it one stitch-length ahead and bringing it up one stitch-length ahead before inserting into the previous hole; repeat to follow your traced line.
Step 8
Fill large areas like the rocket body using satin stitch by placing straight stitches next to each other to cover the shape smoothly.
Step 9
Add long lines like antennas or seams with running stitch by weaving the needle in and out along the traced line.
Step 10
Make tiny windows or stars with French knots by bringing the needle up through the fabric wrapping the thread once around the needle then pushing the needle back down near the start and pulling snug.
Step 11
Take a photo of your finished embroidered spaceship and share your creation on DIY.org
Help!?
What can we use instead of an embroidery hoop, fabric marker, or embroidery floss if we can't find them?
If you lack an embroidery hoop, stretch the fabric over a small picture frame or a taped cardboard circle instead of loosening the hoop screw, trace the spaceship with a pencil or washable marker, and replace embroidery floss with doubled sewing thread or thin yarn while choosing a larger needle.
My stitches look loose or the fabric puckers—what should I check or try fixing first?
If the fabric isn't taut or stitches pucker, re-seat and retighten the hoop screw, shorten your floss to about 12 inches to reduce tangles, and practice the backstitch and satin stitch on scrap fabric so your outline and fills follow the traced spaceship line smoothly.
How can I change this activity for younger or older kids?
For younger kids pre-trace the spaceship and give them a blunt yarn needle with chunky yarn and big running stitches or stickers for windows, while older kids can use 18-inch floss, finer needles, practice satin stitch shading and French knots, and try more detailed backstitch outlines.
How can we make the embroidered spaceship more special before sharing it on DIY.org?
Personalize the piece by adding sequins or small beads for windows and flames, use glow-in-the-dark or metallic thread for highlights, embroider your name and date on the hoop edge, then take a photo to share on DIY.org.
Watch videos on how to embroider a spaceship
Build a Cardboard Space Station Rocket! | DIY Craft for Kids
4 Videos

Build a Cardboard Space Station Rocket! | DIY Craft for Kids
Let's Learn How to Embroider Together!
SPACESHIP ORIGAMI TUTORIAL | DIY SPACE ROCKET ORIGAMI FOLDING | SPACESHIP CRAFTING PAPER INSTRUCTION

50 Must-Know Embroidery Stitches: The Ultimate Beginner's Guide
Facts about embroidery for kids
🧵 Embroidery has been practiced for thousands of years — ancient stitched decorations appear in many cultures around the world.
🪡 Needles for hand stitching have been used for millennia and come in many sizes to match different fabrics and threads.
🪢 Embroidery hoops keep fabric taut so your stitches stay neat and even — a huge help for beginners!
🚀 Scientists and engineers usually say "spacecraft" instead of "spaceship," but both names spark big imaginations for designs.
🎨 Learning simple stitches like running stitch and backstitch builds fine motor skills and lets kids personalize their projects with color and patches.
How do I help my child embroider a spaceship step-by-step?
What materials do we need to embroider a spaceship for kids?
What ages is spaceship embroidery suitable for?
What are some fun variations and personalization ideas for a spaceship embroidery?
