Draw Key Frames for an Animation
Draw key frames to plan a short animation by sketching main poses, timing each frame, and testing motion with simple flipbook flips.


Step-by-step guide to Draw Key Frames for an Animation
Step 1
Gather all your materials and find a flat workspace where you can sit comfortably.
Step 2
Pick one very simple action to animate like a jump a wave or a blink.
Step 3
Decide how many seconds your animation will last pick 1 to 3 seconds to keep it short.
Step 4
Choose how many key frames you will draw aim for 3 to 5 big poses.
Step 5
On the first sheet lightly sketch the starting key pose of your action.
Step 6
On a different sheet lightly sketch the ending key pose of your action.
Step 7
On separate sheets sketch the main middle key poses that show big changes between start and end.
Step 8
Number each sheet in order with a small number in the top corner.
Step 9
Decide how many counts you will hold each frame when flipping try 1 to 3 counts per frame.
Step 10
Stack the sheets in order and clip or band them together at one edge so they flip easily.
Step 11
Flip the stack quickly with your thumb to watch the motion.
Step 12
Use a timer or count out loud to measure how long the flip takes and compare it to the time you planned.
Step 13
Erase and re-sketch any key pose that looks wrong until the motion feels right.
Step 14
Draw cleaner final versions of each key frame on fresh sheets if you want neater art.
Step 15
Share your finished flipbook animation on DIY.org
Help!?
What can I use if I don't have lots of loose sheets, binder clips, or a timer?
If you don't have loose sheets use index cards or cut pages from a notebook, replace a binder clip with a clothespin or stapler to hold the stack at one edge, and use your phone's stopwatch as the timer.
My flip looks jumpy or the action isn't the right length—what should I check?
Check that each sheet is numbered and stacked in the correct order, make sure the edge is securely clipped so the pages flip smoothly, experiment with different counts per frame (1–3) or flip speed, and erase and re-sketch any key pose that looks wrong.
How can I adapt the activity for different age groups?
For ages 4–6 use 2–3 very simple key poses on thicker paper and hold each frame 2–3 counts, for 7–10 aim for 3–4 key frames with lighter sketches and practice 1–2 count flips, and for 11+ use 4–5 key frames, 1-count flips, and draw cleaner final versions on fresh sheets or digitize them.
How can we make the flipbook more advanced or personal?
Add in-between sketches between your key frames for smoother motion, color the cleaner final versions on fresh sheets, photograph the numbered sheets to create a digital GIF, and then share the finished flipbook animation on DIY.org.
Watch videos on how to Draw Key Frames for an Animation
Part 14/38. Keyframe types and Graph Mode - Learning Moho from beginner to expert
4 Videos
Part 14/38. Keyframe types and Graph Mode - Learning Moho from beginner to expert
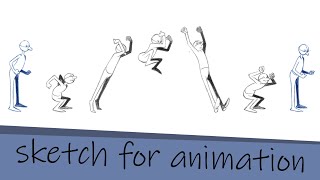
Key Frame animation tutorial part 1: sketch

Moho Animation Tutorial : Keyframe Interpolation & Motion Graph

Understanding Keyframes: The Art of Animation Explained. Full Video: https://youtu.be/-wRi9XmeY_A
Facts about animation and storyboarding for kids
🎞️ At 24 frames per second, one second of smooth animation needs 24 drawings — a whole minute is 1,440 frames!
✍️ Key frames became a standard studio workflow in early 20th-century animation so lead artists could set the big poses for teams.
🔁 The flipbook (kineograph) was patented in 1868 and helped people discover how sequential drawings create motion.
⏱️ Animation timing is a superpower: shifting a pose by just one or two frames can make motion feel snappy or sluggish.
🧩 In traditional hand-drawn animation, 'inbetweeners' draw the frames between key frames and often do most of the frame-by-frame work.
How do you draw key frames for a short animation?
What materials do I need to draw key frames and make a flipbook?
What ages is drawing key frames and simple flipbook animation suitable for?
What are the benefits of drawing key frames for children?
