Draw Cute Food with DIY Star RainbowFroggy
Draw cute food characters and create a DIY star rainbow background using simple shapes, coloring, and step-by-step folding to practice art and symmetry.

Drawing Apps
Step-by-step guide to Draw Cute Food with DIY Star RainbowFroggy
Step 1
Lay out all your materials on a clean table so everything is easy to reach.
Step 2
Fold a full sheet of paper in half vertically and press the crease flat.
Step 3
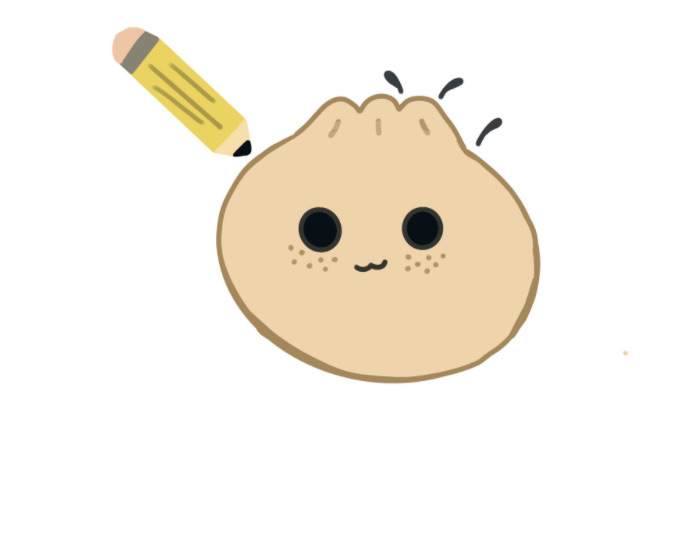
On the folded edge draw half of a food shape like a cookie apple or cupcake so the flat side touches the fold.
Step 4
Cut carefully along your drawn outline while the paper is still folded.
Step 5
Open the paper to reveal your symmetrical food character shape.
Step 6
Use your pencil to add eyes a smile and simple arms or legs to your food character.
Step 7
Fold a small scrap of paper in half to make a star template.
Step 8
On the folded edge of the scrap draw half of a star shape so the point touches the fold.
Step 9
Cut along the half-star outline while the scrap is still folded.
Step 10
Open the scrap to reveal a symmetrical star template.
Step 11
Use the star template to trace a curved row of stars across a background paper to make one rainbow band.
Step 12
Trace more curved rows of stars above or below the first to build several rainbow bands.
Step 13
Color each band of stars in rainbow order using your coloring materials.
Step 14
Glue your finished food characters onto the star rainbow background.
Step 15
Share a photo of your finished star rainbow and cute food characters on DIY.org
Help!?
What can I use instead of a full sheet of paper, scrap paper, or coloring materials if I don't have them?
Use printer paper or folded construction paper instead of a full sheet, cut a cereal-box or cardstock scrap for a sturdier star template or trace a small star cookie-cutter, and swap markers or colored pencils for the listed coloring materials.
My star shapes or food cutouts look uneven after cutting the folded paper — how can I fix that?
To fix uneven cuts from the step where you cut along your drawn outline while the paper is folded, press the crease flat, re-draw the outline with a darker pencil, and cut slowly with small pointed scissors or open and trim the edges carefully so the symmetrical food character shape matches.
How can I adapt this activity for different ages?
For toddlers have an adult pre-fold and pre-cut the food shapes and star template and provide large crayons and glue sticks, while school-age kids can freehand more detailed faces and extra rainbow bands, and older kids can use watercolor paper and fine liners when tracing and coloring the curved rows of stars.
What are simple ways to enhance or personalize our finished star rainbow and food characters?
After gluing your finished food characters onto the star rainbow background, add googly eyes, glitter glue on rainbow bands, write names or little stories beside each character, or punch holes and string several panels to make a hanging mobile for your DIY.org photo.
Watch videos on how to Draw Cute Food with DIY Star RainbowFroggy
😲 AMAZING RAINBOW FOOD IDEAS THAT WILL WOW YOUR FRIENDS! 🌈🎉
4 Videos
😲 AMAZING RAINBOW FOOD IDEAS THAT WILL WOW YOUR FRIENDS! 🌈🎉
🌈 RAINBOW FOOD RECIPES YOU HAVE TO TRY! Fun & Colorful Ideas 🍓✨
LIVE: Rainbow Crafts Extravaganza 🌈😍 20+ DIYs & Recipes You Must See!
Rainbow loom frog tutorial (Squishmallow shape) (intermediate)
Facts about drawing and paper crafts for kids
🍓 Kawaii culture from Japan popularized super-cute food characters with big eyes and simple shapes.
✂️ Folding paper in half and cutting is a fun way to make perfectly symmetrical star shapes.
🌈 Rainbows are commonly shown with seven colors (red, orange, yellow, green, blue, indigo, violet) — but you can choose any palette you like!
🎨 Many adorable food characters are built from simple shapes: circles for cupcakes, ovals for eggs, and triangles for pizza slices.
⭐ A five-point star has a repeating pattern you can explore by rotating or folding to practice symmetry.
How do I draw cute food characters and make a DIY star rainbow background?
What materials do I need to draw cute food and create a DIY star rainbow?
What ages is this Draw Cute Food with DIY Star Rainbow activity suitable for?
What are the benefits of drawing cute food characters and making a star rainbow?
