Draw a historical timeline
Create a colorful historical timeline on poster paper showing five important events, and include dates, drawings, and short descriptions to explore cause and effect.


Step-by-step guide to draw a historical timeline
How to Use a Timeline | Thinking Historically for Kids
Step 1
Gather all the Materials Needed and set them on a clear workspace.
Step 2
Pick a historical topic or time period you want to explore.
Step 3
Decide the start year and end year for your timeline.
Step 4
Use your reference books or printed articles to read about the topic.
Step 5
Choose five important events from your research and note their dates.
Step 6
On sticky notes write a short title and a one-sentence cause-and-effect description for each event.
Step 7
Lightly draw a straight horizontal line across the middle of the poster with your ruler and pencil to make the timeline.
Step 8
Mark five evenly spaced points on the line for your events.
Step 9
Write each event date next to the matching marked point.
Step 10
Write the short event titles next to each date.
Step 11
Draw a colorful picture for each event beside its title using your coloring materials.
Step 12
Add arrows or short connecting lines between events to show cause and effect.
Step 13
Add a big title at the top of the poster and check spelling and neatness.
Step 14
Take a photo or ask an adult to help you upload and share your finished timeline on DIY.org.
Help!?
If I don't have poster board, sticky notes, or a ruler listed in Materials Needed, what can I use instead?
Use a large sheet of printer paper or butcher paper instead of poster board, index cards or folded paper instead of sticky notes, and a straightedge such as a book edge or cereal box side instead of a ruler so you can still lightly draw the horizontal line and mark points.
My event markings look uneven and some dates don't line up—how can I fix that when drawing the timeline?
Measure the pencil-drawn timeline with your ruler or straightedge, divide the total length by four to place five evenly spaced marks, then erase and redraw any misplaced points so each date and title sits next to a marked point as instructed.
How can I change the activity for a younger child or make it more challenging for an older student?
For younger children, reduce the task to three simple events with pre-drawn pictures or stickers and adult help writing the one-sentence cause-and-effect on sticky notes, while older students can expand to 8–10 events, add proportional year scaling and brief source citations from reference books or printed articles.
What are some ways to extend, improve, or personalize the finished timeline before I take a photo to upload to DIY.org?
Add a bold title at the top, use colored arrows or numbered tags to show cause-and-effect chains, glue photos or printed images beside your drawings, and include a small bibliography or QR code linking to your reference articles to make the poster more informative and unique before photographing it for DIY.org.
Watch videos on how to draw a historical timeline
How to Make a Simple Timeline for Homeschool History
4 Videos
How to Make a Simple Timeline for Homeschool History

How To Make A History Timeline: Charlotte Mason Homeschooling
Activities Using History Timelines
How to make a TIMELINE in Word | MS WORD Tutorials
Facts about historical timelines
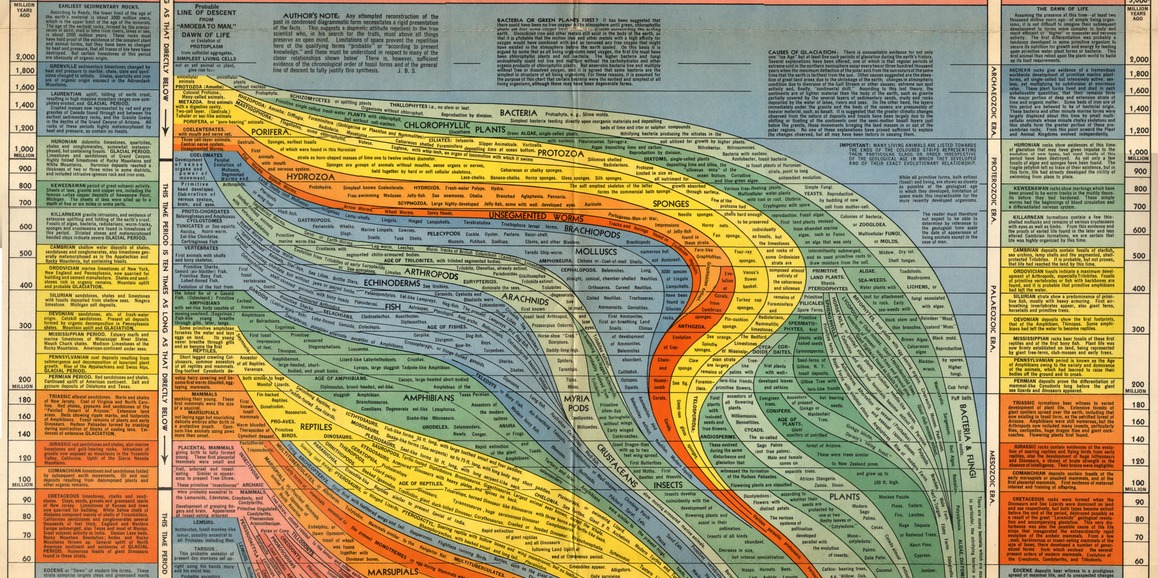
🕰️ Joseph Priestley made popular chronological charts in the 18th century so people could see history at a glance.
🎨 Using bright colors and simple icons on a timeline makes events easier to spot and remember.
✏️ Drawing a tiny picture next to a date helps kids remember that event better than just reading the words.
🔄 Timelines show cause and effect by placing events in order—sometimes a small earlier event leads to a big later change!
📏 When timelines cover very long spans, designers often change the scale (compressing ancient times and expanding recent years) to fit everything.
How do I create a colorful historical timeline on poster paper showing five important events?
What materials do I need to make a five-event historical timeline with dates, drawings, and short descriptions?
What ages is a five-event historical timeline activity suitable for?
What are the benefits of making a historical timeline, and are there safe variations or ways to expand it?
