Draw a Diagram of the Brain
Draw a labeled diagram of the human brain using pencils and colored markers, identify major parts, compare left and right sides, and explain functions.


Step-by-step guide to draw a diagram of the brain
Parts of the Brain-Human Brain Structure and Function
Step 1
Gather all your materials and sit at a flat table so you have plenty of room to draw.
Step 2
Lightly draw a large brain-shaped outline in the center of the paper with a pencil.
Step 3
Draw a straight vertical line down the middle of the brain outline to show the left and right hemispheres.
Step 4
Inside both halves draw wavy lines to show the folded surface (gyri and sulci) of the cerebrum.
Step 5
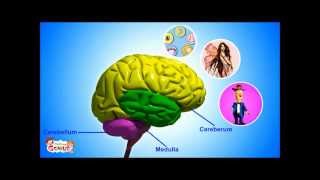
Add a small rounded shape at the back bottom for the cerebellum and a tube-like shape below the brain for the brainstem.
Step 6
Use colored markers to color the left hemisphere one color and the right hemisphere a different color so they look easy to compare.
Step 7
Mark and label the major parts on the drawing: Left Hemisphere; Right Hemisphere; Cerebellum; Brainstem.
Step 8
On one hemisphere draw and label the four lobes: Frontal Lobe; Parietal Lobe; Temporal Lobe; Occipital Lobe using your ruler to make neat lines.
Step 9
Next to each labeled part write a short one-sentence function: Frontal controls thinking and voluntary movement; Parietal handles touch and space; Temporal manages hearing and memory; Occipital processes vision; Cerebellum controls balance and coordination; Brainstem controls breathing and heartbeat.
Step 10
Write two short sentences that compare the left and right hemispheres (for example which side is usually stronger at language and which side helps with visual and creative tasks).
Step 11
Add a clear title at the top and draw a small color key or legend that matches your marker colors to the left and right labels and then share your finished brain diagram on DIY.org.
Help!?
What can we use instead of colored markers or a ruler if we don't have them?
If you don't have colored markers, use colored pencils or crayons to color the left and right hemispheres and use the straight edge of a book or the edge of another piece of paper as a ruler to make neat lobe lines.
My brain halves or lobe lines look crooked—how can I fix that?
If the vertical centerline or lobe lines look uneven, lightly erase and redraw the midline with a ruler or folded-paper straightedge and practice the wavy gyri on scrap paper before inking or coloring on the final sheet.
How do I change the activity to fit different ages?
For younger kids, pre-draw the brain outline and let them color the left/right hemispheres and stick pre-made labels, while older kids should draw detailed gyri, use a ruler to label the four lobes neatly, and write the one-sentence functions from the instructions.
What are easy ways to extend or personalize this brain diagram project?
To enhance the project, laminate the finished diagram to reuse with velcro labels, add arrows and short example activities (e.g., 'speaking' for Frontal) beside each lobe, or create a small clay cerebellum and brainstem to attach as a 3D element before sharing on DIY.org.
Watch videos on how to draw a diagram of the brain
A Level Biology Revision (Year 13) "The Human Brain"
4 Videos

A Level Biology Revision (Year 13) "The Human Brain"
Facts About the Brain | Lesson Video

The Brain for Kids - What is the brain and how does it work?
Our Brain - Human Anatomy -Lesson for Kids- School Science Video
Facts about brain anatomy
🧠 The adult human brain weighs about 1.3–1.4 kilograms (around 3 pounds).
⚡ Although it's only about 2% of body weight, the brain uses roughly 20% of the body's energy and oxygen.
🔗 The left and right hemispheres communicate through the corpus callosum, which contains on the order of hundreds of millions of nerve fibers.
🧩 The cerebellum is small but densely packed with neurons—it's crucial for balance, coordination, and fine motor control.
🎨 The left hemisphere is often stronger at language and logic while the right often helps with spatial and creative tasks—but both sides work together.
How do I guide my child to draw and label a simple diagram of the brain?
What materials do I need to draw and label a brain diagram at home?
What ages is the brain diagram activity suitable for?
What are the benefits of having my child draw and label a brain diagram?
