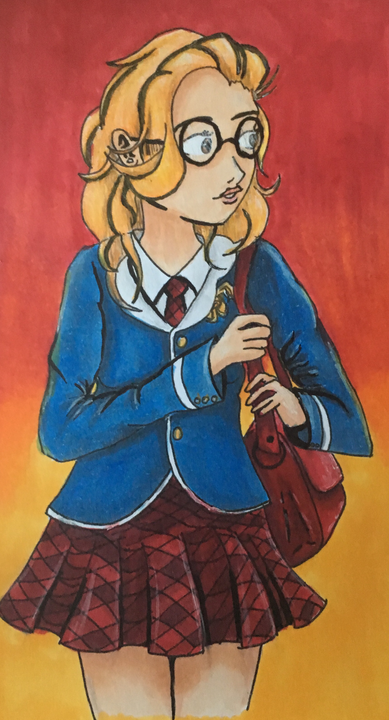
Describe a main character for an animation you want to create
Design and create a main animated character by drawing, crafting a simple puppet, and testing basic movements while developing personality and backstory.


Step-by-step guide to design and create a main character for an animation
Making a TED-Ed Lesson: Animation
Step 1
Pick the kind of character you want to create such as an animal a robot a superhero or a silly monster.
Step 2
Choose three short personality traits that describe your character for example brave curious funny or shy.
Step 3
Give your character a name and say it out loud to make it real.
Step 4
Draw a simple front view sketch of your character on paper showing the head body and limbs.
Step 5
Add one or two special features like a hat big eyes a cape stripes or a tail.
Step 6
Colour your sketch using your colouring materials to make your character pop.
Step 7
Cut out matching head and body shapes from cardboard or thicker paper to make your puppet parts strong.
Step 8
Glue or tape your paper drawing pieces onto the cardboard cutouts so the picture is attached firmly.
Step 9
Attach a craft stick to the back of the body cutout with tape or glue to make a handle.
Step 10
Cut paper strips to make arms and legs for your puppet.
Step 11
Attach the paper limbs to the body using paper fasteners or short pieces of string so they can move.
Step 12
Test your puppet by moving the limbs and head to make it wave nod and take a few steps.
Step 13
Fix any parts that do not move well by loosening or reattaching fasteners or adjusting tape and position.
Step 14
Write a short backstory of two or three sentences that explains where your character comes from and what they want.
Step 15
Share a photo or video of your finished character and puppet on DIY.org
Help!?
What can we use instead of cardboard or a craft stick if we don't have them?
Use sturdy cereal-box cardboard or a folded thick magazine for the head and body cutouts, and substitute a pencil, ruler, or sturdy recycled plastic strip for the craft stick handle when attaching it to the back of the body.
What should we do if the paper limbs won't move well or keep falling off?
If the limbs don't move smoothly or fall off, loosen or replace the paper fasteners, try short pieces of string threaded through the limb holes, and reinforce attachment points with small pieces of tape behind the joint so they can still swivel.
How can we adapt this puppet activity for younger or older kids?
For younger children, pre-cut the head and body shapes and glue on fixed paper strip limbs, while older kids can cut their own cardboard, use paper fasteners or metal brads for moving joints, and expand the two- or three-sentence backstory into a detailed storyboard.
How can we extend or personalize the character beyond the basic steps?
Enhance the puppet by adding a folded paper tab for a movable mouth, gluing on fabric or yarn for clothes and hair, adding big googly eyes or stickers as a special feature, and film a short video of the puppet acting out its backstory to share on DIY.org.
Watch videos on how to design and create a main character for an animation
Digital Interactive Comic Instructions | Kids Cartoon
4 Videos
Digital Interactive Comic Instructions | Kids Cartoon
Pinocchio | Sidekicks And Mentors | Disney+
The Characters We Animated | Inside Pixar: Foundations | Pixar
Animation For Beginners | Kids Learn How To Animate | Animation Basics
Facts about character design and basic animation
🎨 Character designers often draw dozens of different versions of a hero before choosing a final look.
🎬 Traditional film animation runs at about 24 frames per second, so animators often test motion “on twos” (12 drawings/sec) to save work.
🎭 Storyboards were popularized at Walt Disney Studios in the 1930s to plan scenes visually before animating.
🐸 Puppetry is ancient — people used simple puppets in storytelling thousands of years ago, with evidence from ancient civilizations.
🤖 Many animators and creators act out scenes or use simple puppets as reference to discover a character’s unique movements and personality.
How do I design and test a main animated character with my child?
What materials do I need to draw and make a simple puppet for an animated character?
What ages is designing and making an animated character suitable for?
What are the benefits of having my child design a main animated character and are there safety tips?
