Create Art Using Colors to Bring Out Emotions
Paint an emotion based artwork using colors, brushes, and mixed media to explore feelings, color choices, and how hues change mood.


Step-by-step guide to Create Art Using Colors to Bring Out Emotions
Step 1
Choose a workspace and cover it with paper towels or an old cloth to keep it clean.
Step 2
Pick one emotion to paint such as happy sad excited calm or angry.
Step 3
Lightly sketch shapes lines or symbols on your paper that remind you of that emotion.
Step 4
Choose three to five colors that match the feeling and put small blobs of each color on your palette.
Step 5
Paint the background using broad strokes or washes to set the main mood.
Step 6
Add another paint layer with a different brush size to change texture and energy.
Step 7
Glue a piece of tissue paper or a magazine cutout onto your painting to add texture.
Step 8
Mix a little white or black into a chosen color to create lighter or darker shades and paint with them.
Step 9
Use coloring materials or a pencil to draw small details outlines or marks once paint is dry.
Step 10
Share your finished creation on DIY.org.
Help!?
What can we use instead of a palette, tissue paper, or special brushes if we don't have them?
Use a clean paper plate or wax paper as a palette for your paint blobs (step 4), replace tissue paper with torn paper napkins or fabric scraps to glue on (step 7), and substitute special brushes with sponges or cotton swabs for different textures (step 6).
My colors look muddy or the tissue paper won't stick—how do I fix that?
If colors become muddy when layering (step 6), let the background dry fully (step 5) and test mixes on your paper plate, and if tissue paper won't adhere (step 7) apply a thin layer of glue and press gently until it dries.
How can I adapt this activity for different ages?
For preschoolers use two colors, big brushes, and pre-drawn shapes (steps 3–6); for elementary kids use three-to-five colors and try mixing lighter/darker shades with white or black (step 8); and for teens add fine details with pencils (step 9) and create a themed series to share (step 10).
How can we make the final artwork more personal or lasting?
Personalize by adding meaningful magazine cutouts or handwriting onto the glued paper (step 7), varnish or frame the dry painting to preserve it, and photograph the finished piece to post on DIY.org (step 10).
Watch videos on how to Create Art Using Colors to Bring Out Emotions
Art & Emotions
4 Videos
Art & Emotions

Painting Emotions - Watercolor as Art Therapy for Kids
"Learn Emotions with Colors | Emotion Wheel for Kids | Kiddo Color Club"
Express Yourself! How To Express Your Emotions Through Art
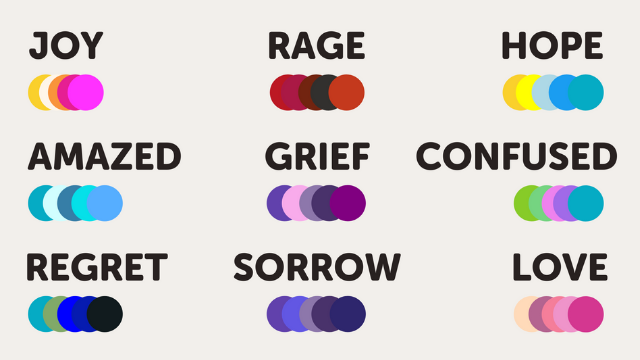
Facts about color theory and emotional expression for kids
🎨 Expressionist artists used wild, non-realistic colors to show inner feelings rather than realistic scenes.
🧠 Research shows cool colors like blue often lower heart rate and warm colors like red can raise energy and arousal.
❤️ Many children by preschool age consistently link yellow with happiness and blue or gray with sadness.
🌈 Mixing complementary colors (like blue and orange) mutes brightness and can make a mood feel softer or more complex.
🖌️ Adding mixed-media textures (paper, fabric, salt, scraping) layers emotion into a piece that color alone can't always express.
How do I guide my child to paint an emotion-based artwork?
What materials do I need for an emotion-painting activity?
What ages is this emotion-color painting activity suitable for?
What are the benefits of painting emotions with color?
