Create a cookie dunker
Build a simple cookie dunker using cardboard, straws, rubber bands, and clothespins to safely dip cookies into milk and test dunking designs.


Step-by-step guide to build a cookie dunker
Step 1
Gather all the Materials Needed and put them on a clear workspace.
Step 2
Cut a cardboard rectangle about 15 cm by 10 cm using scissors.
Step 3
Fold one short edge of the cardboard up about 1 cm to make a drip lip.
Step 4
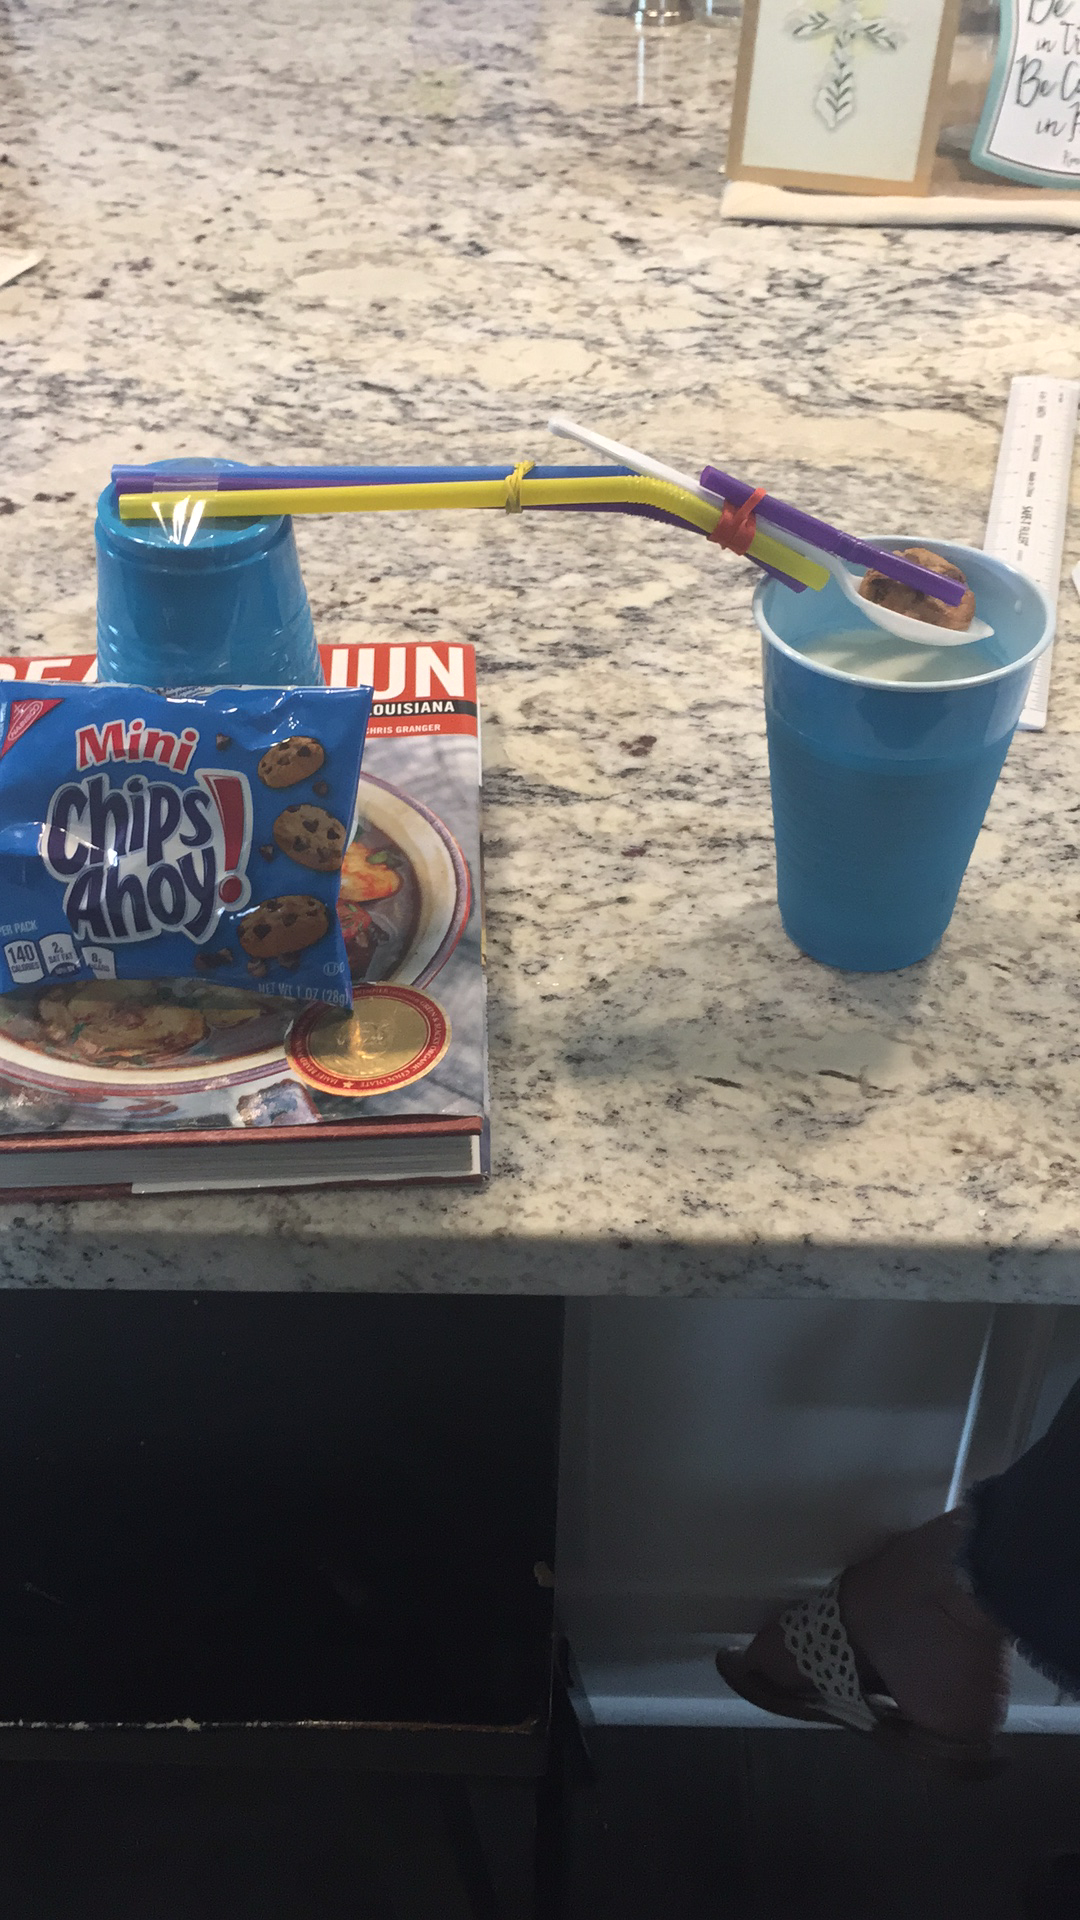
Line two drinking straws end-to-end and tape them together to make a longer handle.
Step 5
Wrap a rubber band around the clothespin hinge and the taped end of the straws to attach the clothespin to the straw handle.
Step 6
Wrap tape around the clothespin and straw joint to make the connection extra secure.
Step 7
Tape the free end of the straw handle flat onto the cardboard near the folded drip lip so the clothespin end can reach over the edge.
Step 8
Pour milk into a shallow bowl to a level safe for dunking.
Step 9
Place the bowl on the folded cardboard lip so it sits steady and won’t tip.
Step 10
Open the clothespin and clamp a cookie in its jaws.
Step 11
Lower the cookie slowly into the milk until it just touches the surface.
Step 12
Count to your chosen dunk time while the cookie stays submerged.
Step 13
Lift the cookie straight up and place it on the folded cardboard lip to let it drip.
Step 14
Share a photo and a short description of your finished cookie dunker and your dunk test results on DIY.org
Help!?
What can we use instead of drinking straws or a clothespin if we can't find them?
Line two pencils, chopsticks, or a wooden skewer end-to-end and tape them together as the handle and use a small binder clip, peg, or clothespin substitute wrapped with a rubber band to clamp the cookie as in the original straw-and-clothespin step.
My cookie keeps slipping or the clothespin connection is loose—how can I fix that?
Tighten the grip by wrapping the rubber band around the clothespin hinge and the taped end of the straws, add extra tape around the clothespin-and-straw joint, and make sure the straw handle is taped flat onto the cardboard near the folded 1 cm drip lip so the clothespin reaches securely over the edge.
How can I adapt this cookie dunker activity for different age groups?
For younger children have an adult cut the 15 cm × 10 cm cardboard, pre-fold the 1 cm drip lip, and attach the taped straw-and-clothespin so the child only clamps and dunks, while older kids can measure dunk times, design different drip-lip heights, swap handle materials, or decorate and document results for a science comparison.
What are some ways to extend or personalize the cookie dunker after finishing the basic version?
Decorate the cardboard base with markers or stickers, tape a simple paper timer or ruler next to the folded drip lip to record dunk times, try swapping milk for different liquids to compare soak results, or replace the taped straws with a wooden dowel for a sturdier handle.
Watch videos on how to build a cookie dunker
Video GAME! @Mia's Magic Playground - Cartoons For Kids | Funny Stories for Kids
4 Videos
Video GAME! @Mia's Magic Playground - Cartoons For Kids | Funny Stories for Kids
Mini Basketball Game | Crafts for Kids

Solo GOLDEN GAME! | @Mia's Magic Playground - Cartoons For Kids | Funny Stories for Kids
Crafts for Kids | How to Make an Alphabet Activity Game
Facts about simple engineering projects for kids
🍪 'Cookie' comes from the Dutch word koekje, which means 'little cake'.
🥛 Cow's milk is about 87% water, so it soaks into cookies fast—perfect for dunk tests!
🥤 The modern drinking straw was invented and patented in 1888 by Marvin Stone.
🪢 Rubber bands were first patented in the 19th century and are a handy fastener in many DIY builds.
🧰 A clothespin works like a simple lever and clamp—great for gripping a cookie gently without squishing it.
How do you build a cookie dunker for kids?
What materials do I need to make a cookie dunker?
What ages is a cookie dunker activity suitable for?
What safety tips should I follow when kids make a cookie dunker?
