Craft a cool collage
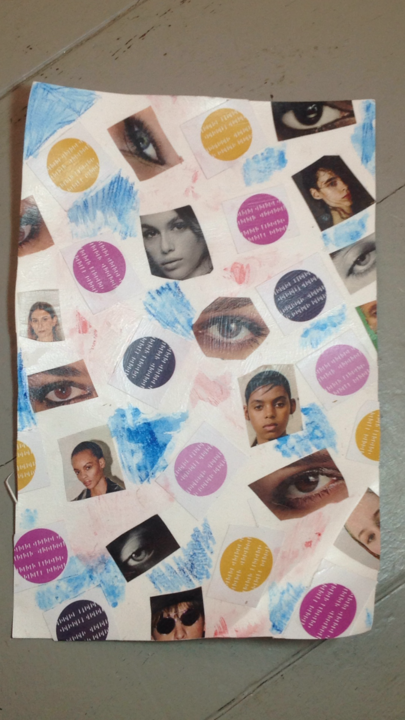
Create a colorful collage using magazines, recycled materials, scissors, and glue. Arrange shapes, textures, and themes to express ideas and practice composition.


Step-by-step guide to create a colorful collage
DIY Collage Craft for Kids | Fun & Easy Creative Collage Art
Step 1
Place your large sheet of paper or thin cardboard on a clean flat table.
Step 2
Arrange your magazines recycled materials scissors glue and colouring materials within easy reach.
Step 3
Choose a theme or idea for your collage such as nature space friends or a favorite color.
Step 4
Look through magazines to find pictures patterns or colors that match your theme.
Step 5
Put each chosen picture or pattern into a small pile.
Step 6
Cut out the pictures and shapes from the magazines carefully using scissors.
Step 7
Arrange the cut pieces on the base to create a layout without gluing.
Step 8
Move pieces around until you like the composition and balance.
Step 9
Tear or cut small bits from recycled materials to add texture to your design.
Step 10
Place the textured bits into your layout where they look best.
Step 11
Glue down the pieces by starting with the background layer and working forward.
Step 12
Press each glued piece flat with your fingers or a ruler so it sticks well.
Step 13
Use colouring materials to add small details borders or accents if you want.
Step 14
Let the collage dry flat for at least 15 minutes.
Step 15
Sign your name and ask an adult to help you share your finished collage on DIY.org.
Help!?
What can we use instead of magazines or thin cardboard if we don't have them?
If you don't have magazines, use junk mail, printed photos, wrapping paper, or fabric scraps for the 'Look through magazines' step, and replace thin cardboard with a cereal box or unused manila folder as your base.
My cut pieces keep sliding and won't stick—what should I do?
If pieces slide during the 'Glue down' step, use a glue stick or double-sided tape, press each glued piece flat with a ruler as the instructions say, and let the collage dry longer than the recommended 15 minutes.
How can I adapt this collage activity for different age groups?
For younger children, provide larger pre-cut pictures and supervise the 'Cut out the pictures' step, while older kids can add fine details with colouring materials and experiment with layered recycled materials for texture.
How can we make the collage more special or challenging?
To enhance the project, incorporate 3D recycled bits for texture, paint borders or accents with your colouring materials, and frame or laminate the finished piece before signing your name and sharing on DIY.org.
Watch videos on how to create a colorful collage
Popsicle Color Fun! Warm & Cool Colors Art Project for Kids - Summer Art - Paper Collage Project
4 Videos
Popsicle Color Fun! Warm & Cool Colors Art Project for Kids - Summer Art - Paper Collage Project
Popsicle Color Fun! Warm & Cool Colors Art Project for Kids - Summer Art - Paper Collage Project

BEST Springtime Art Project | Step-by-Step Bunny Collage Tutorial for Kids!
How To Make An Animal Collage | Creativity Tips | Crayola Learning
Facts about collage and mixed-media art
🧩 Picasso (and Georges Braque) helped introduce collage into modern art in the early 1900s — they glued newspaper and fabric into paintings!
✂️ The oldest scissors-like tools go back to around 1500 BC in ancient Egypt — people have been cutting for a very long time!
♻️ Recycling one ton of paper can save roughly 17 trees, so using old magazines for art helps the planet.
📰 Most magazines are printed with four inks (CMYK) that mix to create thousands of vibrant colors for collages.
🎨 Artists often use the rule of thirds, contrast, and repetition to make collages look balanced and exciting.
How do I help my child create a colorful collage step-by-step?
What materials do I need to make a collage with magazines and recycled items?
What ages is a magazine collage suitable for?
What are the benefits of making collages with recycled materials?
