Construct a "trip" alarm
Build a simple trip alarm using string, a clothespin switch, and a low-voltage battery buzzer. Test how the alarm triggers when the string is pulled.


Step-by-step guide to build a trip alarm with string, a clothespin switch, and a low-voltage battery buzzer
Tiny Folding Digital Travel Alarm Clock Review
Step 1
Gather all the materials on a table so everything is ready.
Step 2
Use the scissors to carefully bend two paperclips into short L-shaped metal pieces about 2 cm long.
Step 3
Hook one bent paperclip onto the inside face of each clothespin jaw so the metal tips face each other and will touch when the clothespin closes.
Step 4
Cut two short pieces of insulated wire about 10 cm long.
Step 5
Strip about 1 cm of insulation off each end of both wires so the metal is exposed.
Step 6
Wrap one stripped wire end around the paperclip on one jaw and secure it with a small piece of electrical tape.
Step 7
Wrap the other stripped wire end around the paperclip on the other jaw and secure it with electrical tape.
Step 8
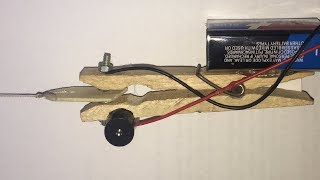
Tape the buzzer's positive terminal firmly to the battery's positive terminal using a small piece of electrical tape.
Step 9
Attach the wire from the first paperclip to the buzzer's negative terminal and tape it securely.
Step 10
Attach the wire from the second paperclip to the battery's negative terminal and tape it securely.
Step 11
Slide the toothpick between the clothespin jaws to keep the clothespin held open.
Step 12
Tie one end of the string around the toothpick so pulling the string will pull the toothpick out.
Step 13
Stretch the string across a doorway or hallway and tie the other end to a chair or table leg so the string is taut.
Step 14
Gently pull the string to test your trip alarm and watch the clothespin snap shut and the buzzer sound when the toothpick is pulled out.
Step 15
Take a photo or video of your finished trip alarm and share your creation on DIY.org
Help!?
What can I use if I don't have a buzzer or insulated wire listed in the materials?
If you don't have a buzzer, substitute a small piezo speaker or a 3V LED (remember to check polarity) wired in place of the buzzer and if you lack insulated wire, salvage 10 cm pieces from an old toy cable and strip about 1 cm at each end as in the instructions.
The buzzer doesn't sound when the clothespin snaps shut—what should I check?
Check that the bent paperclip L-tips (step 2) actually touch when the clothespin closes and that the stripped wire ends and taped connections to the buzzer and battery (steps 6–11) have exposed metal and tight electrical tape to ensure continuity.
How can I adapt this project for different ages and skill levels?
For preschoolers have an adult do the paperclip bending, wire stripping, and battery/tape steps while the child helps tie the string and test the trip; for older kids let them bend the paperclips (step 2), strip wires (step 4), and experiment with toothpick placement (step 12) to change sensitivity.
How can we make the trip alarm more fun or advanced once it's working?
To enhance it, add an LED in parallel with the buzzer or chain extra clothespins and paperclips across the doorway to create a multi-point alarm, and personalize the clothespins or string decorations before testing the trip (steps 12–13).
Watch videos on how to build a trip alarm using string and a clothespin switch
💣Camping TRIP ALARMS using over-sized powder loads
4 Videos

💣Camping TRIP ALARMS using over-sized powder loads
TRIP WIRE ALARM DIY - How to make a Tripwire Alarm (Easy)

Instructions on how to set your Travelon® Travel Alarm Clock Style #12654
Quick "How to Use" FithOps Perimeter Trip Alarm w/ 209 Primer
Facts about simple electrical circuits for kids
🧵 A simple length of string can act as a tripwire that mechanically moves a clothespin to open or close an electrical circuit.
🔔 Many small battery-powered buzzers run on just 1.5–3 volts, making them ideal and safe for kid-friendly alarm projects.
⚡ A single AA battery supplies about 1.5 volts — enough to power low-voltage buzzers without needing complicated wiring.
📎 A wooden clothespin doubles as a handy spring-loaded switch in DIY electronics because its jaws and spring can complete or break a circuit.
🛡️ Trip alarms are a fun way to learn cause-and-effect and basic circuits—always use low-voltage batteries and adult supervision for safety.
How do you build and test a simple trip alarm with a clothespin switch?
What materials do I need to make a string-and-clothespin trip alarm?
What ages is this trip alarm activity suitable for?
What safety tips should I follow when making a trip alarm with a battery buzzer?
