Click A Picture Of The Moon From Your Phone!
Use your phone to photograph the Moon: find it, steady your hands or use a tripod, adjust zoom and exposure, and compare phases.


Step-by-step guide to click a picture of the Moon from your phone
Step 1
Go outside with an adult when the Moon is visible.
Step 2
Choose a comfy spot to stand or sit.
Step 3
Set up a tripod or rest your phone on a steady surface.
Step 4
Pick up your phone.
Step 5
Open the camera app.
Step 6
Point the camera at the Moon.
Step 7
Tap the Moon on the screen to focus and wait for the focus to lock.
Step 8
Pinch or use zoom controls to make the Moon larger in the frame.
Step 9
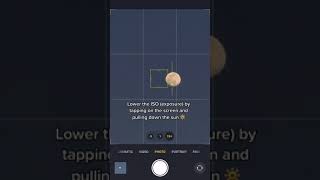
Drag the exposure control or swipe the sun icon to adjust brightness until you can see Moon details.
Step 10
Press the shutter button gently to take one clear photo.
Step 11
Take two more photos using slightly different zoom or exposure settings.
Step 12
Look up the Moon phase using a chart or app and write the date and phase in your notebook.
Step 13
Share your favorite Moon photo and the phase you observed on DIY.org
Help!?
What can we use instead of a tripod if we don't have one?
If you don't have a tripod, rest your phone on a stack of books, a sturdy cup, or the hood of a parked car and use the phone's timer so you can tap the screen to focus without moving it.
My Moon photos are blurry or too bright — what should I check or change?
If the Moon looks blurry or overexposed, tap the Moon and wait for the focus to lock, then drag the exposure/sun icon to lower brightness and take the two extra photos at slightly different zoom or exposure settings as the instructions say.
How can I adapt this activity for younger or older kids?
For younger children, have an adult set up the phone on a tripod or steady surface and guide them to press the shutter and draw the date and phase in the notebook, while older kids can try manual camera apps, more zoom, and compare the three shots before posting on DIY.org.
How can we extend or improve our Moon photos before sharing on DIY.org?
To enhance the activity, attach a clip-on telephoto lens or use a camera app to stack and lightly edit your three photos for more detail, then label the date and phase in your notebook and create a multi-night Moon series to share on DIY.org.
Watch videos on how to click a picture of the Moon from your phone
How to take a photo of the moon with just your iPhone!🌖
3 Videos
How to take a photo of the moon with just your iPhone!🌖
How to take photos of the moon with the iPhone 16 Pro

HOW TO TAKE AN AMAZING PICTURE OF THE MOON WITH YOUR PHONE!
Facts about the Moon and astronomy for kids
🌕 The Moon is about one-quarter the diameter of Earth, so its big features like craters can be visible with phone zoom and steady hands.
🌗 The phases of the Moon repeat every ~29.5 days (a synodic month), so you can plan to photograph crescent, quarter, or full phases on a schedule.
📸 Smartphone tip: tapping and locking exposure on the Moon often lowers brightness so details show instead of a blown-out white disk.
🔭 Surface detail pops best near crescent or first/last quarter because shadows highlight craters—full Moons look flatter and less textured.
🕒 The Moon moves about 0.5° per hour across the sky, so a tripod or steady support helps prevent motion blur in longer exposures.
How do you take a clear photo of the Moon with a phone?
What materials and apps do I need to photograph the Moon from my phone?
What ages is phone moon photography suitable for?
What are fun variations, benefits, and safety tips for moon photography?
