Build your avatar
Design and build a personalized paper or cardboard avatar puppet with movable parts, colors, and accessories to represent yourself and tell its story.

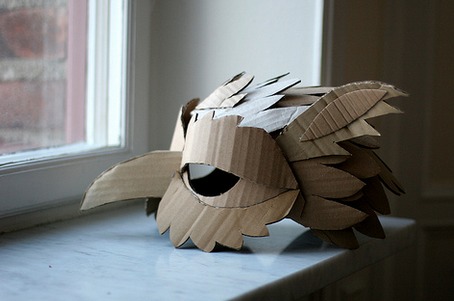

Step-by-step guide to build your avatar
Avatar for Kids | How to Create Your Own Avatar | Learn about Avatar | 7-Day FREE Trial | Socrates
Step 1
Gather all the materials listed and set them on a clear workspace.
Step 2
Decide how your avatar will look and lightly sketch a head and body shape on the cardboard or thick paper.
Step 3
Draw separate arms legs and any accessories you want (like a hat or backpack) on plain paper.
Step 4
Cut out the head body arms legs and accessories carefully with scissors.
Step 5
Use your pencil to mark small dots on the body where each arm and leg should attach.
Step 6
Make small holes at the marked dots using a pencil tip or a hole punch.
Step 7
Push brad fasteners through the holes to attach the arms and legs so they can move.
Step 8
Color and decorate the face body limbs and accessories with your coloring materials.
Step 9
Glue clothing or extra accessories onto your avatar’s body.
Step 10
Write a short one or two sentence story about your avatar on a small piece of paper.
Step 11
Tape or glue the story paper to the back of your avatar.
Step 12
Move the limbs to see if they swing freely.
Step 13
If any limb is too loose or too tight adjust its brad fastener a little to fix it.
Step 14
Share your finished avatar puppet and its story on DIY.org.
Help!?
What can we use instead of brad fasteners or thick cardboard if we can't find them?
If you don't have brad fasteners use brass split-pins or small paper fasteners and substitute cardboard with a cereal box or heavyweight construction paper, then still push the fastener through the hole to attach the limbs so they can move.
What if the limbs are too loose or too tight and don't swing properly?
If a limb is too loose, add a small paper washer or a tiny piece of tape behind the hole, and if it's too tight slightly widen the hole with the pencil tip or loosen the brad as suggested in the 'adjust its brad fastener' step so the limb swings freely.
How can I adapt this activity for younger children or older kids who want more challenge?
For younger children, pre-sketch and pre-cut the head, body, arms and legs and have an adult make the holes and push in the brad fasteners, while older kids can add extra brad joints, detailed accessories with coloring materials, and layered glued clothing for more articulation and design complexity.
How can we make the avatar more creative or use it after it's finished?
Personalize the avatar by gluing fabric scraps, sequins or googly eyes as accessories in the 'Glue clothing' step, add extra brads for elbow or knee joints, tape a popsicle stick to the back as a puppet handle, and expand the short story into a script to perform and share on DIY.org.
Watch videos on how to build your avatar
How to Create a Talking Avatar For Free IN Three Steps
4 Videos
How to Create a Talking Avatar For Free IN Three Steps
How to Create a Talking Avatar in Canva: No Experience Needed

Create 3D AI Avatar That Talks - Pixar Style Animation Tutorial 100% FREE | Kling AI
Well this is FUN! Creating my LEGO Avatar!
Facts about puppet making for kids
🎭 Puppetry has been performed for over 2,000 years — ancient puppets told stories across many cultures.
👗 Paper dolls were a Victorian-era favorite; children used cut-out outfits to create characters long before digital avatars.
📦 Corrugated cardboard was invented in the 19th century for packaging and is surprisingly strong for building puppet bodies and joints.
🎨 Color choices help tell a character's story — bright colors often read as energetic while cool hues can feel calm or thoughtful.
🪢 Simple tricks like brads, string, and folded paper hinges can make arms and legs move without complicated tools.
How do I design and build a personalized paper or cardboard avatar puppet?
What materials do I need to make an avatar puppet with movable parts and accessories?
What ages is a build-your-avatar puppet activity suitable for and when is adult supervision needed?
What are the benefits of making a personalized avatar puppet for kids?
