Build a go-kart
Build a safe, low-speed wooden go-kart with wheels and steering, learn basic mechanics and testing while using adult supervision and wearing a helmet.


Step-by-step guide to build a safe wooden go-kart
HOW TO GET STARTED IN KID KART RACING! | Go Kart racing at 6-years old | Learn how to start racing!
Step 1
Ask an adult to supervise your go-kart project.
Step 2
Put on your helmet safety goggles and gloves.
Step 3
Lay out all materials on a flat work surface so everything is easy to reach.
Step 4
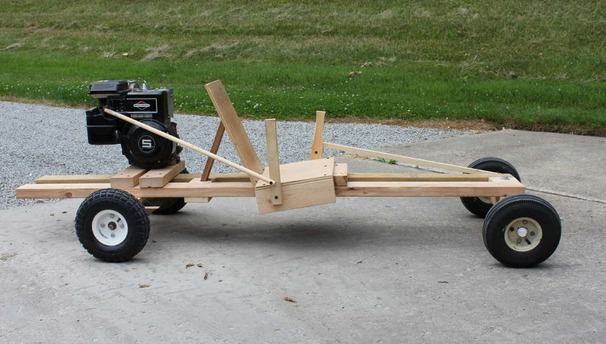
Measure and mark a seat board about 60 cm long and 30 cm wide with your pencil and measuring tape.
Step 5
With adult help cut the seat board along your marks using the saw.
Step 6
Measure and mark two frame rails about 80 cm long and with adult help cut them to length.
Step 7
Place the seat centered on the two frame rails so it will sit evenly.
Step 8
Screw the seat to the rails using screws and a drill or screwdriver.
Step 9
Screw the wood blocks under each end of the rails to serve as axle mounts.
Step 10
Slide the axle rods through the mounts and secure them with nuts on each end.
Step 11
Put the wheels onto each axle and tighten the nuts so the wheels spin freely without wobbling.
Step 12
Attach a wooden dowel or bar to the front axle so turning the dowel turns the front wheels for steering.
Step 13
Sand any rough edges on the seat rails and mounts until everything is smooth.
Step 14
With your adult supervising and holding the kart first, sit wearing your helmet and have them gently push you a short flat distance to check stability steering and speed.
Step 15
Share your finished go-kart on DIY.org.
Help!?
What can we use instead of axle rods or the wooden dowel if those parts are hard to find?
Use straight threaded rod or a rigid metal broom handle from a hardware store for the 'slide the axle rods through the mounts' step, and substitute the wooden dowel for steering with a sturdy broomstick or metal bar cut to length and secured to the front axle.
The wheels wobble when I test the kart—what should I check and fix?
When you 'put the wheels onto each axle', remove and re-seat the wheel, add a washer or spacer, tighten the nuts until the wheels 'spin freely without wobbling', and confirm the wood blocks under the rails are screwed square and aligned.
How can we adapt the build for younger kids or make it more challenging for older kids?
For younger children shorten the seat board and frame rails, lock or limit the front steering dowel and have an adult do the initial supervised push while the child wears their helmet, and for older kids keep the 60×30 cm seat and 80 cm rails but use stronger axle rods and let them do more cutting and screwing with supervision.
What are easy ways to personalize or upgrade the go-kart after finishing the basic build?
After you 'sand any rough edges', personalize by painting the seat and rails, add a padded cushion, mount a simple bicycle-style hand brake to an axle for stopping, and decorate before sharing your finished go-kart on DIY.org.
Watch videos on how to build a safe wooden go-kart
Go-Karting for Kids 🏎️ Sports for Kids 🏁 Vehicle for Kids 🛞 Race Go Karts!
4 Videos
Go-Karting for Kids 🏎️ Sports for Kids 🏁 Vehicle for Kids 🛞 Race Go Karts!
How to build the Simplest Go Kart! | Wild Kinetics

How to Build a GoKart From Scratch | Metalworking Project
How to start Karting as a beginner in 2025
Facts about woodworking and basic mechanics for kids
🏁 Art Ingels is credited with building one of the first go-karts in 1956 in Southern California.
⚙️ The wheel-and-axle is one of the classic simple machines that helps your go-kart roll with less effort.
🛞 Many beginner go-karts use a solid rear axle (no differential), which is simpler to build but affects how the kart turns.
⛑️ Wearing a helmet and testing slowly with adult supervision greatly reduces the risk of serious head injuries.
🌟 Karting is a common first step for top racers—drivers like Lewis Hamilton began in go-karts as kids.
How do I build a safe, low-speed wooden go-kart with steering for my child?
What materials and tools do I need to build a wooden go-kart?
What ages is building and riding a homemade go-kart suitable for?
What safety precautions and benefits should I know before building and testing a go-kart?
