Build a circuit using a photoresistor
Make a simple light sensitive circuit using a photoresistor, battery, LED, and wires to observe how light controls the LED brightness.


Step-by-step guide to build a circuit using a photoresistor
How to Use a Photoresistor (Light Sensor) with Arduino (Lesson #27)
Step 1
Gather all the materials listed.
Step 2
Ask an adult to help and stay nearby for safety.
Step 3
Find the LED and identify the longer leg as the positive anode and the shorter leg as the negative cathode.
Step 4
Attach one wire to the LED anode (long leg) using an alligator clip or by twisting the wire around the leg.
Step 5
Connect the free end of that wire to one end of the 100 ohm resistor by clipping or twisting them together.
Step 6
Attach another wire from the other end of the resistor to the positive terminal of the battery holder or the positive side of the coin cell.
Step 7
Attach a second wire to the LED cathode (short leg) using a clip or by twisting the wire around the leg.
Step 8
Connect the free end of that second wire to one leg of the photoresistor (LDR).
Step 9
Connect a third wire from the other leg of the photoresistor to the negative terminal of the battery holder or the negative side of the coin cell.
Step 10
Secure any loose connections with electrical tape so wires and parts stay in place.
Step 11
Shine a bright light or flashlight onto the photoresistor.
Step 12
Watch the LED and see if it gets brighter when the photoresistor is lit.
Step 13
Cover the photoresistor with your hand or the dark cloth to block the light.
Step 14
Watch the LED and see if it gets dimmer when the photoresistor is in the dark.
Step 15
Share a photo or video of your finished light sensitive circuit on DIY.org.
Help!?
What can we use instead of hard-to-find parts like the photoresistor, 100 ohm resistor, or alligator clips?
If you can't find a photoresistor (LDR) use a small phototransistor or a light sensor module, if you don't have a 100 Ω resistor use a higher value such as 220–330 Ω to still protect the LED, and if you lack alligator clips follow the instructions to twist wires around the LED legs and secure with electrical tape or use a coin cell instead of a battery holder.
My LED doesn't light—what should I check first while building the circuit?
Make sure the longer LED leg is attached as the positive anode per the instructions, that the wire from the anode goes through the resistor to the battery positive and the cathode goes through the photoresistor to the battery negative, that all clips/twists are tight and taped, and that the battery has charge and the photoresistor is being illuminated when you expect the LED to brighten.
How can we adapt this activity for different ages?
For younger children have an adult pre-strip wires, handle battery connections, and demonstrate covering the photoresistor to show the LED dimming, for grade-schoolers let them twist and tape the wires with supervision, and for older kids move the same connections onto a breadboard and use a multimeter to measure how the photoresistor changes with light.
What are simple ways to extend or personalize the light-sensitive circuit?
Add a small toggle switch between the resistor and battery so you can turn the circuit on/off, wire two or three LEDs in parallel to increase brightness, or mount and decorate the components inside a shoebox to make a personalized nightlight to photograph for DIY.org.
Watch videos on how to build a circuit using a photoresistor
Arduino Light Sensor: Learn to Setup a Photoresistor (LDR)
4 Videos

Arduino Light Sensor: Learn to Setup a Photoresistor (LDR)
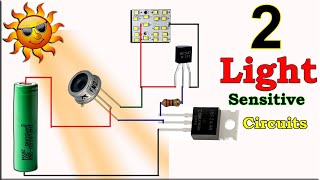
How To Make Light Sensor Circuit, DIY Light Sensor Using LDR & Photodiode, Simple DIY Projects
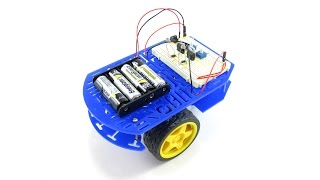
Light-Tracking Robot: BlueBot Project #2 | Science Project
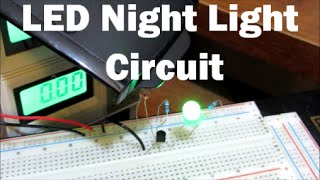
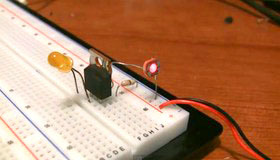
LED Night Light Circuit with a Photoresistor Part 1
Facts about electrical circuits for kids
🌗 Light-dependent resistors (LDRs) can change their resistance by hundreds to thousands of times between dark and bright conditions.
💡 LEDs need very little current — many tiny LEDs glow with just a few milliamps, making them perfect for kid-friendly circuits.
🔋 A single AA battery provides about 1.5 volts, enough to power an LED when paired with the right resistor or photoresistor setup.
⚡ Ohm's law (V = I × R) helps you predict how bright the LED will be by connecting voltage, current, and resistance.
👀 Your eyes adjust to light, so watching an LED dim and brighten with a photoresistor is a neat way to see how sensors respond to real-world light changes.
How do I make a simple light-sensitive circuit using a photoresistor?
What materials do I need to build a photoresistor light circuit?
What ages is this light-sensitive circuit activity suitable for?
What are the safety tips and learning benefits of making a photoresistor circuit?
