Bake a Chocolate Cake with DIY Star KittyKatMaddy
Bake a chocolate cake from scratch with adult help, then decorate it into a star-shaped KittyKatMaddy character using icing and sprinkles.


Step-by-step guide to bake a chocolate cake with DIY Star KittyKatMaddy
Step 1
Ask an adult to preheat the oven to 350°F 175°C so it will be ready when the batter is done.
Step 2
Line your baking pan with parchment paper and grease the paper so the cake won’t stick.
Step 3
Measure and mix the dry ingredients in a bowl by combining the flour sugar cocoa baking soda and salt.
Step 4
Crack the eggs into a separate bowl and add the milk vegetable oil and vanilla then whisk them together until even.
Step 5
Pour the wet ingredients into the dry ingredients and stir gently until the batter looks smooth.
Step 6
Ask an adult to carefully add the boiling water to the batter and stir once more until the batter is thin and even.
Step 7
Ask an adult to pour the batter into the prepared pan and to place it in the oven and set a timer for 25 to 35 minutes.
Step 8
Ask an adult to remove the warm cake from the oven using oven mitts and set the pan on a cooling rack to cool completely.
Step 9
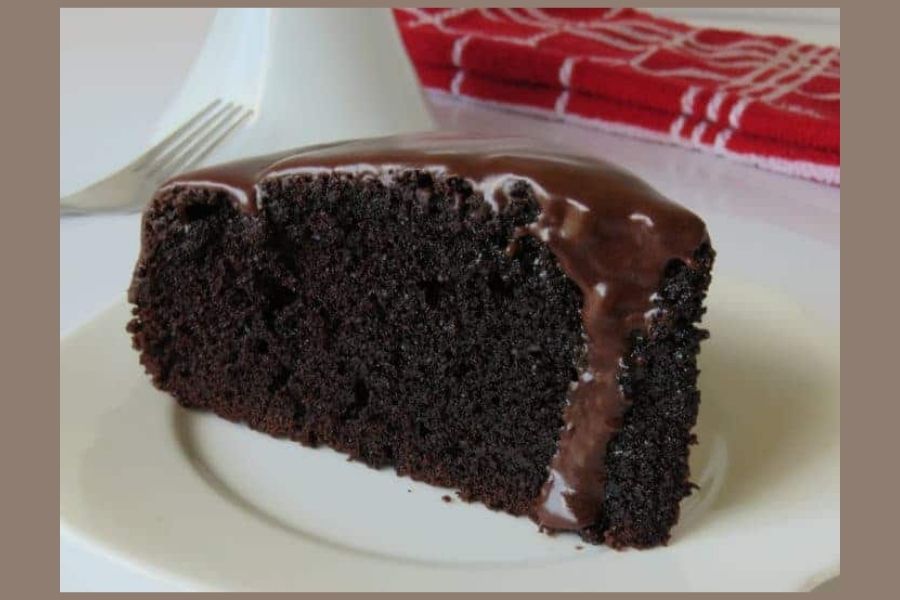
Use a star-shaped cookie cutter to press a star out of the cooled cake or ask an adult to cut a star using a paper template and their knife.
Step 10
Place the star cake on a clean plate and spread a thin layer of buttercream over the top and sides to make a crumb coat.
Step 11
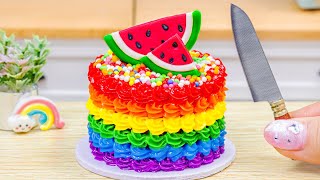
Split some icing into small bowls and add food coloring to make the colors you want for KittyKatMaddy features.
Step 12
Use a piping bag or a plastic bag with the corner snipped to pipe KittyKatMaddy’s face and details on the star cake.
Step 13
Sprinkle colorful sprinkles on the cake points and around the character to make it sparkle.
Step 14
Tidy your workspace by putting away bowls utensils and wiping the table so you’re all clean.
Step 15
Take a photo of your star-shaped KittyKatMaddy cake and share your finished creation on DIY.org
Help!?
What can we use if we don't have parchment paper, a star-shaped cookie cutter, or a piping bag?
If you don't have parchment paper, grease and flour the pan or use greased aluminum foil for step 2, press a paper template and have an adult cut the star in step 9, and use a small zip-top bag with a snipped corner as a piping bag substitute for step 12.
My batter looks lumpy or the star cake sticks when I try to cut it—what should I do?
If the batter is lumpy, gently stir until smooth before adding boiling water and have an adult add and stir the water once more (steps 5–6), and if the star sticks, make sure the cake cooled completely and the parchment was greased in step 2 or chill the cake before cutting (steps 2 and 8–9).
How can I adapt this activity for different age groups?
For toddlers let them measure dry ingredients and sprinkle decorations (steps 3 and 13), for school-age kids have them whisk wet ingredients and press the star cutter (steps 4 and 9), and for older kids let them stir in boiling water with supervision and pipe KittyKatMaddy's face (steps 6 and 12).
How can we make the KittyKatMaddy cake more special or creative?
Split icing into small bowls and add different food coloring to create multiple colors (step 11), use extra buttercream or fondant to add 3D features and pipe details with a snipped bag (steps 10–12), and finish by sprinkling on the cake points for extra sparkle (step 13).
Watch videos on how to bake a chocolate cake with DIY Star KittyKatMaddy
Baking Tiny Red and Blue Chocolate Cake With OREO & KITKAT 🍫 Sweet Mini Cakes
4 Videos
Baking Tiny Red and Blue Chocolate Cake With OREO & KITKAT 🍫 Sweet Mini Cakes
✨ DIY Creative Melting Chocolate Cake Tutorial Quick And Simple That Looks Unbelievable 🍫
Miniature Chocolate Cake Decorating with KITKAT | Yummy Miniature Cake Recipe
KITKAT Cake Art: Colorful Tiny Rainbow Decorating🌈Satisfying ASMR | Delicious Treat
Facts about baking and cake decorating for kids
🍫 Chocolate was first used as a drink by ancient Mesoamerican cultures and only started showing up in European baking after the 1500s.
🎂 Ancient Egyptians made honey-sweetened 'cakes' — recipes for cake-like breads go back thousands of years!
⭐ Star-shaped cutters help make perfect shapes quickly — professional bakers sometimes chill cakes to get cleaner star slices.
🐱 Domestic cats have been living alongside people for at least 9,000 years, making them one of humanity's oldest animal companions.
👩🍳 Beating eggs traps air and adds structure, which helps cakes rise and makes them light and fluffy.
How do I bake and decorate a star-shaped KittyKatMaddy chocolate cake with my child?
What materials and ingredients do I need to make a Chocolate Cake with DIY Star KittyKatMaddy?
What ages is the star-shaped KittyKatMaddy cake activity suitable for?
What safety tips should I follow when baking and decorating a KittyKatMaddy star cake with kids?
