Assemble a fossil hunting kit
Assemble a simple fossil hunting kit with brush, magnifying glass, field notebook, map, and safety gear, then search and identify fossils outdoors.

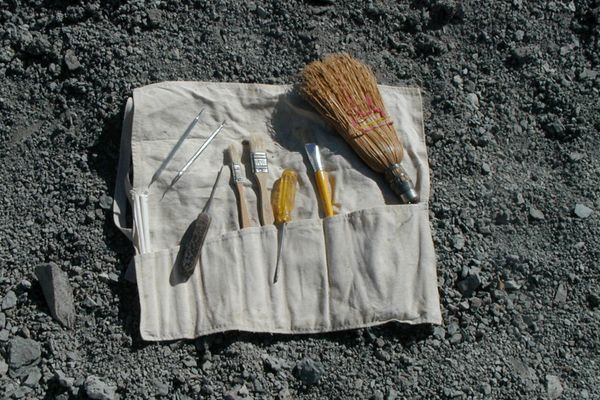

Step-by-step guide to assemble a fossil hunting kit
How To Make A Real Fossil Dig Kit Excavating Adventure
Step 1
Gather all the materials and lay them out on a table so you can see everything.
Step 2
Put on your safety gloves and safety goggles before you start.
Step 3
Look at your map and pick a safe place to search then ask an adult to approve the spot.
Step 4
Put the brush magnifying glass notebook pencil map trowel bags and small container into the container to make your kit.
Step 5
Carry your kit to the chosen search spot with your adult helper.
Step 6
Slowly scan the ground and rock surfaces with your eyes to spot unusual shapes or patterns.
Step 7
Use the soft brush to gently sweep dirt away from a spot that looks interesting.
Step 8
Hold the magnifying glass over any small object to look closely at its surface details.
Step 9
Use the trowel or wooden stick to carefully loosen a suspected fossil without digging too deep.
Step 10
Put your find into a small sealable bag or the small container to keep it safe.
Step 11
Write the date and the exact location of the find in your field notebook.
Step 12
Draw a quick sketch of the find in your notebook to record how it looks.
Step 13
Ask an adult to help you compare your notes and sketch with a fossil guidebook or library resources to try to identify it.
Step 14
Share your finished fossil hunting kit and your finds on DIY.org.
Help!?
What can I use if I don't have a trowel, brush, or magnifying glass?
If you don't have a trowel, soft brush, or magnifying glass, use the wooden stick listed in the instructions instead of the trowel, a clean paintbrush or soft toothbrush for the soft brush, and your smartphone camera's zoom or a jeweler's loupe in place of the magnifying glass.
What should I do if I can't find fossils or I worry I'll damage a find while digging?
If you can't spot fossils or risk damaging one, follow the instructions to slowly scan the ground with your eyes, gently sweep dirt away with the soft brush, use the wooden stick or trowel to carefully loosen material without digging too deep, then put the find into the small container or a sealable bag and ask your adult helper for assistance.
How can I adapt this fossil hunting activity for younger or older kids?
For younger children, have an adult choose and approve the safe search spot and handle the trowel while the child uses the magnifying glass, makes simple sketches in the notebook, and places finds in the small container, whereas older kids can record exact locations on the map, take detailed notes and sketches in the notebook, compare finds with a fossil guidebook, and photograph specimens to upload to DIY.org.
How can we extend or personalize the fossil hunting kit and finds?
To extend the activity, label each small sealable bag with the date and exact location before sealing, add index pages in the field notebook for identification notes, photograph each find with your phone or magnifying glass for a record, and create a display box or DIY.org post to share your collection.
Watch videos on how to assemble a fossil hunting kit
How To Make A DIY Dollar Store Fossil Hunting Kit (SHARK TOOTH Hunting!!)
4 Videos
How To Make A DIY Dollar Store Fossil Hunting Kit (SHARK TOOTH Hunting!!)
How To Make A Real Fossil Dig Kit
How To Make A DIY Dinosaur Fossil Dig Kit At Home Using Corn Starch | Dinosaurs For Kids | Easy DIY

How to Make a Cast Fossil with Kids
Facts about paleontology for kids
🦴 Some fossils are over 3.5 billion years old — stromatolites preserve Earth's oldest known life.
🔎 Paleontologists often use simple tools like toothbrushes, paintbrushes, and dental picks to gently uncover fossils.
🪨 Fossils are most commonly found in sedimentary rocks such as sandstone, shale, and limestone.
🗺️ Famous fossil sites (like England's Jurassic Coast) are often protected — always check local rules before collecting.
👩🔬 Mary Anning discovered major Jurassic fossils (like ichthyosaurs) as a girl and helped shape paleontology.
How do I assemble and use a simple fossil hunting kit and search for fossils outdoors?
What materials do I need for a child-friendly fossil hunting kit?
What ages is fossil hunting with this kit suitable for?
What safety and ethical rules should we follow while fossil hunting?
