Add Colors to Your One Line Drawings
Add color to one-line drawings using markers, colored pencils, or watercolors; experiment with blending, shading, and pattern fills to create lively artwork.


Step-by-step guide to add color to one-line drawings
Step 1
Gather your materials and place them on a flat table where you can reach them easily.
Step 2
Put your one-line drawing in front of you so you can see the whole picture.
Step 3
Choose which coloring tool you will start with markers colored pencils or watercolors.
Step 4
Pick two to four main colors and decide which parts of the drawing each color will fill.
Step 5
Test one color on your scrap paper to see how it looks and how it mixes.
Step 6
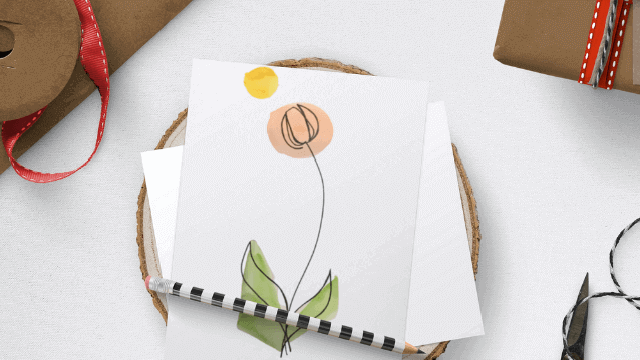
Apply a light base color to the largest area of your drawing using your chosen tool.
Step 7
Add a darker shade along one edge of that same area to create depth.
Step 8
Blend the base and darker shade where they meet using short strokes or a slightly damp brush.
Step 9
Apply a light base color to another area of the drawing.
Step 10
Add a darker shade to that second area to make it pop.
Step 11
Blend the colors in the second area where they meet using short strokes or a damp brush.
Step 12
Add fun pattern fills like dots stripes or tiny shapes inside some areas to make the picture lively.
Step 13
Let your artwork dry completely before touching it further.
Step 14
Share your finished colorful one-line drawing on DIY.org
Help!?
I don’t have watercolors—what can I use instead for the blending steps?
Use diluted washable markers tested first on your scrap paper and blend with short strokes or a slightly damp brush just like the watercolors step.
My colors look muddy when I try to blend—what can I do to fix them?
Let the light base color dry completely, then add the darker shade along the edge and blend slowly with short strokes or a slightly damp brush as the instructions recommend.
How can I adapt this activity for younger or older kids?
For younger kids use markers, only two main colors, and larger areas to fill, while older kids can use watercolors, practice adding a darker shade and blending with a damp brush, and add detailed pattern fills.
How can we make the finished one-line drawing more special or advanced?
After the artwork is completely dry, add metallic accents or white gel-pen highlights over the blended areas and extra dots, stripes, or tiny shapes as pattern fills before sharing on DIY.org.
Watch videos on how to add color to one-line drawings
ONE - LINE DRAWINGS FOR KIDS | Easy Step-by-Step Drawing Tutorial for Kids
4 Videos

ONE - LINE DRAWINGS FOR KIDS | Easy Step-by-Step Drawing Tutorial for Kids

Simple LINE Art activity for Grade 1 and Grade 2 (Primary 1 and Primary 2)
ONE LINE ART TUTORIAL | Beginners guide | How to draw and paint a one line portrait | iPad procreate
12 One Line Drawing Ideas/Easy Single Line Drawing for Beginners/kids/One line drawing tutorial
Facts about drawing and coloring techniques for kids
🌀 One-line (continuous) drawings are made without lifting your pen—great for training focus and seeing shapes!
🎨 Watercolor paint can be reactivated with water after it dries, so you can soften edges or lift color.
✏️ Colored pencils come in wax- and oil-based types; layering and burnishing can make colors shine.
🖊️ Felt-tip (marker) pens can be water-based or alcohol-based—alcohol markers blend into smooth gradients.
🧩 Filling spaces with patterns like hatching, dots, or waves instantly adds texture and personality to simple line art.
How do you add color to one-line drawings?
What materials do I need to add color to one-line drawings?
What ages is this activity suitable for?
What are the benefits of coloring one-line drawings?
