How to draw a lion - a free lion drawing guide
Learn to draw a lion step-by-step, creating a realistic lion portrait with simple shapes, shading, and color techniques suitable for young artists. Download the PDF for complete instructions.


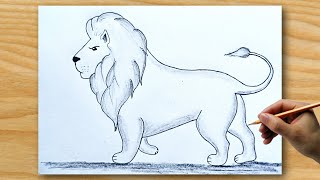
Step-by-step guide to draw a lion
How to Draw a Cute Lion Step by Step for Kids
Step 1
Place your paper flat on the table and hold your pencil ready.
Step 2
Lightly draw a circle near the top center of the paper for the lion's head.
Step 3
Lightly draw a larger oval that overlaps the bottom of the head circle for the lion's body.
Step 4
Lightly draw a vertical line and a horizontal line across the head circle to help place the face.
Step 5
Draw two rounded triangle ears on the top edges of the head circle.
Step 6
Draw a rounded muzzle shape at the bottom center of the head circle.
Step 7
Draw a small triangle nose at the top of the muzzle.
Step 8
Draw two almond-shaped eyes on the horizontal guideline and add small pupils inside each eye.
Step 9
Draw a simple curved line under the nose for the mouth.
Step 10
Add three small whisker dots on each side of the muzzle.
Step 11
Sketch the mane by drawing lots of short curved strokes all around the head circle to make fluffy texture.
Step 12
Draw four legs under the body using long ovals and add a curved tail with a little tuft at the end.
Step 13
Erase the light guidelines and any extra sketch lines so the lion looks clean.
Step 14
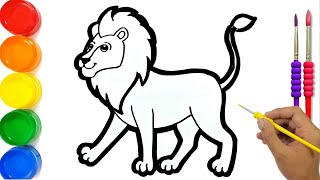
Add light shading with gentle hatching under the mane and belly and colour your lion with your favourite colours.
Step 15
Share your finished creation on DIY.org.
Help!?
What can I use if I don't have a pencil, eraser, or crayons from the materials listed?
If you don't have a pencil, use a lightly held mechanical or soft colored pencil for the guidelines, substitute an eraser with a clean white art rubber or gentle kneaded eraser, and replace crayons with watercolor pencils, markers, or torn colored paper for the coloring step.
My head circle and body oval look wrong or my face is crooked — how can I fix that while following the steps?
Gently erase the overlapping area and re-lightly redraw the head circle and larger body oval, then reapply the vertical and horizontal guide lines across the head to correctly place the almond eyes, triangle nose, and rounded muzzle.
How can I adapt this lion-drawing activity for younger children or older kids?
For younger children simplify by using one big circle for head and body, sticker eyes, and skipping light shading, while older kids can add detailed mane texture with many short curved strokes, careful hatching under the mane and belly, and experiment with proportion and color before sharing on DIY.org.
What are some fun ways to extend or personalize the lion once it's drawn?
Extend or personalize it by adding a savannah background, giving the lion a patterned mane or clothing, making several lions to create a family scene, or cutting the finished picture into a puppet for storytelling before uploading to DIY.org.
Watch videos on how to draw a lion
How to Draw a Lion for Kids and Toddlers Step by Step
4 Videos

How to Draw a Lion for Kids and Toddlers Step by Step

How to draw lion easy step by step, kids drawing, easy drawing, drawing tutorial
Easy Lion Drawing 🦁 How To Draw a Lion | Lion Drawing for Beginners.
How to Draw a Lion for Beginners Step by Step
Photos of lion drawing examples


Facts about drawing and sketching for kids
🦁 Lions are the only big cats that live in social groups called prides — great reference for drawing group portraits or practice poses.
✍️ Starting a lion portrait with simple shapes (circles for the head, ovals for the muzzle) helps keep proportions accurate and makes drawing less scary.
🎨 Using just three values — light, mid, and dark — lets young artists create convincing shading without complicated techniques.
👁️ Adding a tiny white highlight in each eye can instantly make a lion look alive and expressive in a portrait.
🐾 A lion’s mane ranges from blond to nearly black — studying mane color and texture gives your portrait contrast and personality.
How do I teach a child to draw a realistic lion step-by-step?
What materials do I need to draw a realistic lion with my child?
What ages is this lion drawing activity suitable for?
What are the benefits and fun variations of learning to draw a lion?
