The Robot Costume Challenge!
Design and build a wearable robot costume using cardboard, foil, paint, and safe LED circuits; learn measuring, decorating, and problem solving skills.

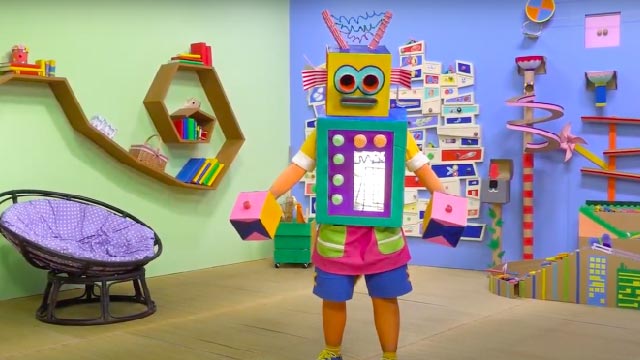

Step-by-step guide to build a wearable robot costume
Step 1
Measure the child from shoulders to waist and mark the top and bottom lines on the cardboard with a pencil and ruler.
Step 2
Cut off the top flaps of the box so the top is open and you can make a head hole.
Step 3
Cut a round or square head hole in the center of the top where you marked it.
Step 4
Mark shoulder points on each side and cut armholes at those marks.
Step 5
Tape all cut edges and seams on the inside and outside to make the costume strong and smooth.
Step 6
Paint the outside of the box with a base colour you like.
Step 7
Let the paint dry completely before you touch the costume again.
Step 8
Smooth pieces of aluminum foil onto areas you want shiny and glue or tape them down to make metal panels.
Step 9
Decide where your lights should go and mark small dots for each LED with your pencil.
Step 10
Connect the batteries to the pre-wired LED lights and turn the lights on to test they work.
Step 11
Attach each LED to its marked spot using tape or glue so the light faces outward.
Step 12
Fasten the LED wires to the inside of the costume using electrical tape so they do not pull loose.
Step 13
Tape the battery pack to the inside of the costume where the switch is easy to reach.
Step 14
Put the costume on and move your arms to check the fit and that the lights light up safely.
Step 15
Share your finished robot costume on DIY.org
Help!?
What can we use if pre-wired LED lights or batteries are hard to find?
Use battery-powered fairy lights or glow sticks taped where you mark LED dots and tape or secure their battery bundle where the instructions say to tape the battery pack so the switch is easy to reach.
My LEDs won't light — what should I check?
Check that the batteries are connected correctly to the pre-wired LED lights, that the battery pack switch is on, and that the LED wires are fastened to the inside with electrical tape so they don't pull loose.
How can I adapt this activity for different ages?
For younger kids have an adult measure and cut the head and armholes and use washable paint and tape-on foil panels, while older children can mark the LED dots, connect the pre-wired LED lights themselves, and add detailed painted designs and aluminum foil panels.
How can we make the costume more impressive or personalized?
Add cardboard antennae taped to the head hole, create accordion-folded jointed arms with duct tape at the armholes, glue extra aluminum foil panels for more shine, and tuck a phone or small speaker near the taped battery pack to play robot sounds before sharing on DIY.org.
Watch videos on how to build a wearable robot costume
How to Make a Robot Costume | Kids Halloween Costumes | DIY Kids Robot Costume | Time 4 Kids TV
4 Videos

How to Make a Robot Costume | Kids Halloween Costumes | DIY Kids Robot Costume | Time 4 Kids TV

How Can I Make An Easy Robot Costume? - Raising A Toddler

DIY Robot Costume for Kids | Cardboard Robot Ramp Walk Outfit | Fancy Dress Idea

How Can I Make A Robot Costume On A Budget? - Raising A Toddler
Facts about costume making and simple electronics for kids
🤖 The word "robot" comes from the Czech word robota meaning "forced labor," introduced in the 1920 play R.U.R.
📦 Corrugated cardboard is super strong for its weight — its fluted layer gives it a high strength-to-weight ratio, perfect for wearable costume panels.
💡 LEDs use very little electricity and can last tens of thousands of hours, so battery-powered costume lights can glow for many shows.
✨ Aluminium foil reflects roughly 90% of visible light, which is why it makes such shiny, space-age robot surfaces.
🛠️ Wearable tech has roots in early experimental gadgets from the mid-20th century and today powers everything from smartwatches to light-up costumes.
How do I build a wearable robot costume for the Robot Costume Challenge?
What materials do I need to make a robot costume?
What ages is the Robot Costume Challenge suitable for?
What safety tips should I follow when making a wearable robot costume?
