Show us your stitching materials!
Gather and display your stitching materials, then sew a simple fabric bookmark practicing running and backstitches, labeling tools and uses with adult help.


Step-by-step guide to Show us your stitching materials!
Step 1
Gather all the materials on a clean table and make a neat display space for them.
Step 2
With an adult, write a label on each small paper label naming one tool and one short use for it.
Step 3
Tape each label next to the matching tool on your display.
Step 4
Use the ruler and pencil to measure and mark a rectangle about 6 inches by 2 inches (15 cm by 5 cm) on the felt for your bookmark.
Step 5
Cut out the marked rectangle to make the bookmark shape.
Step 6
Use the pencil to draw a row of dots about 5 mm from one long edge to guide a running stitch.
Step 7
Use the pencil to draw a solid line about 5 mm from the other long edge to guide a backstitch.
Step 8
With an adult's help, thread the needle with a length of embroidery floss about the length of your arm.
Step 9
Tie a small knot at the end of the thread to anchor your stitches.
Step 10
Starting at one end of the dotted line sew a running stitch by pushing the needle up through the felt then down a short even distance and repeating until you reach the end.
Step 11
Tie off and trim the thread after finishing the running stitch.
Step 12
Starting at one end of the solid line sew a backstitch by bringing the needle up at the start point then taking a short stitch forward inserting the needle down then bringing it up ahead and inserting it back into the end of the previous stitch; repeat to the end.
Step 13
Tie off and trim the thread and place your finished bookmark on your display next to its labeled tools.
Step 14
Share your finished creation on DIY.org
Help!?
If I don't have felt, embroidery floss, or an embroidery needle, what can I use instead?
Use sturdy cardboard or cotton fabric in place of felt, swap embroidery floss for stranded cotton thread or thin yarn, and use a blunt plastic/tapestry needle or a large-eye darning needle so you can still thread it for the bookmark steps.
What should I do if my stitches look uneven or the thread keeps slipping when I sew the running stitch or backstitch?
Re-mark the dotted and solid guide lines about 5 mm from the edges on the felt to keep stitch spacing even, make consistent short stitches following the drawn guides, and secure the ends by tying a small knot and adding a tiny dab of fabric glue before trimming.
How can I adapt this activity for different ages or skill levels?
For younger children pre-punch the 5 mm-spaced holes in the felt and use a blunt plastic needle with yarn and close adult supervision, while older kids can use real embroidery floss, thinner needles, and follow the dotted and solid guide lines for cleaner running and backstitches.
How can we enhance or personalize the bookmark and the materials display after finishing the basic steps?
Embellish the 6 x 2 inch bookmark by stitching on beads or a small felt appliqué, add a ribbon loop or tassel before tying off, or make a double-sided bookmark by sewing two rectangles together and then place it next to its labeled tools on the display to share on DIY.org.
Watch videos on how to Show us your stitching materials!
Learn to Sew with Debbie Shore, Kids! Lesson 2, blanket stitch
4 Videos

Learn to Sew with Debbie Shore, Kids! Lesson 2, blanket stitch
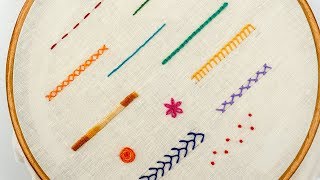
20 Basic Hand Embroidery Stitches Sampler for Absolute Beginners
TOP 12 STITCHES IN HAND EMBROIDERY | Tutorial for Beginners

How to Sew an Easy Fabric Purse + Tips on Teaching Kids to Sew
Facts about hand-sewing for kids
🪡 The oldest known sewing needle is about 40,000 years old — people have been stitching since prehistoric times!
✂️ A basic sewing kit usually includes needles, thread, scissors, pins, a thimble, and a measuring tape — perfect for making a bookmark!
🧵 Embroidery floss is made of 6 thin strands you can separate to make stitches thinner or thicker.
📏 Backstitch is much stronger than a running stitch and can make seams nearly as durable as machine stitching.
📚 Bookmarks were used in ancient Egypt and Rome — your fabric bookmark continues a long reading tradition!
How do I teach my child to make a simple stitched fabric bookmark?
What materials do I need for a 'Show us your stitching materials' activity?
What ages is sewing a fabric bookmark suitable for?
What safety tips and benefits should I know before sewing with kids?
