Recreate Paper Cut Square in Layers
Cut and layer colored paper squares to recreate a stacked paper-cut square artwork with child-safe scissors, practicing measuring, cutting, and arranging layers to create depth.


Step-by-step guide to Recreate Paper Cut Square in Layers
Step 1
Gather all the materials from the list and set them on your workspace.
Step 2
Choose 4 to 6 colored paper sheets you like for your layered square artwork.
Step 3
Decide how many layers you will make (choose a number between 4 and 6).
Step 4
Use the ruler and pencil to draw the largest square on one sheet (about 15 cm or 6 inches is a good size).
Step 5
On each remaining sheet draw a square that is about 1 cm smaller on each side than the previous one.
Step 6
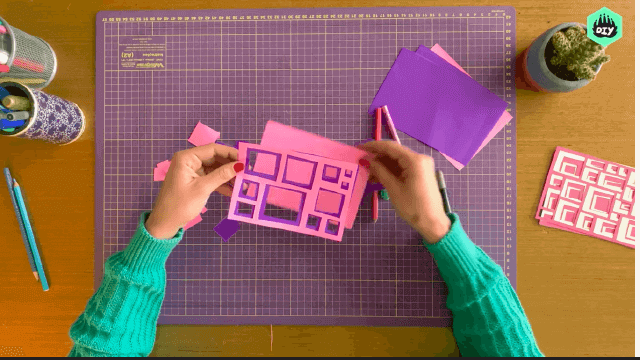
Cut out the outer squares from each sheet using your child-safe scissors.
Step 7
Fold each cut square in half one way and then the other way to find and mark the center point.
Step 8
On every square except the largest, draw a centered smaller square leaving about a 1 cm border to make a frame.
Step 9
Carefully cut out the centered squares to turn those sheets into frames.
Step 10
Lay the pieces out from largest on the bottom to smallest on top to choose the color order you like.
Step 11
Put a thin line of glue around the top edge of the lower layer where the next piece will sit.
Step 12
Place the next frame centered on top of the glued layer and press it gently to stick.
Step 13
Repeat the glue-and-place steps until all layers are stacked and secured.
Step 14
Share your finished stacked paper-cut square artwork on DIY.org.
Help!?
What can we use if we don't have colored paper sheets or a ruler?
Substitute construction paper, thin cardboard, or colorful magazine pages for the colored paper sheets and use a straight-edged book or a tape measure in place of the ruler when following steps 2–5.
What should we do if the inner frames tear when cutting out the centered squares?
To prevent tearing in step 7, reinforce the sheet with scrap cardboard behind it or fold along the center marks from step 6 and make small snips to open the inner square, then finish cutting toward the corners.
How can we adapt this activity for different age groups?
For preschoolers, simplify steps 4–8 by pre-cutting the squares and limiting to 3–4 layers for them to stack and glue (steps 9–12), while older kids can precisely measure the 1 cm reductions in step 5 and add detailed cut designs to the frames in step 7.
How can we make the finished layered square more special or advanced?
Enhance the final piece by painting the edges of each layer before gluing (steps 11–12), adding a center brad or ribbon through the center point found in step 6 for hanging, or embedding a small LED behind layers for backlit effect before sharing on DIY.org (step 13).
Watch videos on how to Recreate Paper Cut Square in Layers
How To Make Paper House - Easy paper toys
4 Videos
How To Make Paper House - Easy paper toys
Let's Make Paper Building Blocks | Crafts for Kids | STEM Project
How to make paper toys - 6 Easy paper crafts

Paper CUBE | Easy Paper crafts
Facts about paper crafts for kids
✂️ Papercutting is an ancient art — Chinese paper cutting (jianzhi) dates back over 1,500 years and was used to decorate homes and celebrate festivals.
🏮 Kirigami literally means 'cut paper' in Japanese (kiru = to cut, kami = paper) and uses both cutting and folding for pop-up effects.
🎨 Collage techniques using cut paper were popularized by artists like Pablo Picasso and Georges Braque in the early 1900s.
📐 Measuring and stacking simple shapes like squares helps kids learn basic geometry — size, symmetry, and alignment — while making art.
🧾 Construction paper is thicker and sturdier than regular printer paper, which makes it easier and safer for kids to cut and layer into colorful stacks.
How do you recreate a paper-cut square in layers with a child?
What materials do I need to make a layered paper-cut square?
What ages is the layered paper-cut square activity suitable for?
What are the benefits and safety tips for doing layered paper cutting with kids?


