Paint digital skin tones by @KawaiiSilverWolf
Learn to paint digital skin tones on a tablet or computer using simple brushes, color mixing, shading, and highlights to practice realistic skin colors.


Step-by-step guide to paint digital skin tones by @KawaiiSilverWolf
Step 1
Open your drawing app and make a new square canvas about 2000 by 2000 pixels.
Step 2
Add a new layer and draw a simple head shape or paste your reference photo so you have a face to paint.
Step 3
Use the color picker to choose a base skin color that looks like your reference.
Step 4
Fill the head shape with the base color using the fill tool or a solid brush.
Step 5
Select a soft round brush at medium opacity to paint softer tones.
Step 6
Pick a slightly darker color and paint shadows where the light won’t hit like under the chin and the sides of the nose.
Step 7
Pick a slightly lighter color and paint highlights on places the light hits like the forehead nose bridge and cheek tops.
Step 8
Use a low-opacity brush or smudge tool to gently blend the shadow and highlight edges so the skin looks smooth.
Step 9
Add small color details like a soft blush on the cheeks and a touch of lip color with a smaller brush.
Step 10
Use a small hard brush to add sharp tiny highlights on the tip of the nose and the lower lip for a natural sparkle.
Step 11
Create an adjustment layer and nudge the overall color or brightness until the skin feels balanced with the reference.
Step 12
Save your final picture and share your finished skin-tone painting on DIY.org
Help!?
What can we use if we don't have the same drawing app, a fill tool, or an adjustment layer?
Use any free app that supports layers and a solid brush or selection fill (for example Krita or Medibang), and if your app lacks an adjustment layer, duplicate the painted skin layer and change its opacity or use a color/brightness tool to nudge the overall skin color.
My shadows and highlights look patchy or the fill spilled outside the head—how do I fix that?
Lock transparency or make a selection around the head before using the fill tool to prevent spilling, and smooth patchy shadows and highlights by lowering the soft round brush opacity or using the smudge tool to gently blend the edges as described.
How can I change this activity for younger kids or older kids?
For younger kids, simplify by tracing a head, using the fill tool for a base color plus one darker shadow and one lighter highlight, while older kids can add multiple mid-tones, use the small hard brush for tiny highlights, and tweak an adjustment layer for color balance.
How can I personalize or make the skin-tone painting more advanced?
Add personal touches like a soft blush on the cheeks, freckles and a touch of lip color with a smaller brush, use the small hard brush for sharp highlights on the nose and lower lip, experiment with different light directions, then fine-tune with an adjustment layer and save to share on DIY.org.
Watch videos on how to paint digital skin tones by @KawaiiSilverWolf
Painting Skin Tones
4 Videos

Painting Skin Tones
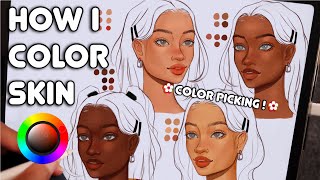
How I Digitally Paint Skin Tones | ✿ How to Color Skin tones (ipad Procreate)
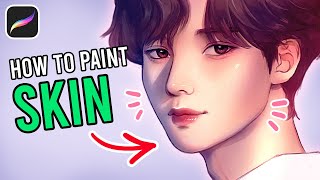
How to Paint Skin in Digital Art | Semi Realistic Tutorial
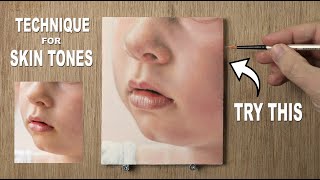
How to Mix SKIN TONES | Oil Painting Tutorial | PORTRAIT Study for Beginners onwards.
Facts about digital painting for kids
🎨 Many drawing tablets and styluses support pressure sensitivity (some up to 8192 levels) so brush strokes can feel smooth and natural!
🧬 Melanin is the pigment that mostly determines human skin color—different amounts and types make a huge rainbow of tones.
🌡️ Warm skin tones usually have hints of red, orange, or yellow, while cooler shadows can lean blue or green—mixing them gives life to portraits.
💻 Computer screens use the RGB color model (red, green, blue), so colors on-screen can look different than printed art.
✨ Artists often add a tiny bit of the complementary color or mid-gray to skin tones to reduce oversaturation and make them look real.
How do I paint digital skin tones on a tablet or computer?
What materials do I need to paint digital skin tones?
What ages is painting digital skin tones suitable for?
What are the benefits of learning to paint digital skin tones?
