Paint a moonscape on Procreate by @ParkerBradbury
Use Procreate on an iPad to paint a moonscape with layers, craters, shading, and star details while following @ParkerBradbury’s simple digital art steps.


Step-by-step guide to paint a moonscape on Procreate
Step 1
Open Procreate and create a new square canvas at a comfortable size for painting.
Step 2
Open @ParkerBradbury’s tutorial or your reference moon image so you can follow his simple digital art steps while you work.
Step 3
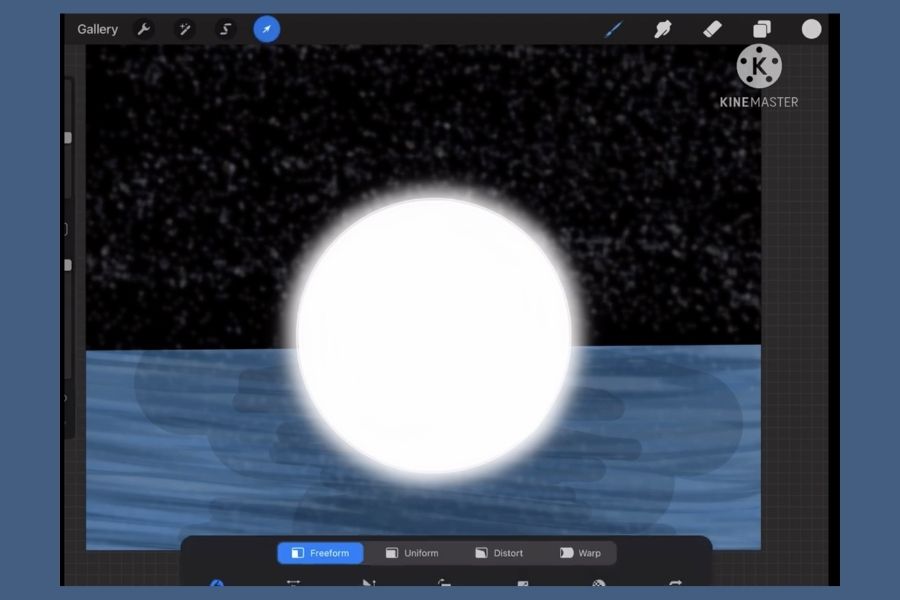
Create a new layer named Background and fill it with a deep space color like navy or black.
Step 4
Create a new layer named Moon Base and draw a large circle where you want the moon to sit.
Step 5
Fill the Moon Base circle with a mid-gray color using the color drop or a solid brush.
Step 6
Create a new layer above the Moon Base and set it as a clipping mask to keep your details inside the moon.
Step 7
On the clipping layer paint several crater shapes and darker patches using a textured brush and a darker gray.
Step 8
Create a shading layer and use a soft airbrush on low opacity to add shadow to the moon edge and inside the craters.
Step 9
Create a highlights layer and use a small bright brush to add light spots and a rim highlight along the lit edge.
Step 10
Create a star layer behind the moon and use a scatter or speckle brush to paint stars of different sizes and brightness.
Step 11
Tweak layer opacities and blend modes until the moon and background look balanced and detailed.
Step 12
Export your finished moonscape as a PNG or JPEG and save it to your Photos.
Step 13
Share your finished moonscape on DIY.org so everyone can see your space art.
Help!?
What can we use if we don't have Procreate or an Apple Pencil?
If you don't have Procreate or an Apple Pencil, follow the same steps in free apps like Autodesk SketchBook, ibisPaint, or Adobe Fresco and use your finger or any capacitive stylus to create a square canvas, draw the Moon Base circle, and use equivalent textured and airbrush tools.
My clipping mask or color drop isn't working—how do I fix it?
If the clipping mask or color drop fails, make sure the Moon Base layer actually contains a filled circle, place the clipping layer directly above the Moon Base, enable Clipping Mask from the layer menu (not Alpha Lock), and drag the color slowly into the shape so the fill registers.
How can I adapt this moonscape activity for different ages?
For younger kids simplify by using a larger square canvas and a big soft brush to create a single gray Moon Base with a few large craters on one clipping layer, while older kids can add textured brushes for craters, low-opacity airbrush shading, rim highlights, multiple blend modes, and a separate scatter star layer as described.
How can we enhance or personalize the finished moonscape?
Personalize and enhance your piece by adding colored nebula layers behind the Background with soft brushes and blend modes, painting an Earth, rover, or flags on new layers, tweaking opacities for mood, then Export your finished moonscape as a PNG and Share it on DIY.org.
Watch videos on how to paint a moonscape on Procreate
Procreate Beginners Series: Part One | The Fundamentals
4 Videos

Procreate Beginners Series: Part One | The Fundamentals

How to Start Painting in PROCREATE for BEGINNERS
Digital Oil Painting in Procreate: Beginner Tutorial
How to Draw in Procreate | Beginners Guide
Facts about digital painting for kids
🎨 Procreate was made by Savage Interactive and brought powerful digital painting tools to the iPad community.
🖌️ Procreate uses layers so you can paint craters, shading, and stars separately — and undo quickly with a two-finger tap.
🌕 The Moon's dark patches are called "maria" (Latin for "seas") and are ancient volcanic plains, not actual oceans.
🪨 Because the Moon lacks weather and a thick atmosphere, impact craters can stay visible for millions to billions of years.
✨ Artists usually add tiny star dots last to make a moonscape pop and give the scene a deep-space sparkle.
How do I paint a moonscape on Procreate like @ParkerBradbury?
What materials do I need to paint a moonscape on Procreate?
What ages is painting a Procreate moonscape suitable for?
What are the benefits of making a moonscape on Procreate for kids?
