Make squishy smores with @LeanBean13
Make squishy s'mores toys using foam, felt, glue, and paint with @LeanBean13, together practicing cutting, assembling layers, and decorating safely.


Step-by-step guide to make squishy smores with @LeanBean13
Step 1
Gather all materials and lay them out on a clean flat workspace.
Step 2
Choose a palm-sized size and use your pencil and ruler to draw a circle on a brown craft foam sheet for the graham cracker base.
Step 3
Cut out the brown foam circle carefully with child-safe scissors.
Step 4
Draw a slightly smaller circle on white craft foam for the marshmallow layer.
Step 5
Cut out the white foam marshmallow shape using scissors.
Step 6
Cut a small square or circle from brown felt to be the chocolate layer.
Step 7
Put small dots of white glue in the center of the brown foam graham cracker base.
Step 8
Press the white marshmallow foam onto the glued center of the base and hold it in place for a few seconds.
Step 9
Put a little glue on top of the marshmallow foam.
Step 10
Press the felt chocolate piece onto the glued top of the marshmallow and hold until it sticks.
Step 11
Let the glued layers dry for at least 15 minutes on a flat surface.
Step 12
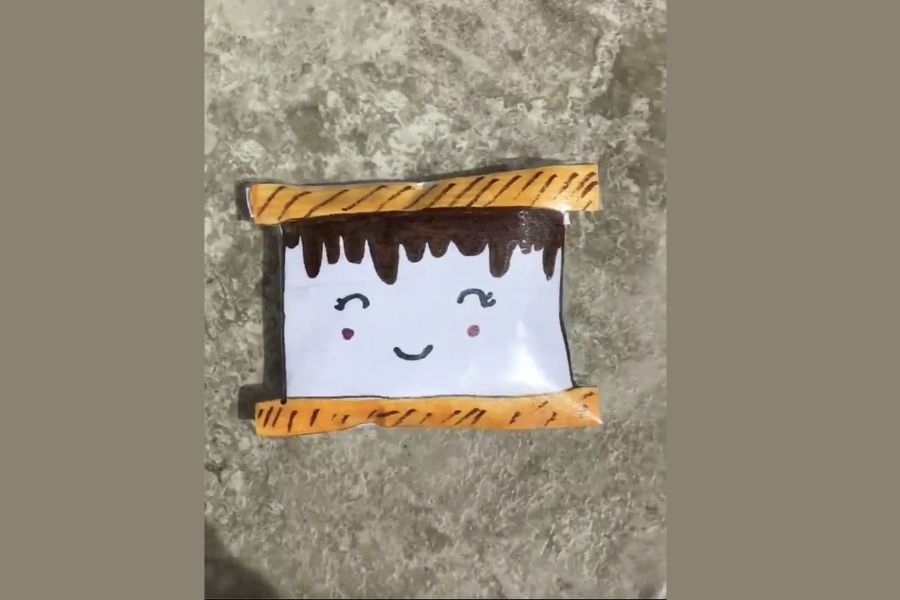
Paint toasted brown marks onto the marshmallow with your paintbrush and use a marker to add small dotted holes on the graham cracker base.
Step 13
Share your finished squishy s'more creation on DIY.org.
Help!?
What can we use if we don't have brown craft foam or brown felt?
If you don't have brown craft foam or brown felt, substitute brown construction paper for the graham cracker base (cut as in step 3) and a square of brown cardstock or aluminum foil for the chocolate layer, gluing them in place per steps 6–8.
The layers keep sliding apart—how do we fix the glue not holding?
If the foam layers won't stick or the marshmallow slides (steps 6–8), roughen the contact areas slightly with sandpaper, apply a thin layer of stronger craft glue or a glue dot, then press and weigh down with a book while drying for a firmer bond.
How can I adapt this activity for different age groups?
For toddlers, pre-cut the brown base, white marshmallow, and chocolate felt so they only do the gluing and decorating (steps 3–8 and 12), while older kids can measure with the ruler, cut their own shapes (step 2–4), and paint realistic toasted marks (step 11).
What are some ways to extend or personalize the squishy s'mores project?
To extend and personalize the craft, vary the palm-sized circle in step 2 to make mini or giant s'mores, insert a thin sponge or extra foam between layers for extra squish, use puff paint for raised toasted marks in step 11, and decorate each graham cracker with names before sharing on DIY.org.
Watch videos on how to make squishy smores with @LeanBean13
5 DIY Squishies - Learn how to make a squishy from every day materials
4 Videos
5 DIY Squishies - Learn how to make a squishy from every day materials
How to make quick and easy slime at home! | Science experiments for kids | #doitwithdiy
DIY with Kids | Teach Kids to Make Cube-Shaped Bubbles | Amazing, Easy, Fun Activity at Home

How to Draw a Pumpkin Spice Latte | Squishmallows
Facts about foam and felt crafts for kids
🍫 The first published s'more recipe appeared in a 1927 Girl Scouts cookbook called "Tramping and Trailing with the Girl Scouts."
🧵 Felt is one of the oldest known textiles — humans have been making felt for thousands of years.
🧽 Craft foam (often EVA foam) is lightweight, easy to cut with scissors, and doesn't fray, so it's perfect for kids' projects.
🖌️ Use non-toxic, child-safe paints and glues for crafts — look for labels like AP non-toxic or ASTM D-4236.
🧸 Slow-rising "squishy" toys are usually made from polyurethane foam and exploded in popularity as collectible stress-relief toys in the 2010s.
How do I make squishy s'mores with @LeanBean13?
What materials do I need to make squishy s'mores with @LeanBean13?
What ages is making squishy s'mores with @LeanBean13 suitable for?
What safety tips should I follow when making squishy s'mores with @LeanBean13?
