Make a Pizza Plushie
Make a soft pizza plushie from felt and stuffing, cut shapes, arrange toppings, and learn measuring and simple hand-sewing with adult help.


Step-by-step guide to Make a Pizza Plushie
Step 1
Lay out all Materials Needed on a clean workspace so everything is easy to reach.
Step 2
Use the paper and pencil with the ruler to draw a circle about 18 centimeters across for your pizza base.
Step 3
Pin the paper circle pattern to the beige felt so it will not move while you cut.
Step 4
Cut around the pinned paper pattern to make the first beige pizza circle.
Step 5
Pin the pattern again and cut a second identical beige pizza circle.
Step 6
Trace a slightly smaller circle on the yellow felt to be the cheese layer.
Step 7
Cut out the traced yellow cheese circle carefully.
Step 8
Cut small topping shapes like pepperoni circles green pepper strips and mushroom pieces from the red green and brown felt.
Step 9
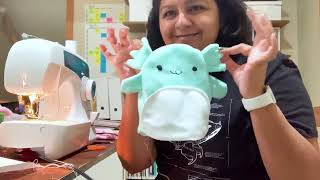
Arrange the cheese circle and the felt toppings on one beige pizza circle until you like the look.
Step 10
Have an adult help you sew the toppings and cheese onto the pizza top using small stitches so they stay in place.
Step 11
Place the two beige circles together and pin them around the edge so the top and bottom match.
Step 12
Have an adult help you sew around the edge leaving a 3 centimeter gap for stuffing.
Step 13
Push small amounts of polyfill into the gap until your pizza plushie is soft and puffy but not overstuffed.
Step 14
Have an adult help you sew the gap closed with neat small stitches to finish your plushie.
Step 15
Share a photo of your finished pizza plushie on DIY.org
Help!?
What can we use if we don't have beige felt, polyfill, or sewing pins?
If beige felt isn't available use light-brown cotton from an old T-shirt for the two pizza circles, substitute clean pillow stuffing or cotton batting for the polyfill, and use safety pins or paperclips to hold the paper pattern in place while cutting.
My edges don't match when pinning the two beige circles—how do I fix it before sewing?
Re-pin both beige circles starting at four evenly spaced points (top, bottom, left, right), trim any uneven fabric with scissors, and align the cheese and toppings layer before sewing around the edge leaving the 3 centimeter gap.
How can I adapt this activity for younger children or make it more challenging for older kids?
For preschoolers, have an adult pre-cut the circles and let them arrange and glue the toppings instead of sewing, while older kids can trace more precise 18 cm circles, hand-sew neat small stitches, or add embroidered details.
What are some fun ways to personalize or extend the pizza plushie after it's finished?
Embroider a smiling face on the cheese layer, sew on a fabric loop to hang it, add extra felt toppings or a removable felt slice closed with velcro, and then share a photo on DIY.org as suggested.
Watch videos on how to Make a Pizza Plushie
How to make a plushie at home!
4 Videos
How to make a plushie at home!
🍕 DIY Paper Pizza for Kids - Mister Maker - Art and Craft

Kids Make Pizza in 30 Seconds?! Try This Easy Recipe!

🍕🍕How to Make Mini Pizzas (With a Twist! 🐰) 🍕🍕| Recipe | LEGO Friends Cooking Class
Facts about hand-sewing and felt crafts for kids
🍕 Pepperoni is the most popular pizza topping in the United States — a perfect choice to inspire plushie toppings!
🧵 Felt is one of the oldest textiles; people have been felting wool for thousands of years for warm clothes and crafts.
🧸 The teddy bear helped make stuffed toys famous after a story about President Theodore Roosevelt popularized them in the early 1900s.
✂️ The running stitch is one of the simplest hand-sewing stitches and great for attaching felt shapes safely with adult help.
🧪 Polyester fiberfill is lightweight, washable, and hypoallergenic, which is why it's commonly used to stuff plushies.
How do you make a pizza plushie?
What materials do I need to make a pizza plushie?
What ages is this pizza plushie activity suitable for?
What are fun variations and safety tips for a pizza plushie?
