Learn Salt Painting
Make colorful salt paintings by gluing designs, sprinkling salt, and applying watercolors to watch pigments spread and learn capillary action.


Step-by-step guide to make salt paintings
Step 1
Lay the tray or newspaper on the table and put your paper on top to keep things tidy.
Step 2
Draw a simple design or picture on the paper with your pencil.
Step 3
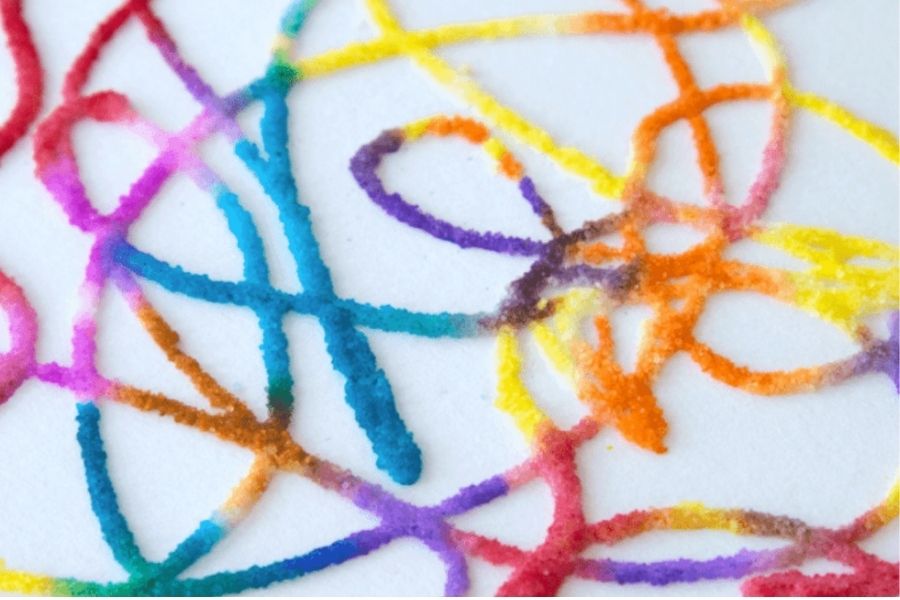
Squeeze thin lines of white glue along your pencil drawing to outline the design.
Step 4
Immediately sprinkle table salt over the glue so the glue lines are fully covered with salt.
Step 5
Gently tap the paper so the extra salt falls onto the tray or newspaper.
Step 6
Wait about 30 seconds until the glue feels slightly tacky but is not fully dry.
Step 7
Dip your brush or dropper into one watercolor color and touch a small spot of the salted glue to add that color.
Step 8
Add different colors to other salted spots one at a time to make the pigments spread along the salt.
Step 9
If water pools anywhere, gently dab the edge with a paper towel to soak up extra water.
Step 10
Let your painting dry completely for at least one hour or until the glue and salt are dry.
Step 11
Write one sentence about how the watercolor moved along the salt to show capillary action.
Step 12
Share your finished creation on DIY.org
Help!?
What can I use instead of watercolor paints or a paintbrush if I don't have them?
If you don't have watercolors, dilute food coloring with water or rub washable marker ink into small drops and use a clean brush or an eye dropper exactly as you would 'Dip your brush or dropper into one watercolor color' to touch the salted glue.
Why won't the salt stick to my glue or why don't the colors spread, and how can I fix it?
If the salt won't stick or colors don't spread, make sure you 'squeeze thin lines of white glue' and 'immediately sprinkle table salt' so the salt covers wet glue, wait 'about 30 seconds' until the glue is tacky before adding color, and if water pools gently 'dab the edge with a paper towel' to remove excess.
How can I adapt this salt painting activity for younger children or older kids?
For younger children, pre-draw simple shapes, have an adult squeeze the 'white glue' and let them sprinkle 'table salt' and add color with a big brush, while older kids can create finer pencil drawings, squeeze thinner glue lines, use a dropper for precise color placement, and write a more detailed sentence about capillary action after the piece 'dries completely.'
How can we extend or personalize the project when it's finished?
To enhance the activity, experiment with different salt sizes or metallic watercolors when you 'dip your brush,' let the artwork 'dry completely for at least one hour,' add a background wash before gluing, frame the finished piece, and 'share your finished creation on DIY.org.'
Watch videos on how to make salt paintings
Raised Salt Painting for Kids | Easy and Fun STEAM Art Idea
3 Videos

Raised Salt Painting for Kids | Easy and Fun STEAM Art Idea
Salt Painting! How to Paint with Salt
Painting for Kids - Salt Painting
Facts about watercolor art and capillary action
🧂 Salt crystals pull water (and pigment) toward themselves on wet paper, making sparkly starburst textures.
🎨 Watercolor pigments travel through paper fibers by capillary action — the same tiny pull that helps trees lift water to their leaves.
🌊 Capillary action can make water climb narrow spaces even against gravity, which is why pigment spreads across your salt painting.
🔬 Fine table salt creates tiny speckles while coarse sea salt produces big, dramatic starbursts — try both to compare effects!
🧾 Heavier watercolor paper (about 300 gsm / 140 lb) holds more water and shows crisper salt patterns than regular printer paper.
How do you make salt paintings to see pigments spread?
What materials do I need for a salt painting activity?
What ages is salt painting suitable for?
What are the benefits of salt painting for kids?
