How to make a paper snowflake
Fold and cut paper to create a snowflake design. Practice symmetry, safe scissor techniques, and decorating the unfolded pattern for winter display.

Step-by-step guide to make a paper snowflake
❄️EASY PAPER SNOWFLAKE STEP BY STEP | BEST SCHOOL PROJECT INCL ART
Step 1
Fold one corner of the paper over to the opposite edge to make a triangle and crease the fold firmly.
Step 2
Cut off the long rectangle strip left along the open edge so the triangle becomes a perfect square when unfolded.
Step 3
Unfold the paper to check you have a square then refold it diagonally corner to corner to make a triangle and crease.
Step 4
Fold the triangle in half again so you have a smaller triangle and crease the fold.
Step 5
Fold the smaller triangle in half one more time so it becomes an even smaller triangle and press a clear crease.
Step 6
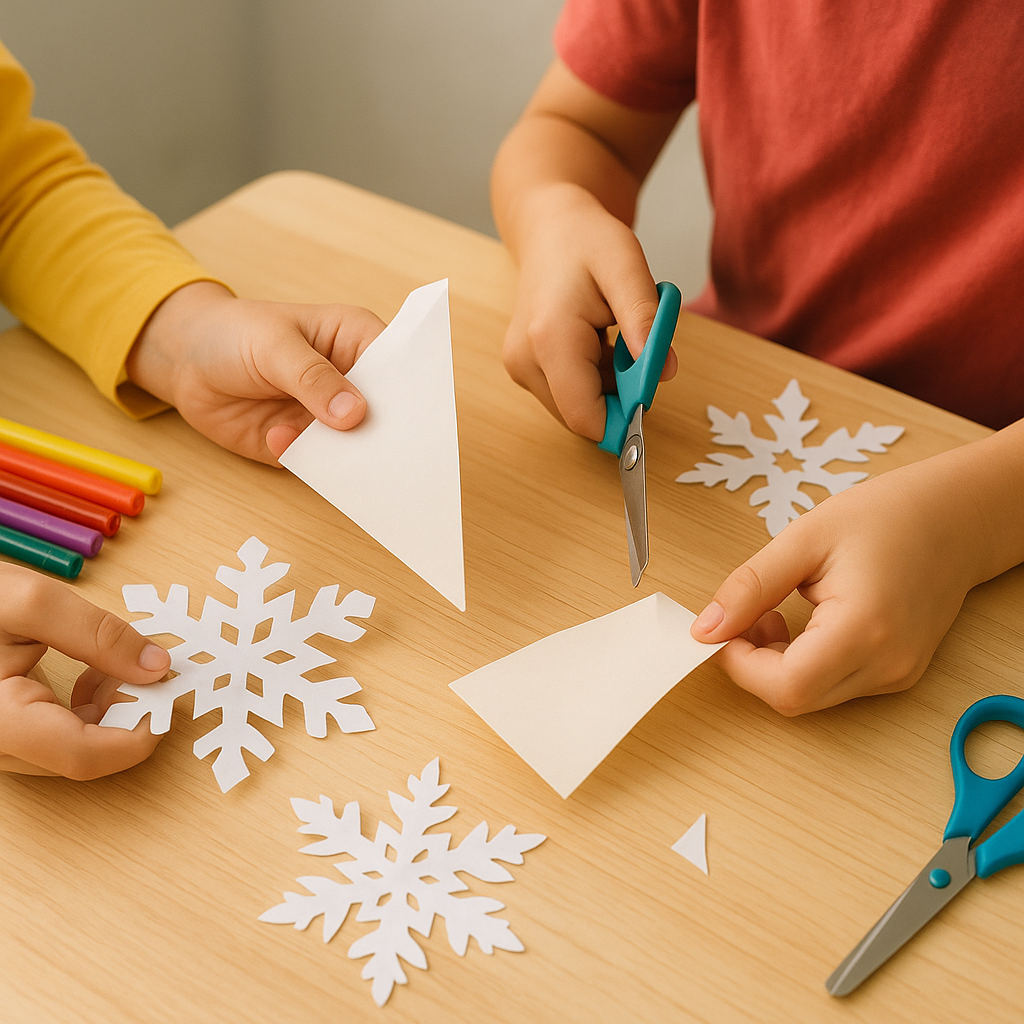
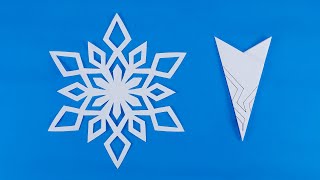
Draw small shapes like triangles semicircles and diamonds along the two long outer edges of the folded triangle with your pencil.
Step 7
Ask an adult to check your safety and then cut out the pencil shapes slowly while holding the folded paper steady.
Step 8
Carefully unfold the paper to reveal your snowflake pattern.
Step 9
Decorate your snowflake with coloring materials and attach a short piece of string to the top with tape if you want to hang it.
Step 10
Take a photo and share your finished snowflake creation on DIY.org
Help!?
What can we use instead of scissors, tape, or string if we don't have them?
If you don't have scissors, ask an adult to cut the folded triangle for you while you hold it steady, and if you lack tape or string make a small paper loop from the trimmed rectangle strip or staple a folded paper tab to the top for hanging.
My snowflake rips or the cuts look messy—what should I check?
Check that your creases are sharp at each folding step and redraw larger, simpler shapes along the two long outer edges, then cut slowly with small snips while keeping the folded paper steady to avoid tearing.
How can I adapt this activity for toddlers, early elementary kids, or older kids?
For toddlers have an adult pre-fold the square and triangle stages and let them draw or cut big shapes, for early elementary supervise them folding and cutting simpler shapes, and for older kids try extra folds for more layers or finer pencil patterns and use adult help with a craft blade for intricate cuts.
How can we personalize or extend the snowflake after unfolding it?
Personalize by layering colored paper snowflakes and gluing them together, adding glitter or punched confetti after you decorate, attaching a string or paper loop with tape or a staple to hang, and then take a photo to share on DIY.org as the instructions suggest.
Watch videos on how to make a paper snowflake
HOW TO MAKE A PAPER SNOWFLAKE TUTORIAL | INCL ART SNOWFLAKE
4 Videos
HOW TO MAKE A PAPER SNOWFLAKE TUTORIAL | INCL ART SNOWFLAKE
Easy Paper Snowflakes | How to make snowflakes out of paper | Christmas Decoration Ideas
How to Make Easy Paper Snowflakes - Step by Step Tutorial
Easy DIY Paper Snowflakes | How to make snowflakes out of paper | Christmas Decoration Ideas
Facts about paper crafts for kids
❄️ Snowflakes almost always show six-fold symmetry because water molecules freeze into hexagonal crystal shapes.
✂️ The earliest scissors-like tools are over 3,000 years old, but modern child-safe scissors have rounded tips for safety.
🏯 The paper crane in origami is a symbol of peace—Japanese tradition says folding 1,000 cranes grants a wish.
🔁 Making paper snowflakes is a fun, hands-on way to explore mirror symmetry and repeating patterns.
🎨 Kirigami adds cuts to folded paper so you can create delicate lace-like patterns and pop-up shapes from one sheet.
How do I make a paper snowflake by folding and cutting paper?
What materials do I need to make a paper snowflake?
What ages is folding and cutting paper snowflakes suitable for?
What safety tips should I follow when making paper snowflakes?
