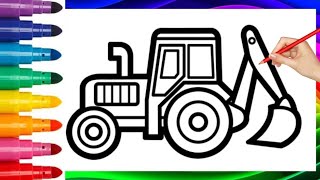
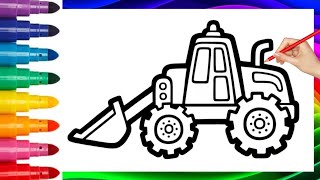
How to draw a tractor - a free tractor drawing guide
Draw a tractor step by step using simple shapes, wheels, windows, and details. Practice proportion, perspective, and shading to finish your drawing.


Drawing Apps
Get inspired with these


Instructions
🚜 Easy Tractor Drawing and Coloring for Kids | Fun and Simple Step-by-Step Tutorial! #drawing
Step 1
Place your paper in landscape (wide) position on the table.
Step 2
Lightly draw a straight horizon line near the bottom of the paper.
Step 3
Put a small dot on the horizon to the right as your vanishing point for perspective.
Step 4
Sketch the tractor body as a big horizontal rectangle above the horizon using light lines.
Step 5
Add a smaller rectangle on the back-top of the body for the cabin.
Step 6
Draw two big circles that touch the horizon for the rear and front wheels, making the rear wheel larger.
Step 7
Draw smaller concentric circles inside each wheel to make the rims.
Step 8
Add tire treads by drawing short curved lines or little rectangles around each wheel.
Step 9
Draw the cabin windows as rectangles and tilt their top edges slightly toward the vanishing point.
Step 10
Add front details by sketching a grill with vertical lines two round headlights and a simple exhaust pipe on top.
Step 11
Erase extra construction lines gently so your tractor looks clean.
Step 12
Shade the tractor by darkening the side away from your imagined light and draw a soft shadow on the ground under the tractor.
Step 13
Trace your final outline with a black pen and let the ink dry.
Step 14
Color your tractor with colouring materials using brighter colors for the body and darker tones for shaded areas.
Step 15
Share your finished tractor drawing on DIY.org.
Help!?
What can we use instead of a black pen, ruler, or special coloring supplies mentioned in the instructions?
If you don't have a black pen or special colouring materials, trace the final outline with a dark pencil or marker and use crayons, colored pencils, or watercolors to color, and use a cup lid or bottle cap to draw the two big wheel circles and a straight edge or the long side of a book to make the horizon line.
My tractor looks lopsided or the perspective is wrong—what should I check and fix from the steps?
If the tractor looks lopsided, lightly recheck that your horizon line is straight near the bottom and that both wheel circles touch that horizon and that the cabin window tops are tilted toward the small vanishing point dot before inking and erasing construction lines.
How can I adapt the activity for younger kids or make it more challenging for older kids?
For younger children, simplify by using pre-drawn big rectangles and stickers or stamped circles for wheels and skip the vanishing point, while older kids can keep the perspective step, add concentric rims, detailed tire treads, more nuanced shading, and finer pen work.
What are some ways to extend or personalize the tractor drawing after finishing the basic steps?
You can personalize and extend the drawing by adding a farm background along the horizon, using patterned or metallic colors on the body, attaching brads to make wheels turn, and following the shading and inking steps before sharing the finished tractor on DIY.org.
Related videos
How to Draw a Tractor Step by Step for Kids | Fun Drawing Tutorial
4 Videos
How to Draw a Tractor Step by Step for Kids | Fun Drawing Tutorial

How to Draw a Tractor Step by Step for Kids | Fun Drawing Tutorial
How to Draw a Tractor Step by Step for Kids | Fun Drawing Tutorial
How to Draw a Tractor Step by Step for Kids | Fun Drawing Tutorial
Fun Facts
🚜 Modern tractors often use GPS auto-steering so farmers can drive straight rows with centimeter-level accuracy.
⚙️ Tractor rear wheels are usually much larger than the front ones to give better traction and stability in fields.
🧭 One-point perspective uses a single vanishing point on the horizon to make objects look like they recede into the distance.
✏️ Proportion in vehicle drawing keeps parts consistent—artists often compare sizes by measuring how many wheel-heights tall the cab is.
🎨 Shading techniques like hatching, cross-hatching, or soft blending turn flat shapes into convincing round wheels and shiny windows.
How do you draw a tractor step by step?
What materials do I need to draw a tractor?
What ages is drawing a tractor suitable for?
What are the benefits of drawing a tractor?
