How to draw a rope - a free rope drawing guide
Draw a realistic rope by sketching twisted strands, adding curvature and shading. Practice texture and perspective to improve observational drawing skills.

Drawing Apps
Photos of rope drawing examples


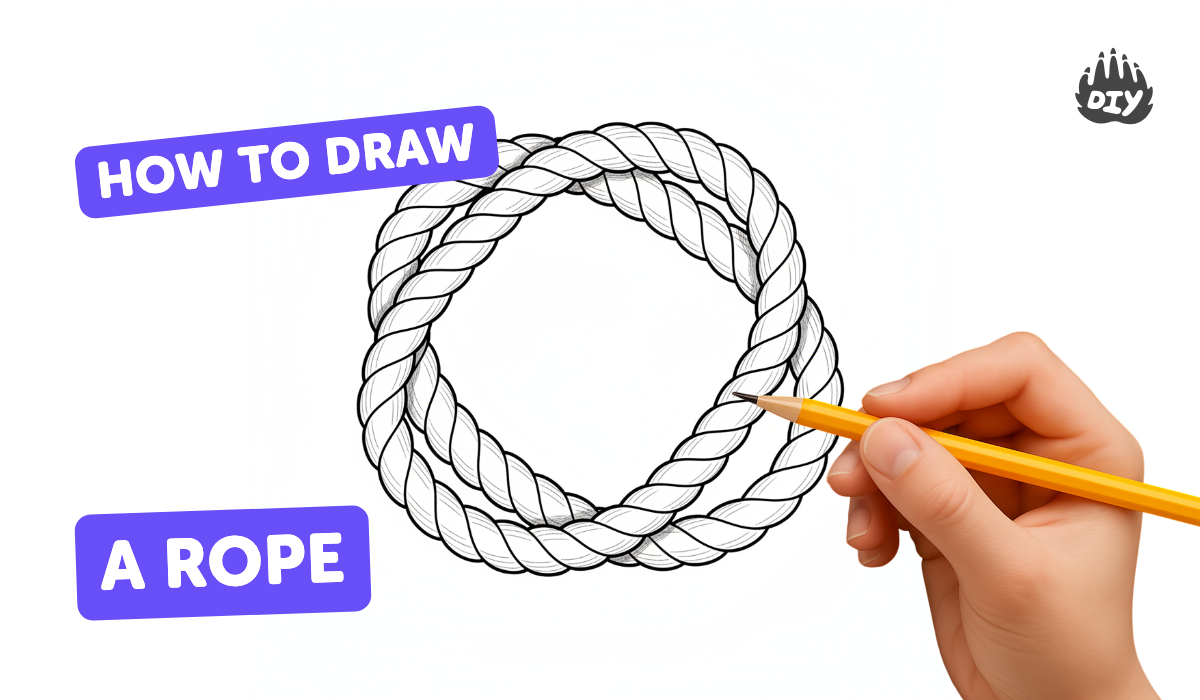
Step-by-step guide to draw a realistic rope
How To Draw A Kid Playing Jump Rope
Step 1
Gather your materials and clear a comfy drawing spot so you can work without interruptions.
Step 2
Lightly draw two parallel curved lines to mark the top and bottom edges of the rope path.
Step 3
Use the ruler to add evenly spaced short perpendicular lines between the edges to divide the rope into segments.
Step 4
Lightly sketch three long wavy ribbons that run along the rope and follow the curve to show the three twisted strands.
Step 5
In each segment, adjust the ribbons so they weave over and under each other to make the strands interlock.
Step 6
Add short diagonal texture lines across each strand following the strand’s twist direction to suggest fibers.
Step 7
Gently erase the original edge and segment guidelines that are no longer needed.
Step 8
Decide where the light is coming from and lightly shade the opposite side of each strand to show roundness.
Step 9
Use a blending stump or tissue to smooth the shading along the curves so the strands look cylindrical.
Step 10
Darken the deepest shadows where strands overlap and between strands to increase depth.
Step 11
Lift a thin line of graphite with the eraser along the top curves to create highlights where light hits.
Step 12
Add tiny stray fiber lines along the rope edges for extra realism.
Step 13
Optionally color the rope with your coloring materials while keeping your shading and highlights visible.
Step 14
Sign your name and date your drawing to show you finished it.
Step 15
Take a photo or scan your finished rope drawing and share your creation on DIY.org.
Help!?
I don’t have a blending stump or tissue — what can I use to smooth the shading in the step that says to 'Use a blending stump or tissue'?
If you don't have a blending stump or tissue, smooth the shading along the curves with a soft cotton swab, a folded microfiber cloth, or your clean fingertip to achieve cylindrical strands as described in the smoothing step.
My rope strands look flat or the ribbons won’t weave properly — what should I check or redo from the instructions?
Make sure your initial two parallel curved lines and the ruler-divided perpendicular segment marks are drawn lightly so you can adjust the three wavy ribbons in each segment to alternate over-and-under as the instruction 'In each segment, adjust the ribbons so they weave over and under each other' requires.
How can I adapt this rope drawing activity for different ages?
For younger kids, have them trace two thick parallel curved lines and color broad strands, for elementary kids simplify to two strands and add diagonal texture lines, and for older children follow every step including subtle shading, lifting highlights with the eraser, and optional coloring.
How can we enhance or personalize the finished rope drawing beyond the basic instructions?
Personalize it by adding a background (like a wooden dock), use colored pencils or watercolors as the 'Optionally color the rope' step suggests, lift thin highlight lines with a kneaded eraser, add extra stray fiber lines, then photograph and share on DIY.org.
Watch videos on how to draw a realistic rope
What is a Pulley- Lesson for Kids -Kindergarten,Preschoolers
4 Videos
What is a Pulley- Lesson for Kids -Kindergarten,Preschoolers
Fun & Easy Drawing Tutorial For Beginners
How To Draw Seashells - Preschool

Pulley - Simple Machines lesson for kids by www.makemegenius.com
Facts about observational drawing
🪢 Rope-making is one of humanity's oldest crafts — simple cordage was used by prehistoric people for binding, hunting, and building.
✍️ Artists from Albrecht Dürer to modern illustrators use cross-hatching to build form and deep shadows using only lines.
🔁 Twisting fibers into strands and then twisting strands together increases strength because the load gets shared across many fibers.
🎨 Adding small highlights and curved shadows along each strand helps a flat sketch read as a round, twisted rope.
👀 Practicing textures like a rope's tiny hairs and gaps sharpens observation and improves hand-eye drawing accuracy.
How do you draw a realistic rope with twisted strands and shading?
What materials do I need to draw a realistic rope?
What ages is this rope-drawing activity suitable for?
What are the benefits of practicing drawing realistic rope for children?
