How to draw a present - a free present drawing guide
Draw a wrapped present with ribbon and bow, add patterns and shading to practice shapes, symmetry, and simple perspective in a step by step exercise.

Drawing Apps
Get inspired with these


Instructions
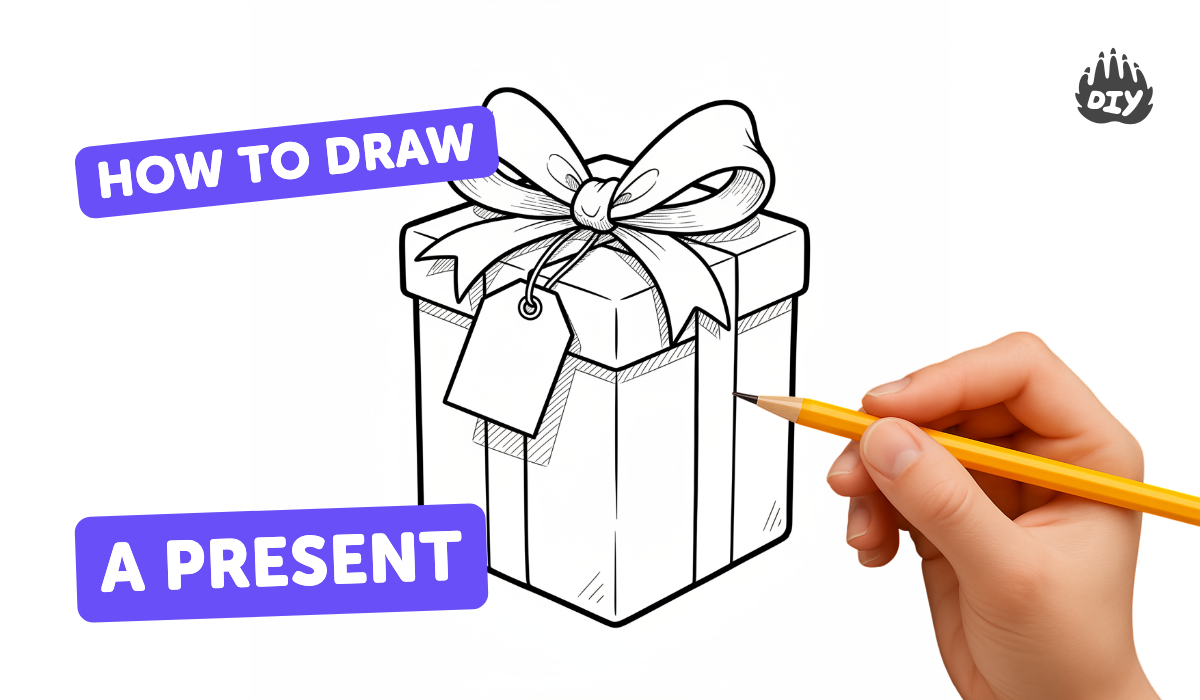
How to Draw Presents Easy | Christmas Gifts
Step 1
Place your paper on a flat surface and hold your pencil ready to draw.
Step 2
Lightly draw a centered rectangle or square for the front face of your present.
Step 3
From the top-left and top-right corners draw two short diagonal lines up and to the right to show depth.
Step 4
Connect the ends of those diagonal lines with a straight line to make the back edge of the top face.
Step 5
Draw straight lines from the ends of that back edge down to the bottom corners to form the right-side face of the present.
Step 6
Draw a thin horizontal lid line where the front meets the top face to show the gift lid.
Step 7
Draw a vertical ribbon band down the middle of the front face and continue it onto the top face.
Step 8
Draw a horizontal ribbon band across the middle of the front face and continue it onto the top face so the bands cross at the center.
Step 9
Sketch a bow at the crossing point by drawing two mirrored loops one on each side of the center.
Step 10
Draw two ribbon tails coming from under the bow and give them slightly different lengths.
Step 11
Add patterns like stripes dots or stars across the wrapping paper to practice shapes and symmetry.
Step 12
Shade the right-side face a bit darker than the front to show light coming from the left and create simple perspective.
Step 13
Add a small shadow under the bow on the top face to make the bow look raised.
Step 14
Take a photo of your finished present and share your creation on DIY.org.
Help!?
What can we use if we don't have a ruler, eraser, or a phone to take the photo?
Use the straight edge of a book or cereal box to draw straight lines (for the diagonal depth lines and back edge), a clean corner of a tissue or soft cloth to lift pencil marks as an eraser substitute, and ask a parent to scan or photograph your paper with a tablet or camera to share on DIY.org.
My depth lines and box look crooked—how can I fix the perspective?
Lightly erase the short diagonal lines from the top-left and top-right corners and redraw them up and to the right using a ruler or card so they are parallel, then reconnect the back edge and redraw the right-side face so the corners line up.
How can I adapt this present-drawing for different ages?
For ages 3–5 simplify to a flat square with one vertical ribbon band and stickers for patterns, for 6–9 follow all steps with light pencil lines and basic shading, and for 10+ add more precise perspective, darker shading on the right-side face, detailed mirrored bow loops, and symmetric patterns before photographing for DIY.org.
How can we make the present drawing more special or creative?
Turn the bow into a glued paper or fabric bow, use colored paper or markers for the ribbon bands and stripes/dots/stars, add textured shading on the right-side face and a small shadow under the bow for depth, then photograph it against a plain background to share on DIY.org.
Related videos
Fun & Easy Drawing Tutorial For Beginners
4 Videos
Fun & Easy Drawing Tutorial For Beginners
Drawing A Person With My 2-Year-Old (Preschool Lesson)
How To Draw A Christmas Present
Easy Drawing And Painting Tutorials For Beginners
Fun Facts
🎁 Drawing presents as cubes is a great beginner trick — cubes let kids practice simple perspective and keep shapes tidy.
🎀 A ribbon's twist is shown by overlapping loops and a thin highlight line; that small detail makes it look soft and real.
🖼️ Linear perspective uses a horizon line and one or more vanishing points to make boxes and ribbons look like they sit in space.
✳️ Many bows and gift designs use bilateral symmetry — mirror-image halves — because our eyes find balanced shapes pleasing.
✏️ Try cross-hatching for darker shadows and gentle smudging or blending for smooth shading — both make patterns pop on wrapping paper.
How do you draw a wrapped present with ribbon and bow step by step?
What materials do I need to draw a present with ribbon and bow?
What ages is drawing a present with ribbon and shading suitable for?
What are the benefits of drawing wrapped presents with patterns and shading?
