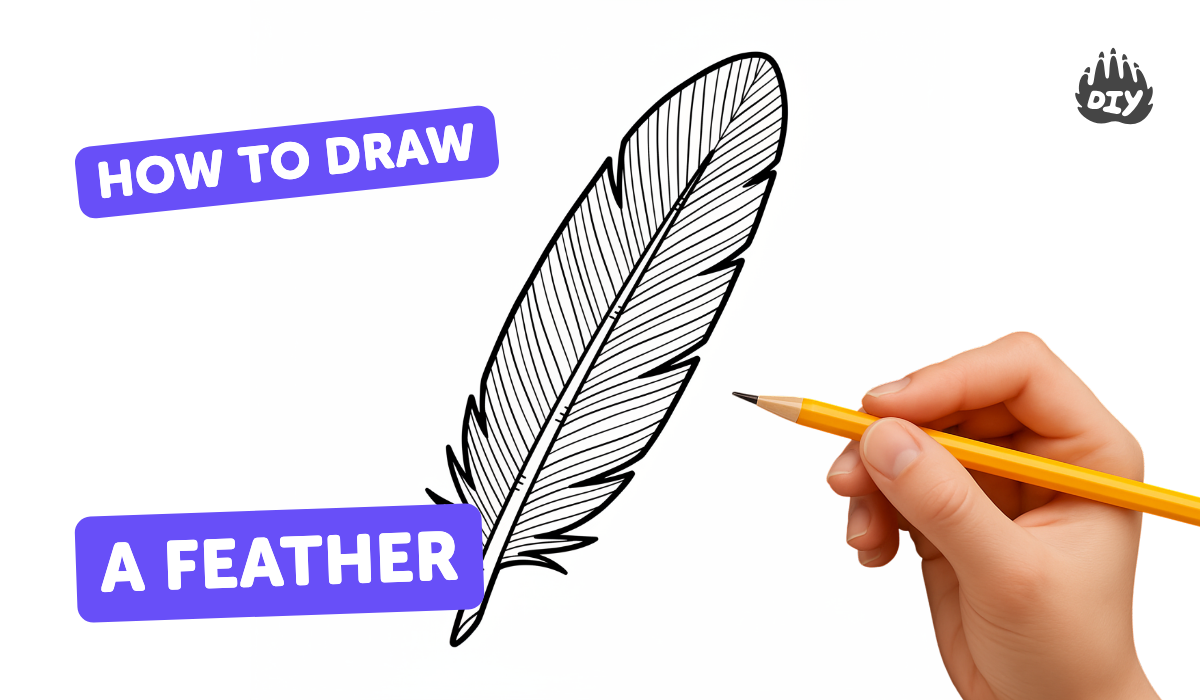
How to draw a feather - a free feather drawing guide
Draw a detailed feather using pencil, ink, or colored pencils. Practice symmetry, varying pressure, shading, and realistic texture through step by step strokes.

Drawing Apps
Photos of feather drawing examples


Step-by-step guide to draw a detailed feather
How to Draw a Feather Step by Step Easy for Beginners/Kids - Simple Feathers Drawing Tutorial
Step 1
Gather your materials and find a comfy, well-lit spot to draw.
Step 2
Lightly draw a gentle curved line down the center of the paper to make the feather’s shaft.
Step 3
Draw a smooth outer curve from the base up to the tip on one side of the shaft.
Step 4
Draw a matching outer curve on the other side so both edges meet at the tip to form the feather outline.
Step 5
Make small, evenly spaced guide marks along the shaft on one side to plan where barbs will start.
Step 6
Make matching guide marks on the opposite side aligned with the first set to keep symmetry.
Step 7
From each guide mark on one side draw short angled barbs toward the outer edge, keeping lengths similar.
Step 8
Repeat drawing angled barbs from the marks on the other side so both sides mirror each other.
Step 9
Add thin wispy fibers along some barbs using very light strokes while varying your pressure to create darker and lighter lines.
Step 10
Shade the area near the shaft and under overlapping barbs with darker pencil strokes to add depth.
Step 11
Gently blend the shaded areas with a blending stump or tissue for a soft, feathery look.
Step 12
Optionally go over chosen lines with a fineliner for crisp edges or color the feather with colored pencils using light layers then stronger pressure for gradients.
Step 13
Erase any remaining guide marks and clean up stray lines to finish your detailed feather.
Step 14
Show off your finished feather by sharing it on DIY.org.
Help!?
What can we use if we don't have a blending stump or fineliner mentioned in the instructions?
If you don't have a blending stump use a clean tissue or cotton swab to gently blend the shaded areas, and substitute a sharpened HB pencil or fine-tipped washable marker for the fineliner when creating crisp edges.
My feather looks lopsided—how do I fix symmetry problems from the outer curves and barbs?
If one side looks uneven, lightly recheck and add or erase guide marks along the shaft (used to plan barbs) and use small measuring dots or fold the paper to align barbs so both outer curves and barb lengths mirror each other.
How can I adapt this feather drawing for different ages or skill levels?
For little kids simplify to drawing the central shaft and two outer curves with crayons and skip blending, while older kids can follow all steps including wispy fibers, pencil shading, blending, fineliner outlining, and colored-pencil gradients.
What are some ways to enhance or personalize the finished feather beyond the basic instructions?
To extend the activity, add watercolor washes under the colored-pencil gradients, ink selected barbs with a fineliner, experiment with metallic pencils for highlights, or make a set of different bird feathers to photograph and share on DIY.org.
Watch videos on how to draw a detailed feather
How to Draw a Realistic Feather | Step by Step Art Lesson for Beginners
4 Videos
How to Draw a Realistic Feather | Step by Step Art Lesson for Beginners
![How To Draw a Realistic Feather Step by Step [EASY TO FOLLOW]](https://img.youtube.com/vi/5Lip8pbYELc/mqdefault.jpg)
How To Draw a Realistic Feather Step by Step [EASY TO FOLLOW]
How to Draw a Feather
How to Draw a Feather - Simple Nature Sketch for Kids & Beginners
Facts about drawing techniques and shading
🪶 Feathers are made of keratin (the same protein as hair and nails) and have a central shaft with barbs and tiny barbules that hook together like a zipper.
✨ Many flight feathers are slightly asymmetrical on purpose — that uneven shape helps birds steer and stay airborne.
✏️ Pencil “lead” is actually graphite mixed with clay; artists use a range from very soft/dark (9B) to very hard/light (9H) for shading and detail.
🖋️ Pen-and-ink sketches have been used by artists for centuries because ink makes crisp lines that hold up well for fine textures.
🎨 Cross-hatching and pressure control let you create smooth shading and realistic feather texture using just lines and strokes.
How do you draw a detailed feather step by step?
What materials do I need to draw a feather?
What ages is feather drawing suitable for?
What are the benefits of drawing feathers and how can I vary the activity?


