How to draw a fall leaf - a free fall leaf drawing guide
Draw a detailed fall leaf using pencil, colored pencils, and blending techniques. Practice observing shapes, veins, and autumn colors step by step.

Drawing Apps
Photos of fall leaf drawings


Step-by-step guide to draw a fall leaf
How To Draw Fall Leaves
Step 1
Find a real fall leaf or a printed photo of a fall leaf to use as your reference.
Step 2
Put your paper and pencil on a flat surface where you can sit comfortably.
Step 3
Lightly sketch the outer shape of the leaf with soft pencil lines.
Step 4
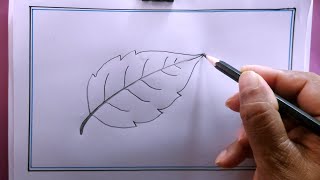
Draw the stem and a light central vein from the stem to the tip.
Step 5
Add side veins branching from the central vein on both sides of the leaf.
Step 6
Refine the leaf edge by drawing the jagged or smooth outline you see in your reference.
Step 7
Erase any extra sketch lines so your drawing looks clean and ready for color.
Step 8
Add gentle pencil shading near the veins and at the base to create depth.
Step 9
Sharpen your colored pencils so the tips are ready for fine work.
Step 10
Choose three to five autumn colors that match your reference.
Step 11
Apply the lightest color across the whole leaf with even gentle strokes.
Step 12
Layer mid-tone colors in patches to mimic the leaf’s color changes.
Step 13
Use the darkest color to emphasize veins and shadowed areas.
Step 14
Gently blend where the colors meet using a blending stump or soft tissue for smooth transitions.
Step 15
Take a photo and share your finished fall leaf drawing on DIY.org.
Help!?
What can I use if I can't find a real fall leaf, sharp colored pencils, or a blending stump?
If you don't have a real leaf, sharp colored pencils, or a blending stump, use a printed leaf photo or a smartphone picture as your reference, substitute crayons or soft graphite pencils (sharpened with a manual sharpener) for fine work, and blend colors with a soft tissue or cotton swab while following the same sketch, vein, and shading steps.
My jagged leaf edges don't match the reference and my colors look patchy—how can I fix that?
If the edge isn't right, lightly re-sketch the jagged or smooth outline using your reference before erasing extra lines, and if colors are patchy, apply the lightest color evenly across the whole leaf then layer mid-tones with gentle strokes and blend where the colors meet using a blending stump or soft tissue as the instructions say.
How can I adapt this drawing activity for much younger kids or older children wanting more challenge?
For younger kids, simplify by tracing the leaf shape and using chunky crayons to fill in three bold autumn colors, while older kids can add refined pencil shading near veins, use sharpened colored pencils for subtle layering, and emphasize veins and shadows with the darkest color as described.
What are some ways to enhance or personalize the finished fall leaf drawing?
To extend the activity, make a series of leaves in different sizes and colors using the same sketch, vein, layering, and blending steps, add real leaf textures or glue drawings into a collage background, then take a photo of the composition and share it on DIY.org as suggested.
Watch videos on how to draw a fall leaf
How To Draw Fall Leaf Friends
4 Videos
How To Draw Fall Leaf Friends
How To Draw An Autumn Leaf Step By Step 🍁 Leaf Drawing Easy
How To Draw A Leaf | Step by Step For Beginners
how to draw a leaf easy/leaf drawing
Facts about drawing and colored-pencil techniques
🍁 Many trees produce anthocyanins in autumn, making leaves bright red or purple as chlorophyll fades.
🌈 Carotenoids (yellows and oranges) are present all year but become visible in fall once green chlorophyll breaks down.
✏️ Colored pencil sets often contain 100–200+ hues — layering light strokes helps artists achieve smooth blends.
🔍 Leaf venation comes in patterns like pinnate (one main vein) and palmate (several veins from a point), great guides for drawing.
🎨 Using light, small circular strokes and gradual pressure changes creates soft, realistic color transitions for autumn leaves.
How do you draw a detailed fall leaf using pencil, colored pencils, and blending techniques?
What materials do I need to draw a fall leaf with pencils and blending?
What ages is this fall leaf drawing activity suitable for?
What are the benefits of drawing detailed fall leaves for kids?
