How to draw a eye - a free eye drawing guide
Draw a realistic eye step-by-step using pencil, eraser, and blending. Learn proportions, shading, highlights, and simple textures to create depth.

Drawing Apps
Photos of realistic eye drawing examples


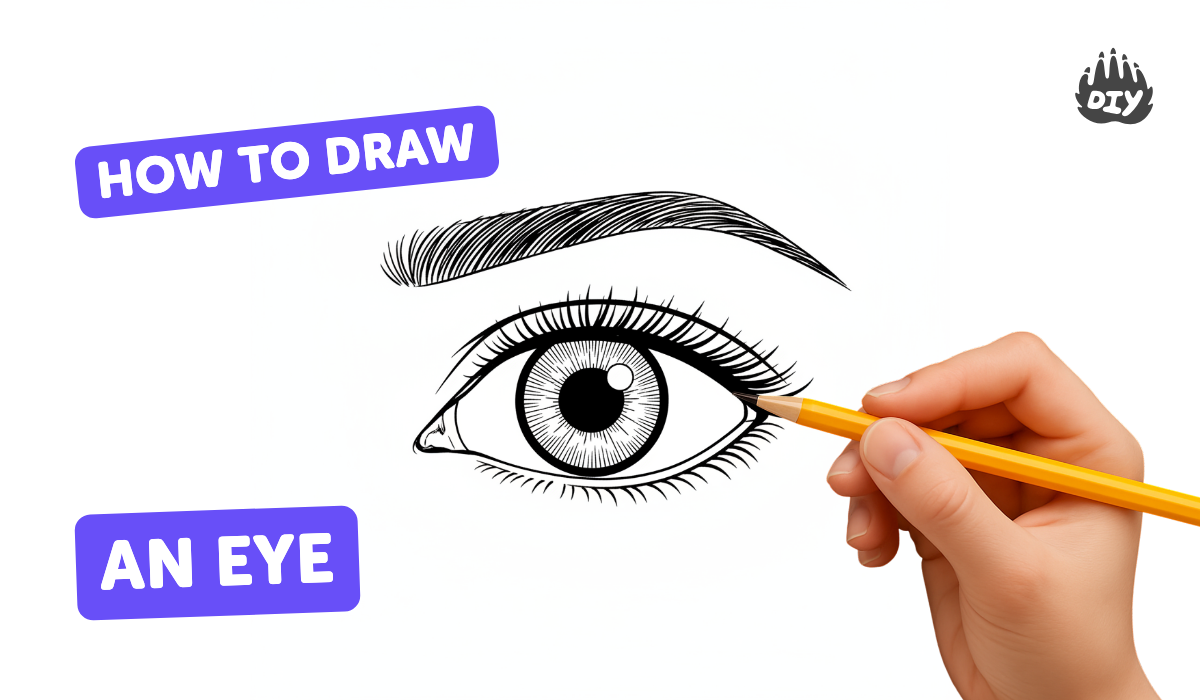
Step-by-step guide to draw a realistic eye
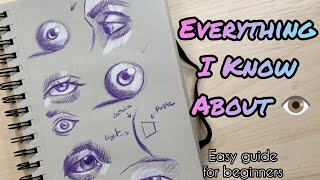
HOW TO DRAW AN EYE FOR BEGINNERS [*EASY TUTORIAL*]
Step 1
Place your paper and pencil in front of you and set your reference photo or mirror where you can see it clearly.
Step 2
Lightly draw a horizontal guideline across the paper where the middle of the eye will sit.
Step 3
Sketch a light almond shaped outline around the guideline to make the outer shape of the eye.
Step 4
Draw a circle for the iris inside the almond shape making sure the top of the circle is slightly covered by the upper eyelid.
Step 5
Mark the pupil as a small circle in the center of the iris.
Step 6
Gently erase extra guideline lines so the eye outline and iris are clean and easy to work on.
Step 7
Shade the iris with a mid tone using light circular strokes while leaving a small white highlight area untouched.
Step 8
Darken the pupil and the outer edge of the iris to add contrast and depth.
Step 9
Draw thin radial lines outward from the pupil into the iris to create realistic texture.
Step 10
Use your blending tool or tissue to softly blend the iris tones while keeping some radial texture visible.
Step 11
Shade the eyelids and the white of the eye with soft gradients to show the eye sitting in the socket.
Step 12
Add eyelashes and eyebrow hairs with short curved strokes that follow the natural direction of hair growth.
Step 13
Use your eraser to lift tiny highlights on the iris and along the wet edge of the lower eyelid and clean any smudges.
Step 14
Share a photo of your finished realistic eye drawing on DIY.org
Help!?
What can I use if I don't have a blending tool?
Use a clean tissue, a cotton swab, or the edge of a soft cloth to softly blend the iris tones in step 10 instead of a blending stump.
My iris looks flat — how can I make it look more realistic?
Darken the pupil and the outer edge of the iris (step 8), draw thin radial lines outward from the pupil (step 9), and then gently blend with a tissue (step 10) while keeping the small white highlight from step 7 untouched.
How can I adapt this eye-drawing activity for younger or older children?
For younger kids simplify by drawing just the horizontal guideline (step 2), almond outline (step 3), iris circle (step 4) and bold pupil (step 5) and color with crayons, while older kids can add eyelid shading (step 11), detailed radial texture (step 9), and lift highlights with an eraser (step 13).
How can we extend or personalize the finished eye drawing?
Experiment with colored pencils over the blended graphite in the iris (steps 7–10) to create unique eye colors or add a custom reflection before sharing a photo on DIY.org as suggested in the final step.
Watch videos on how to draw a realistic eye
How To Draw Eyes ( Beginner Tutorial)
4 Videos
How To Draw Eyes ( Beginner Tutorial)
How to Draw a Simple Eye | Easy Art Tutorial
How to draw an eye/eyes easy step by step for beginners Eye drawing easy tutorial with pencil basics
Learn How to Draw eyes 👁️ Easily | Step by Step Eye Drawing Tutorial for Beginners❤️
Facts about pencil drawing and shading for kids
👁️ No two irises are alike — iris patterns are as unique as fingerprints.
✏️ Graphite pencils are graded from 9H (very hard, very light) to 9B (very soft, very dark); use H for fine lines and B for deep shading.
🖌️ Blending stumps (tortillons) smooth graphite to create soft transitions without removing the marks like an eraser would.
✨ Leaving a tiny bright highlight unshaded makes an eye look wet and alive — highlights sell realism!
📏 The iris is often partly hidden by the upper eyelid; that small overlap helps give the eye depth and correct proportion.
How do you draw a realistic eye step-by-step?
What materials do I need to draw a realistic eye?
What ages is drawing a realistic eye suitable for?
What are the benefits of drawing realistic eyes for children?
