How to draw a balloon - a free balloon drawing guide
Draw a realistic balloon using simple shapes, shading, and string. Practice step by step sketching, coloring, and creating highlights to make it look three dimensional.

Drawing Apps
Photos of realistic balloon examples


Step-by-step guide to draw a realistic balloon
How to Draw Balloons - Easy Step-by-Step Tutorial
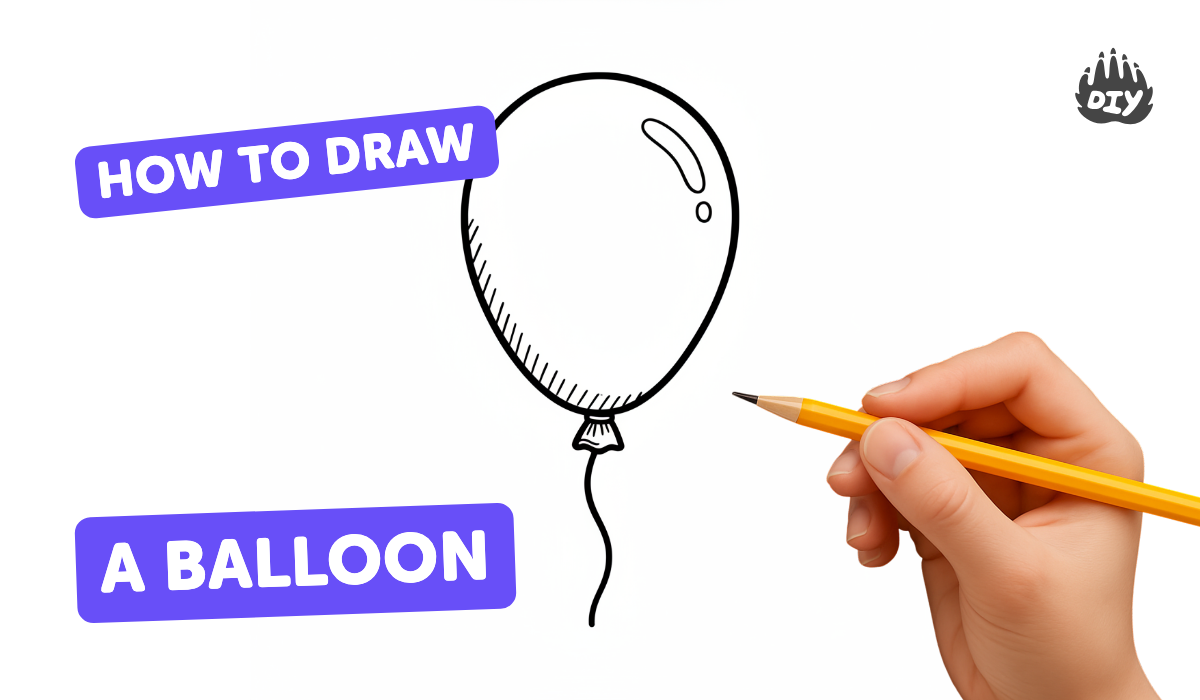
Step 1
Find a flat table and sit with your materials ready.
Step 2
Lightly draw a large oval in the middle of the paper for the balloon body.
Step 3
Draw a small knot shape at the bottom of the oval using a tiny triangle or diamond.
Step 4
Draw a curved line down from the knot to make the string.
Step 5
Choose which side will be the light source by looking at your paper and deciding left or right.
Step 6
Lightly mark a small oval or circle on the balloon where the bright highlight will sit.
Step 7
Use gentle pencil strokes to shade the side opposite the highlight to make a shadow area.
Step 8
Add medium pencil strokes between the highlight and the shadow to create a smooth middle tone.
Step 9
Blend the shaded areas with a tissue or cotton swab to make the balloon look round.
Step 10
Erase any extra guide lines so the balloon shape is clean.
Step 11
Trace the final balloon outline and string with a black marker for a bold edge.
Step 12
Color the balloon with a light base layer using your chosen color.
Step 13
Add a darker shade on the shadow side to deepen the three‑dimensional look.
Step 14
Use a white colored pencil or gel pen to brighten the tiny highlight spot so it looks glossy.
Step 15
Take a photo of your finished balloon and share your creation on DIY.org.
Help!?
What can we use instead of a white gel pen for the tiny highlight if we can't find one?
If you don't have a white gel pen for the tiny highlight, use a white colored pencil, a small dab of white acrylic or gouache paint, or carefully lift graphite with a clean eraser on the marked highlight spot.
My balloon looks flat after shading — what should I check or redo?
If the balloon looks flat, darken the shadow side more (step 'Add a darker shade'), re‑blend the middle tones with a tissue or cotton swab (step 'Blend the shaded areas'), and brighten the tiny highlight with your white pencil or paint (step 'Use a white colored pencil or gel pen').
How can I adapt this drawing for different ages or skill levels?
For younger children, simplify by drawing a larger oval, skipping subtle shading and using crayons and a thick marker for the outline (steps 'Lightly draw a large oval' and 'Trace the final balloon outline'), while older kids can keep the shading/blending steps and add a cast shadow on the table or layered color glazing for extra realism.
How can we make the finished balloon more interesting or personalized before sharing the photo?
Personalize your balloon by adding patterns or a name before coloring, draw several overlapping balloons with varied highlights and strings for a bouquet, or use metallic paint or glitter gel pens on the highlight before taking the photo to share on DIY.org (step 'Take a photo of your finished balloon').
Watch videos on how to draw a realistic balloon
How to draw a cute balloon |Easy step by step drawing for kids
4 Videos
How to draw a cute balloon |Easy step by step drawing for kids
easy step by step method to draw balloons. draw and color balloons. drawing for kids. Part 1
🎈 How to Draw a Balloon - Step-by-Step Guide!

How to Draw Balloon 🎈 | Easy Drawing for Kids & Toddlers | Tori Drawings
Facts about drawing and shading for kids
🎈 Balloons: modern latex balloons can stretch to more than twice their original size, which helps when you shape and shade them.
✏️ Shading: by changing pencil pressure and using different pencil grades (like 2B to 6B) you can create many tones to make a balloon look round.
🌟 Highlights: a single bright specular highlight shows the light source and instantly makes a balloon look shiny and three-dimensional.
🖼️ Chiaroscuro: Renaissance artists used dramatic light-and-shadow to model forms — the same idea helps turn simple shapes into realistic balloons.
🎈🪢 Float time: a helium latex balloon usually floats 8–12 hours, while foil (Mylar) balloons can float for several days — their surfaces reflect light differently.
How do you draw a realistic balloon step by step?
What materials do I need to draw a realistic balloon?
What ages is this balloon-drawing activity suitable for?
What are the benefits of drawing realistic balloons for kids?
