Draw Using the Scribble Feature on Tinkercad
Use Tinkercad's Scribble tool to draw a custom 2D shape, convert it into a simple 3D model, and prepare it for printing.


Step-by-step guide to draw using the Scribble feature on Tinkercad
Step 1
Sign in to your Tinkercad account and click "Create new design" to start a fresh workplane.
Step 2
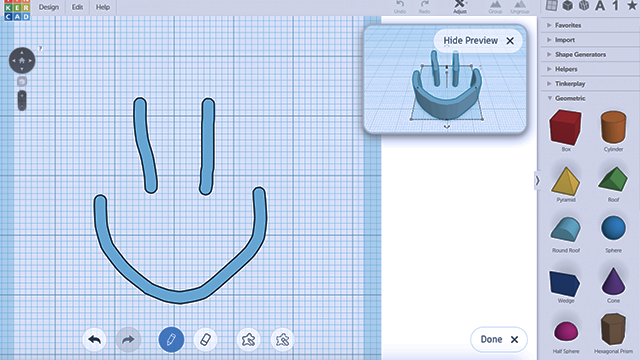
Click the "Scribble" shape from the Shapes menu to open the Scribble drawing window.
Step 3
Draw a closed 2D shape in the Scribble window using your mouse or stylus; make the lines meet so the shape is sealed.
Step 4
Click "Done" to place your drawn shape onto the workplane as a 2D object.
Step 5
Drag a corner handle to resize the shape so it fits the size you want for printing.
Step 6
Click the top white handle and set the height (thickness) to at least 3 mm so the model prints strong enough.
Step 7
Move the shape to the center of the workplane using the mouse so it sits flat and ready.
Step 8
If you add other shapes, select them and click the Group button to join everything into one solid object.
Step 9
Use the Ruler tool to check the final dimensions and make one last size adjustment if needed.
Step 10
Click Export and choose the .STL file option to save your model for 3D printing.
Step 11
Share your finished creation on DIY.org
Help!?
What can we use if we don't have a mouse or stylus or can't draw in the Scribble window?
Use your laptop's touchpad or a touchscreen to draw in the Scribble window, or instead place simple closed shapes from the Shapes menu if freehand isn't possible.
My drawn shape won't become a solid or exports with holes—what should I check?
Before clicking "Done" make sure all your lines meet so the Scribble is a sealed 2D shape, and if edges still look open zoom in and redraw the touching points so the object can be extruded into a solid.
How can I adapt this activity for younger or older children?
For younger kids use big simple shapes from the Shapes menu and set the height to at least 3 mm, while older kids can combine multiple Scribble drawings, use the Ruler tool for exact dimensions, and Group them into one solid before exporting the .STL.
How can we personalize or improve our 3D model after drawing it?
Add text or extra shapes, adjust the top white handle to change thickness, Group everything into one object, export the .STL to print and then paint or share the finished creation on DIY.org.
Watch videos on how to draw using the Scribble feature on Tinkercad
How to Cut an Object in Two Parts Using the Scribble Tool | Tinkercad Tutorial
4 Videos
How to Cut an Object in Two Parts Using the Scribble Tool | Tinkercad Tutorial
Creating Tinkercad models using the Scribble Shape

Tinkercad Scribble Tool
Sketch vs. Scribble: A Beginner's Tinkercad Tutorial
Facts about 3D design and 3D printing
🖥️ Tinkercad runs in your web browser and is a free, beginner-friendly way to learn 3D design—no installation needed.
✏️ The Scribble tool lets you draw freehand 2D shapes that can be converted into editable 3D objects with just a few clicks.
🖨️ Home 3D printers build objects layer by layer (additive manufacturing) using common filaments like PLA or ABS.
📁 You can export Tinkercad designs as STL or OBJ files to import into slicing software and prepare them for printing.
🏫 Tinkercad is popular in classrooms and maker spaces because it teaches creative design and basic CAD skills to kids.
How do I use Tinkercad's Scribble tool to make a 3D printable shape?
What materials and tools do I need to draw with Scribble and 3D print the result?
What ages are suitable for using the Scribble tool in Tinkercad?
What are the benefits and fun variations of drawing with Tinkercad’s Scribble?
