Draw A Self-Portrait With @craftyunicorn10
Draw a detailed self-portrait with guidance from @craftyunicorn10 using a mirror, pencil, and colors to observe proportions, features, and personal style.

Drawing Apps
Step-by-step guide to draw a self-portrait with @craftyunicorn10
Step 1
Position your mirror at eye level on a table or shelf so you can see your whole face clearly.
Step 2
Sit comfortably with your plain paper and pencil in front of the mirror.
Step 3
Check @craftyunicorn10 for a quick tip or short demo on observing faces before you begin.
Step 4
Look carefully at your face in the mirror and notice the overall head shape and how your features line up.
Step 5
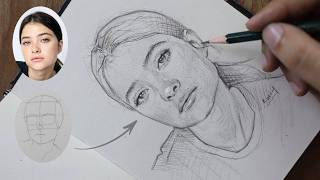
Lightly draw a simple oval on the paper to map out your head shape.
Step 6
Lightly draw a vertical centerline down the oval to show the middle of your face.
Step 7
Lightly draw a horizontal eye line across the oval about halfway down.
Step 8
Lightly mark where your eyes nose and mouth sit along the lines you drew.
Step 9
Draw one eye using light strokes while watching the mirror and following @craftyunicorn10's tip.
Step 10
Draw the other eye to match the first and check the spacing between them.
Step 11
Draw your nose and mouth paying attention to their shapes and any small shadows you see.
Step 12
Add ears neck and hair by observing their positions and shapes in the mirror.
Step 13
Gently erase extra construction lines and refine the features of your portrait.
Step 14
Use your coloring materials to add color shading and personal style like clothes or jewelry.
Step 15
Share your finished self-portrait on DIY.org
Help!?
What can I use if I don't have a mirror or plain paper for the activity?
Use your phone or tablet's front camera held at eye level as the mirror and substitute plain paper with printer paper, notebook paper, or light cardboard while using any pencil and eraser to follow the light-stroke construction steps.
My portrait's eyes look uneven—how can I fix that using the instructions?
Use the lightly drawn vertical centerline and horizontal eye line from the steps as guides, draw the first eye with light strokes while watching the mirror and then match the second eye to the first, checking the spacing between them before refining.
How can I adapt this self-portrait activity for younger or older children?
For younger kids, have them trace a simple reflected outline or stick on pre-cut eye and mouth shapes and focus on big features, while older kids can follow @craftyunicorn10's tip to refine proportions, add detailed shading with colored pencils, and erase construction lines for realism.
How can we extend or personalize the finished self-portrait beyond the basic steps?
Personalize it by adding a background scene, collage clothing or real fabric for texture, drawing jewelry and personal items with your coloring materials, and then photograph and share the final portrait on DIY.org.
Watch videos on how to draw a self-portrait with @craftyunicorn10
Self Portrait Drawing for 3rd- 5th Grade | How to Draw a Face Step-by-Step Tutorial for Kids
4 Videos
Self Portrait Drawing for 3rd- 5th Grade | How to Draw a Face Step-by-Step Tutorial for Kids
3 Fun Self Portrait Activities For Kids | How To Draw A Face
How to Draw a Self Portrait: Easy Step by Step Drawing Tutorial for Beginners
You don't need artistic talent! Learn to draw portraits using loomis method✨
Facts about portrait drawing for kids
🎨 Vincent van Gogh painted more than 30 self-portraits—artists often use self-portraits to study themselves over time.
🪞A mirror shows a reversed image, so drawing from a mirror can make your left and right look swapped compared to photos.
✏️Many artists begin portraits with simple shapes (an oval for the head and guideline lines) to get proportions right.
👀A handy rule: eyes usually sit about halfway down the head and the gap between the eyes is roughly one eye-width.
🌈Adding favorite clothes, colors, or objects to a self-portrait tells a personal story and makes your style shine.
How do I draw a self-portrait with @craftyunicorn10?
What materials do I need to draw a self-portrait with @craftyunicorn10?
What ages is drawing a self-portrait with @craftyunicorn10 suitable for?
What are the benefits of drawing self-portraits with @craftyunicorn10?
