Do a back handspring
Learn to do a back handspring by practicing warm-ups, strength moves, and progressive drills with a coach or spotter on a soft mat.

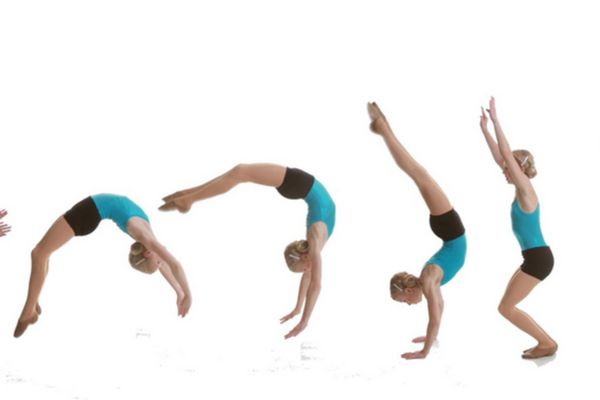

Step-by-step guide to do a back handspring
How to do a back Handspring for Kids
Step 1
Put on comfortable athletic clothing and remove jewelry or anything that can catch.
Step 2
Lay the soft gymnastics mat flat on the floor in a clear open area.
Step 3
Ask your coach or trained spotter to stand next to the mat and get ready to help.
Step 4
Do 5 minutes of light cardio like jogging in place or jumping jacks to warm up.
Step 5
Do 1 minute of wrist circles and shoulder rolls to loosen your wrists and shoulders.
Step 6
Do 1 minute of leg swings and walking lunges to wake up your hips and legs.
Step 7
Hold a hollow body position for 20 seconds and repeat it two times with short rests.
Step 8
Do 3 sets of 10 glute bridges to strengthen your hips and legs.
Step 9
Kick up into a back bridge and hold for 5 seconds and repeat this three times to open your back and shoulders.
Step 10
With your spotter holding your hips, practice a bridge kickover and try to land on your feet for three attempts.
Step 11
From a standing position, jump backward while your spotter guides your back and legs through the motion and do four controlled tries.
Step 12
Attempt a full back handspring with your spotter providing light assistance and focus on pushing through your shoulders and landing on your feet; repeat up to six times or until comfortable.
Step 13
Do gentle full-body stretches for 2 minutes to cool down your muscles.
Step 14
Take a few slow breaths and sip water to rest and recover.
Step 15
Take photos or a short video with your coach and share your finished back handspring practice on DIY.org.
Help!?
What can we use instead of a soft gymnastics mat if we can't find one?
If you don't have a soft gymnastics mat, practice on a carpeted floor with a thick folded yoga mat or two folded blankets topped by a spare yoga mat and always keep the coach or trained spotter next to the mat as instructed.
What should I do if I keep tipping onto my neck or can't push fully through my shoulders during the back handspring attempts?
If you tip onto your neck or can't push through your shoulders, return to the 'hold a hollow body' and '3 sets of 10 glute bridges' steps, repeat the 'bridge kickover with your spotter holding your hips,' and have the spotter give more shoulder-guiding assistance while you focus on pushing through your shoulders.
How can this activity be changed for younger children or older teens?
For younger kids reduce repetitions (fewer jump-backs and only 1–2 assisted back handspring tries), keep the spotter close during every step like 'spotter holding your hips' and focus on bridge/kickovers, while older teens can increase warm-up cardio, lengthen hollow-body holds, and do more assisted attempts before trying unassisted.
How can we extend or personalize the practice once the child can do assisted back handsprings?
Use the 'take photos or a short video with your coach' step to record attempts and review slow-motion to refine the shoulder push and leg snap, keep a progress chart tracking reduced spotter assistance from 'holding hips' to light guidance, and set a goal to safely attempt an unassisted back handspring.
Watch videos on how to do a back handspring
BACK HANDSPRING TUTORIAL : Simple Step-by-Step Guide
4 Videos
BACK HANDSPRING TUTORIAL : Simple Step-by-Step Guide
How to do a Back Handspring with Drills That Actually Work
Master the Back Handspring step-by-step tutorial #backhandspringtutorial
How to Do a Back Handspring Tutorial - Beginner Safe
Facts about gymnastics for kids
🤸 Back handsprings are a common tumbling skill used in gymnastics, cheerleading, and parkour.
💪 Strong shoulders, wrists, core, and legs are key—push-ups, hollow holds, and squats help build the power you need.
🧗 Progressive drills like bridge kickovers and wall handstands break the move into safer steps for steady learning.
🛡️ Always practice on soft mats with a trained coach or spotter—supervision and proper spotting greatly reduce injury risk.
🧠 Visualizing the move and rehearsing parts slowly builds confidence and often helps kids learn flips faster than full attempts.
How do I teach my child to do a back handspring safely?
What materials and equipment do I need to practice a back handspring at home or in class?
What ages or skill levels are suitable for learning a back handspring?
What are the safety tips and benefits of learning a back handspring?
