How to draw a football - a free football drawing guide
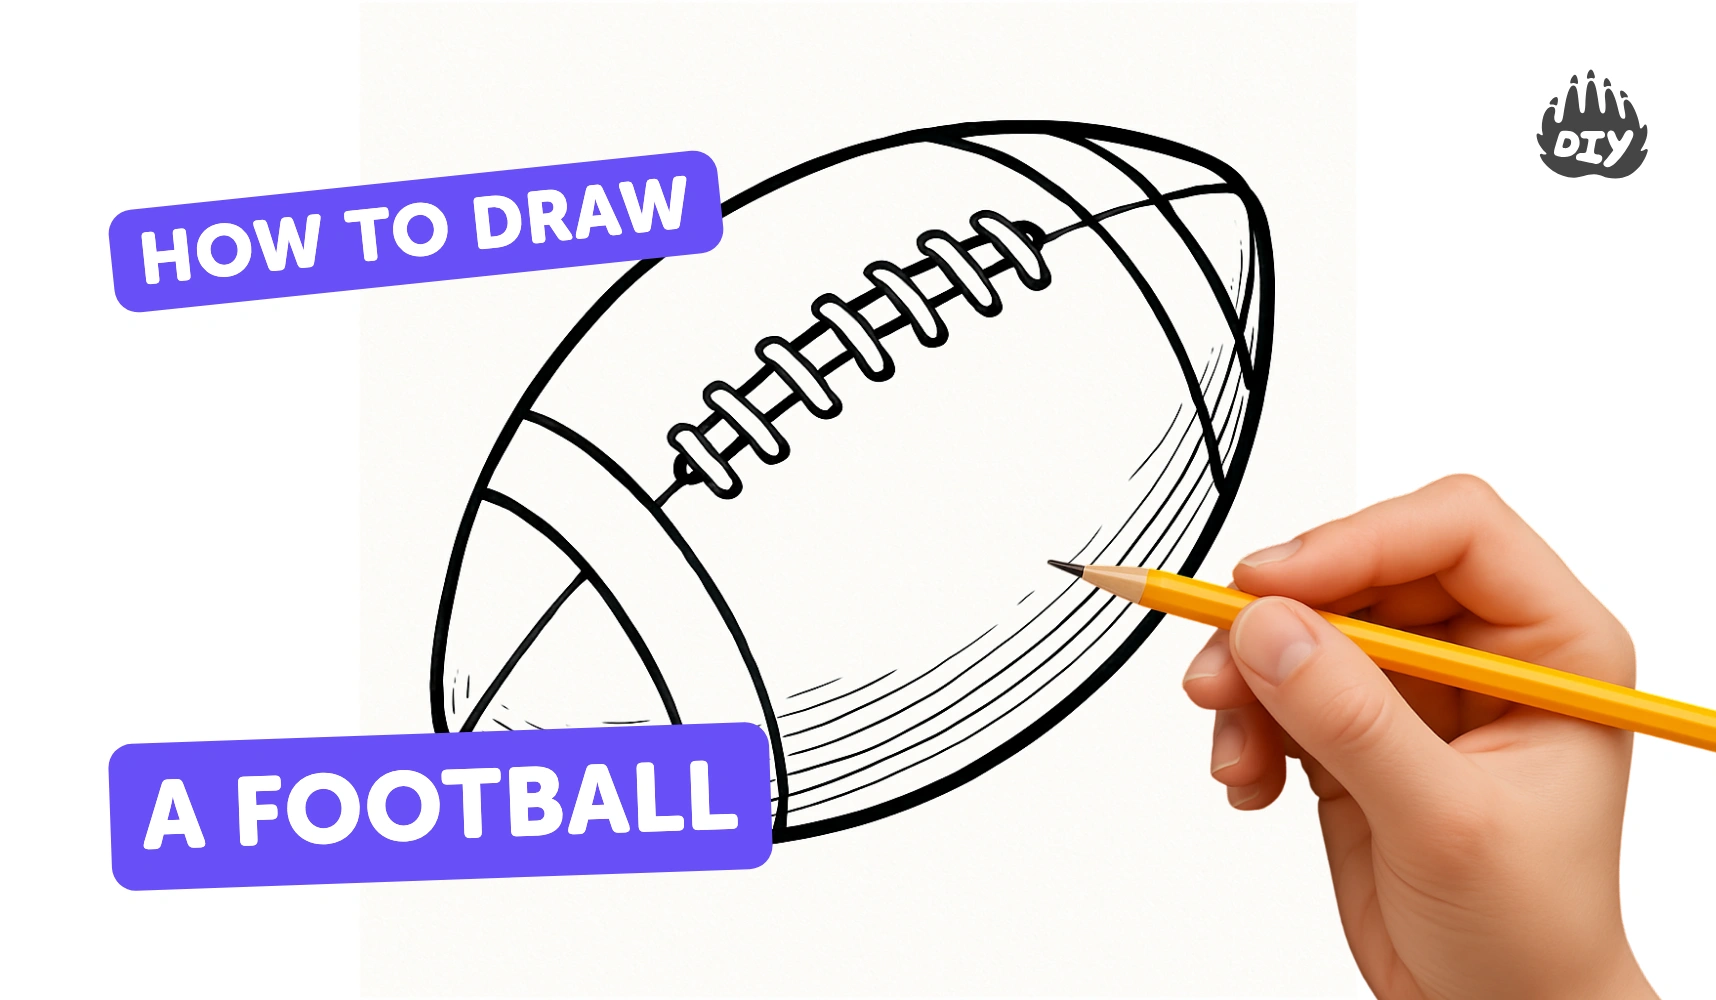
Draw a realistic football by sketching an oval, adding panels, laces, shading, and texture. Practice proportion, symmetry, and shading techniques.

Drawing Apps
Get inspired with these


Instructions
How to Draw a FOOTBALL PLAYER | Easy Step-by-Step for Kids
Step 1
Collect the materials listed.
Step 2
Draw a very light horizontal guideline across the center of your paper.
Step 3
Sketch a long light oval centered on the guideline to make the football's body.
Step 4
Make both ends of the oval slightly pointed by drawing gentle curves that meet at each tip.
Step 5
Erase any extra construction lines outside the football outline so the shape looks clean.
Step 6
Draw a long curved seam line down the middle following the oval's curve.
Step 7
Add two curved panel lines parallel to the seam about a finger's width away on each side.
Step 8
Mark the lace area by sketching a narrow elongated oval or rectangle across the seam near the center.
Step 9
Draw short evenly spaced perpendicular stitches across the lace area to make the laces.
Step 10
Add small stitching marks along the panel edges where the panels meet.
Step 11
Lightly shade the side of the football opposite the light source with soft pencil strokes to create the main shadow.
Step 12
Darken the lower curved edge and the tips with heavier pencil strokes to deepen the shadow.
Step 13
Blend the shaded areas gently with a tissue or blending stump to smooth the tones.
Step 14
Share a photo of your finished football drawing on DIY.org.
Help!?
What can we use if we don’t have a blending stump or tissue to smooth the shading?
Use a clean cotton swab, your fingertip, or a folded coffee filter to gently blend the shaded areas in the step "Blend the shaded areas gently with a tissue or blending stump to smooth the tones."
My football looks uneven or lopsided—what step can fix that?
Redraw the very light horizontal guideline and lightly adjust the "Sketch a long light oval centered on the guideline" so both pointed ends match, then erase extra construction lines as directed to keep the shape clean.
How can I adapt this activity for younger or older kids?
For younger kids, use a printed oval template to trace the "Sketch a long light oval" and skip detailed stitches, while older kids can add leather texture, stronger shading on "Darken the lower curved edge and the tips," and highlights for realism.
How can we extend or personalize the finished football drawing?
After erasing construction lines and adding laces, personalize the drawing by sketching a team logo on a panel, coloring the ball with brown colored pencil and white gel pen for laces, or adding a cast shadow to suggest motion before sharing on DIY.org.
Related videos
How To Draw A Football Player
4 Videos
How To Draw A Football Player
How To Draw A Football Player
How to draw a Football step by step (very easy) || Art video
How to Draw a Football Step by Step | Football Drawing Mastery in 3 Easy Steps
Fun Facts
🏈 A football’s shape is a prolate spheroid — an elongated sphere — which helps it travel far when thrown as a spiral.
📏 An official NFL football is about 11 inches (28 cm) long and roughly 22 inches (56 cm) in circumference at its widest point.
🐄 Professional footballs are traditionally made from cowhide leather and are often hand-stitched for consistency and grip.
🪢 The laces aren’t just decoration — quarterbacks use them for finger placement to throw a tight, accurate spiral.
🎨 Chiaroscuro is the art term for light-and-shadow techniques; adding highlights, midtones, and cast shadows makes a drawn football look 3D.
How do I teach my child to draw a realistic football?
What materials do I need to draw a football with my child?
What ages is drawing a realistic football suitable for?
What are the benefits of drawing a football with kids?
