Write the last half of your comic story
Write and illustrate the second half of a short comic story, continuing characters and plot while practicing storytelling, sequencing, and simple drawing techniques.

Step-by-step guide to write the last half of your comic story
Step 1
Gather your materials and find a quiet spot to work.
Step 2
Read the first half of your comic carefully to remember the characters and what just happened.
Step 3
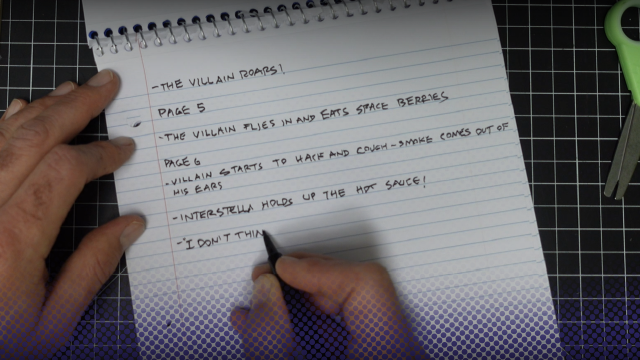
Write one short sentence that says what the main problem or goal is at the start of the second half.
Step 4
Decide how you want the story to end by choosing one goal or outcome for the characters.
Step 5
Use your ruler or pencil to draw six boxes on a new page to make six comic panels for the second half.
Step 6
Write one short sentence under each panel box describing what will happen in that panel from left to right.
Step 7
Lightly sketch each panel in pencil showing characters and the main actions you wrote for each panel.
Step 8
Add clear facial expressions and one important prop in each sketch so the story emotion and action are easy to read.
Step 9
Trace your pencil lines with a black marker to make the final comic art bold and clear.
Step 10
Wait for the ink to dry and then erase any pencil lines with your eraser.
Step 11
Draw speech bubbles and write your characters’ words neatly inside each bubble.
Step 12
Color your panels using your colouring materials to make the scenes bright and easy to follow.
Step 13
Add a short final caption or title in the last panel that shows how the story’s problem was solved or changed.
Step 14
Take a picture or scan your finished comic and share your creation on DIY.org.
Help!?
What can we use if we don't have a ruler, black marker, or scanner?
Use a straight edge like a hardcover book or cereal box to draw the six boxes, trace your pencil lines with a fine-tip black pen if you don't have a marker, and photograph the finished comic with a smartphone instead of scanning to share on DIY.org.
My ink smudged and the pencil lines smeared when I tried to erase—what should I do?
To avoid smudging after you 'trace your pencil lines with a black marker,' test the marker on scrap paper, let the ink dry fully longer than you think before you 'erase any pencil lines,' and use a soft eraser with gentle strokes.
How can I adapt this comic activity for younger or older kids?
For younger kids, simplify by drawing three big panels instead of six and letting them use stickers for the 'one important prop,' while older kids can add extra panels, more dialogue in the 'speech bubbles,' and detailed backgrounds during the 'lightly sketch each panel' step.
What are some ways to enhance or personalize our finished comic?
Add custom sound-effect lettering and unique props when you 'add clear facial expressions and one important prop,' create a colored cover or alt ending in the final caption, and upload behind-the-scenes photos alongside your final image when you 'share your creation on DIY.org.'
Watch videos on how to write the last half of your comic story
How to Make Your Own Comic | Toontorial | @cartoonnetworkuk
4 Videos
How to Make Your Own Comic | Toontorial | @cartoonnetworkuk
Making Comics Is Easy, Actually
How To BRAINSTORM Story Ideas For Your Comics, Manga, & Webtoons?
How to Create Exciting Comics with Ai! - Complete Tutorial
Facts about comic storytelling for kids
🖋️ The Yellow Kid, an 1890s cartoon character, is often called one of the first American comic strip stars.
📚 Will Eisner's book 'Comics and Sequential Art' helped teachers and creators think of comics as a serious storytelling craft.
🎨 Comic panels act like picture-frames for action — the 9-panel grid became famous for tight pacing (used in Watchmen).
💬 Speech balloons and captions guide readers through dialogue and thought — changing their shape or font can change the mood.
🎬 Storyboards are basically comics for movies: animators and directors sketch scenes first to plan camera moves and timing.
How do I guide my child to write and illustrate the second half of a comic story?
What materials do I need to write and illustrate the second half of a short comic?
What ages is this comic continuation activity suitable for?
What are the benefits and fun variations for having a child continue a comic story?
