Write a choose your own adventure
Write and illustrate a short choose-your-own-adventure story with branching choices, plan story paths, test endings, and share it with friends.


Step-by-step guide to write and illustrate a choose-your-own-adventure story
How to Create a Choose Your Own Adventure Story using Google Slides
Step 1
Gather your paper pencil eraser colouring materials sticky notes and ruler and put them on a clean table.
Step 2
Pick a main character and a setting and write one short sentence that describes each.
Step 3
Decide what your character wants most and write one sentence that explains their goal.
Step 4
List 4 to 6 key events that move the story from the start toward the goal on separate sticky notes.
Step 5
Add at least two different choices to two of the key events by writing each choice on its own sticky note.
Step 6
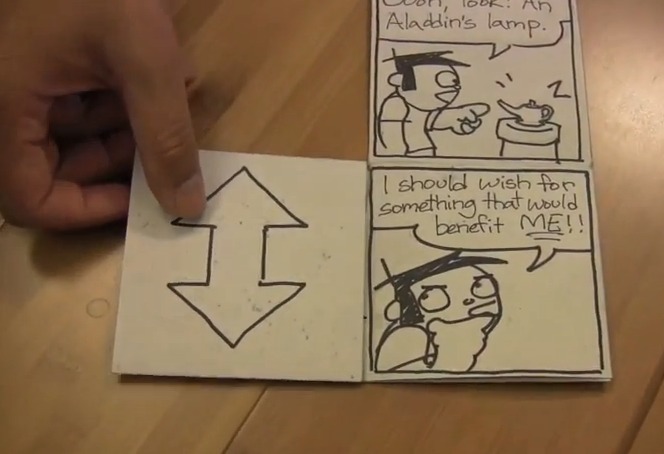
Arrange the sticky notes on the table and draw arrows with your pencil or ruler to show where each choice leads.
Step 7
Write a short scene draft for each event using one to three sentences on a scrap of paper.
Step 8
Playtest your story by choosing different options and reading each path from start to finish at least three times.
Step 9
Fix any confusing parts or dead ends by rewriting the short scenes that need clearer outcomes.
Step 10
Create simple drawings for at least four important scenes and add a one-sentence caption under each drawing.
Step 11
Make a neat final copy of your finished story on clean paper and glue or redraw your final illustrations beside the matching scenes.
Step 12
Share your finished choose-your-own-adventure on DIY.org.
Help!?
What can we use if we don't have sticky notes or a ruler?
Use index cards or cut squares of paper taped to the table in place of sticky notes and a straight edge like a book, the edge of a cereal box, or the long side of a ruler from another kit to draw arrows and arrange events.
What should we do if the story gets confusing or has dead ends during playtesting?
During playtesting, mark confusing or dead-end paths, then follow the instruction to fix any confusing parts by rewriting the short scene drafts on scrap paper and adding or moving sticky-note choices and arrows until each path reads clearly from start to finish.
How can we adapt this activity for different ages?
For younger kids (ages 4–7) use 3 simple key events on sticky notes, mostly drawings with one-sentence captions and adult help arranging arrows, while older kids (10+) can list 4–6 events, add two choices to two events, write 1–3 sentence scene drafts, and make a neat final copy to share on DIY.org.
How can we make the choose-your-own-adventure more special or advanced?
Enhance the project by color-coding sticky-note events with your colouring materials, creating at least four detailed drawings with one-sentence captions and gluing them beside matching scenes in the neat final copy, and optionally recording a read-aloud to upload to DIY.org.
Watch videos on how to write and illustrate a choose-your-own-adventure story
Choose-Your-Own-Adventure Books! | Storytelling and Roleplaying | Secular Homeschool Resources
4 Videos
Choose-Your-Own-Adventure Books! | Storytelling and Roleplaying | Secular Homeschool Resources
Teach Your Students to Write a Choose Your Own Adventure Story with Google Forms | On Edge
Choose Your Own Adventure - Writing

Video tutorial: How to make 'Choose your own' adventure stories using Google Slides.
Facts about creative writing for kids
📚 The first Choose Your Own Adventure book, The Cave of Time, was published in 1979.
🎮 One of the earliest popular interactive fiction games was Colossal Cave Adventure (1976), which helped spark text-based storytelling games.
🌳 With just ten yes/no choices you could design 1,024 different possible endings—branching adds up really fast!
🃏 Many writers plan branching stories with index cards or flowcharts so they can move scenes around like puzzle pieces.
✏️ Simple spot illustrations in gamebooks can give players clues and make each choice feel more exciting.
How do you create a choose-your-own-adventure story with branching choices and endings?
What materials do I need to write and illustrate a short choose-your-own-adventure?
What ages is writing and illustrating a choose-your-own-adventure suitable for?
What are the benefits, variations, and safety tips for this choose-your-own-adventure activity?


