Use a catapult to launch at a target
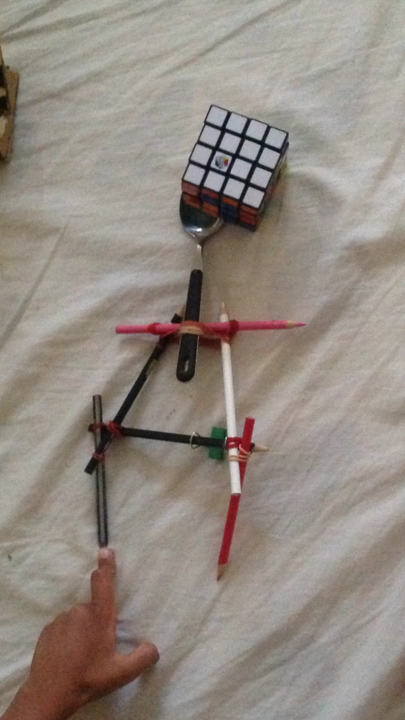
Build a small catapult from craft sticks, rubber bands, and a spoon, then launch soft projectiles at targets to test aim and adjustments.


Step-by-step guide to build and use a small catapult to launch at targets
How does a Catapult Work|Science behind working of Catapult|Twinkle Think|
Step 1
Gather all materials and clear a flat table to work on.
Step 2
Stack four craft sticks into a neat pile.
Step 3
Wrap a rubber band tightly around one end of the stacked sticks.
Step 4
Wrap a second rubber band tightly around the other end of the stacked sticks.
Step 5
Lay a single craft stick across the top of the stack so one end sticks out more to form the launch arm.
Step 6
Loop a rubber band around the stack and the arm where they meet to make a pivot point.
Step 7
Fasten the plastic spoon to the long overhanging end of the arm with a rubber band or a small piece of tape.
Step 8
Slide another craft stick under the arm near the short end to act as a stopper so the arm can push off safely.
Step 9
Place one soft projectile into the spoon cup.
Step 10
Set a paper cup or paper target on the floor about one arm's length away from the catapult.
Step 11
Pull the spoon back gently and let go to launch the projectile at the target.
Step 12
If the shot missed, slide the stopper craft stick one centimeter closer to the base to lower the launch arc.
Step 13
Add one more rubber band around the arm pivot to increase launch strength if you want the projectile to go farther.
Step 14
Pull back and launch again to test your changes.
Step 15
Take a photo or video and share your finished catapult creation and results on DIY.org.
Help!?
What can we use if we can't find craft sticks, rubber bands, or a plastic spoon?
If you don't have craft sticks use sturdy pencils or tongue depressors for the stack, substitute hair elastics or twist ties for the rubber bands when wrapping the ends, and replace the plastic spoon with a small disposable spoon or a folded bottle cap fastened to the arm.
The catapult arm isn't launching or the projectile keeps falling out—what should we check?
If the arm won't swing or the projectile falls out, check that the pivot loop around the stack and arm is tight (step where you loop a rubber band around the stack and arm) and either fasten the plastic spoon more securely with tape as in the fastening step or add one more rubber band around the arm pivot as suggested later.
How can we adapt this activity for different ages?
For preschoolers have an adult do the tight rubber-band wrapping in steps that secure the stacked sticks and fasten the spoon with tape while using larger soft projectiles and a close paper target, and for older kids let them move the stopper craft stick by 1 centimeter increments and add extra pivot rubber bands to experiment with range (steps about the stopper and adding a rubber band).
How can we improve or personalize our catapult and make the challenge more advanced?
To extend the activity decorate and label the craft sticks, mark multiple stopper positions to test how each 1 cm change in step 11 affects accuracy, try adding extra rubber bands around the arm pivot per step 13 to measure increased distance, and set up a scoring target before taking a photo or video to share on DIY.org.
Watch videos on how to build and use a small catapult to launch at targets
Danger Zone - Flight Operations 101: Catapult Hook-Up & Launch
4 Videos

Danger Zone - Flight Operations 101: Catapult Hook-Up & Launch
Catapult - 'How To'
Catapult Launch - The Story Behind "The Bridle" and "Bridle Catchers"

The Best Catapult Launch Angle: Is 45 Degrees Always Optimal?
Facts about simple machines and basic physics
🏰 Medieval catapults could launch huge stones that helped break castle walls during sieges.
🎯 In ideal conditions (no air resistance), a 45° launch angle gives the farthest range — try testing different angles!
⚙️ A catapult is basically a lever: a pivot, an arm (your craft sticks), and a force (your rubber bands) all work together.
🧶 Rubber bands store elastic potential energy — the tighter or more stretched, the more energy you can release.
🧸 Soft projectiles like cotton balls or pom-poms make launches safe and are great for practicing aim and adjustments.
How do I build and use a simple catapult to aim at targets?
What materials do I need for a kid-friendly craft stick catapult?
What ages is this catapult activity suitable for?
What safety tips should I follow when doing catapult target practice?
