Try the Moon Puzzle!
Build a Moon phases puzzle from cardboard, paint, and labels, then assemble pieces to identify and learn each phase's name and order.


Step-by-step guide to build a moon phases puzzle
Step 1
Clear a workspace and gather all your Materials Needed so everything is within reach.
Step 2
Use the round object or compass and pencil to trace eight equal circles onto the cardboard.
Step 3
Cut out the eight cardboard circles carefully with scissors.
Step 4
Paint every circle with a light moon color and let them dry.
Step 5
Paint one circle completely light to make the Full Moon and let it dry.
Step 6
Paint one circle completely dark to make the New Moon and let it dry.
Step 7
Paint one circle half light on the right and half dark on the left to make the First Quarter and let it dry.
Step 8
Paint one circle half light on the left and half dark on the right to make the Last Quarter and let it dry.
Step 9
Paint one circle mostly light with a small dark curve on the left to make the Waxing Gibbous and let it dry.
Step 10
Paint one circle mostly light with a small dark curve on the right to make the Waning Gibbous and let it dry.
Step 11
Paint one circle mostly dark with a thin bright sliver on the right to make the Waxing Crescent and let it dry.
Step 12
Paint one circle mostly dark with a thin bright sliver on the left to make the Waning Crescent and let it dry.
Step 13
Use the black marker and labels or small paper and tape to write each phase name on the matching circle.
Step 14
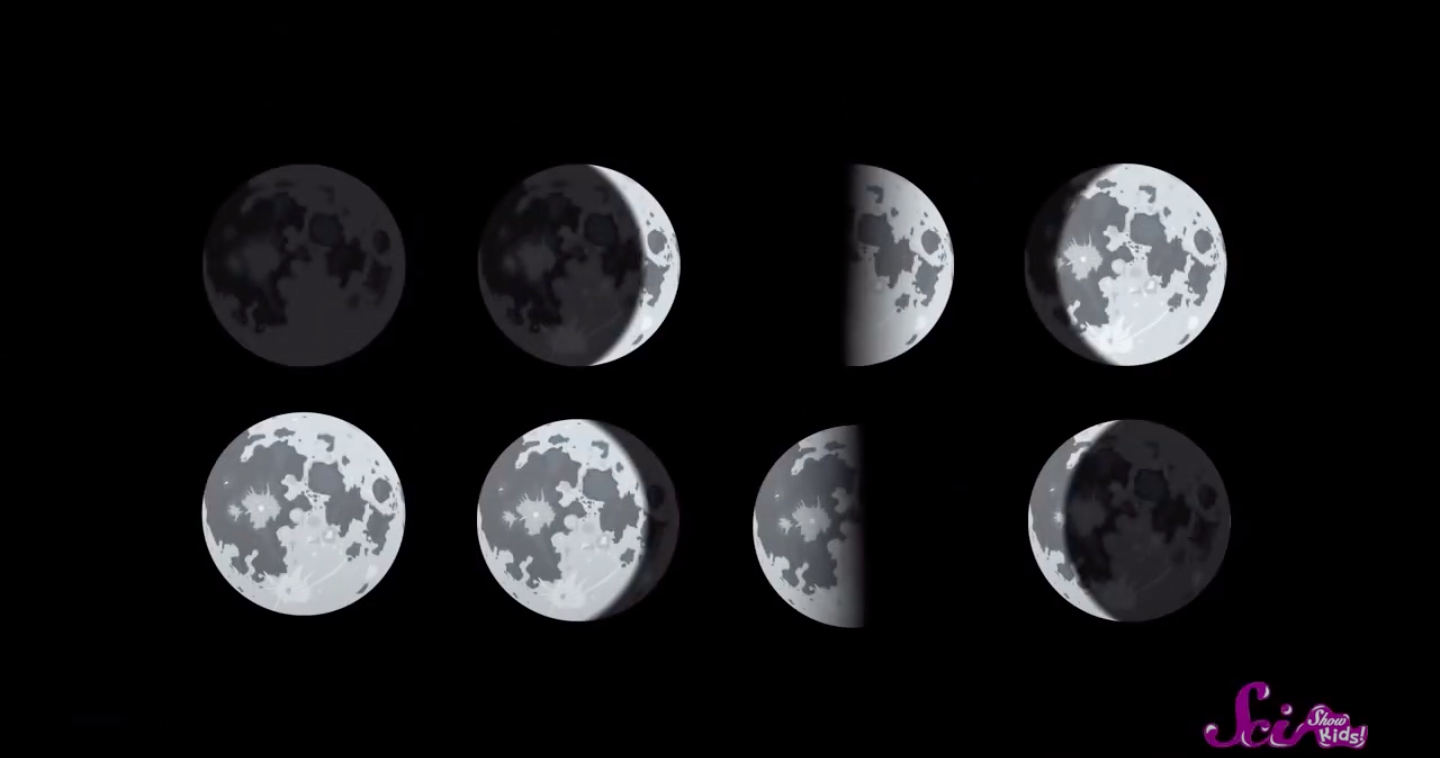
Mix the pieces and then arrange them in the correct lunar cycle order starting with New Moon then Waxing Crescent First Quarter Waxing Gibbous Full Moon Waning Gibbous Last Quarter Waning Crescent.
Step 15
Share your finished Moon phases puzzle on DIY.org.
Final steps
You're almost there! Complete all the steps, bring your creation to life, post it, and conquer the challenge!

Help!?
I don't have cardboard, a compass, or paint — what can I use instead?
Trace eight circles on thick paper or a flattened cereal box using a coin or jar lid instead of a compass, cut them out, and color the phases with crayons, colored pencils, or markers while using stickers or a pen for labels instead of paint and tape.
My circles tear or the paint smudges — how can I avoid mess and make the thin crescent shapes accurately?
Prevent tearing by tracing carefully and cutting slowly or asking an adult to cut, let each painted circle dry flat before handling, and use a small brush or cotton swab to paint the thin waxing and waning slivers precisely.
How can I change the activity for younger kids or make it more challenging for older kids?
For younger children have an adult pre-cut the eight cardboard circles and use sticker halves or pre-painted pieces to match simple Full and New labels, while older kids can add realistic shading to each phase, write dates or facts on the back, or build a larger display showing the full lunar cycle order.
What are fun ways to extend or personalize my Moon Puzzle after I finish it?
Glue the painted circles in a ring on poster board or attach Velcro to make a reusable puzzle, add glow-in-the-dark paint for nighttime display, and personalize by writing moon facts or your name with the black marker before sharing on DIY.org.
Watch videos on how to build a moon phases puzzle
See How I Solve The Moon Puzzle Game - Brain Puzzle
3 Videos
See How I Solve The Moon Puzzle Game - Brain Puzzle
Path to the Moon Puzzle 🌝 PUZZLES FOR KIDS | Lingokids Games
Assembling a Moon Puzzle
Facts about astronomy for kids
⏳ The full cycle of Moon phases takes about 29.5 days — that’s one synodic month.
🌕 Full Moon: the Moon is opposite the Sun and its whole face looks bright from Earth.
🌞 Moon phases happen because sunlight lights different parts of the Moon — not because of Earth’s shadow (that’s an eclipse).
🌑 New Moon: when the Moon sits between Earth and the Sun, the lit side faces away so we can’t see it.
🌓 Quarter moons look like a half-circle but are called “quarter” because they’re a quarter of the way through the cycle.
How do you make the Moon phases puzzle?
What materials do I need for the Moon Puzzle activity?
What ages is the Moon Puzzle suitable for?
What are the learning benefits of making a Moon phases puzzle?


One subscription, many ways to play and learn.
Only $6.99 after trial. No credit card required