The Snowflake Challenge!
Fold and cut paper snowflakes to explore symmetry, patterns, and creativity; compare designs, measure angles, and decorate a winter display.


Step-by-step guide to make paper snowflakes (The Snowflake Challenge)
Step 1
Gather all the materials listed and find a clear table to work on.
Step 2
Fold one sheet by bringing one corner to the opposite long edge and crease to mark a square.
Step 3
Cut along the crease to remove the extra rectangle and make a perfect square.
Step 4
Fold the square diagonally from one corner to the opposite corner and crease to make a triangle.
Step 5
Fold the triangle in half and crease to make a smaller triangle.
Step 6
Fold the smaller triangle in half again and crease so you have a layered triangle with eight paper layers.
Step 7
Use your pencil to draw small shapes and lines along the two open edges of the folded triangle where you will cut.
Step 8
Cut out the pencil shapes carefully with scissors while keeping your fingers away from the blade.
Step 9
Unfold the paper slowly to reveal your first snowflake design.
Step 10
Make a second snowflake by repeating the folding and cutting steps but drawing different shapes before you cut.
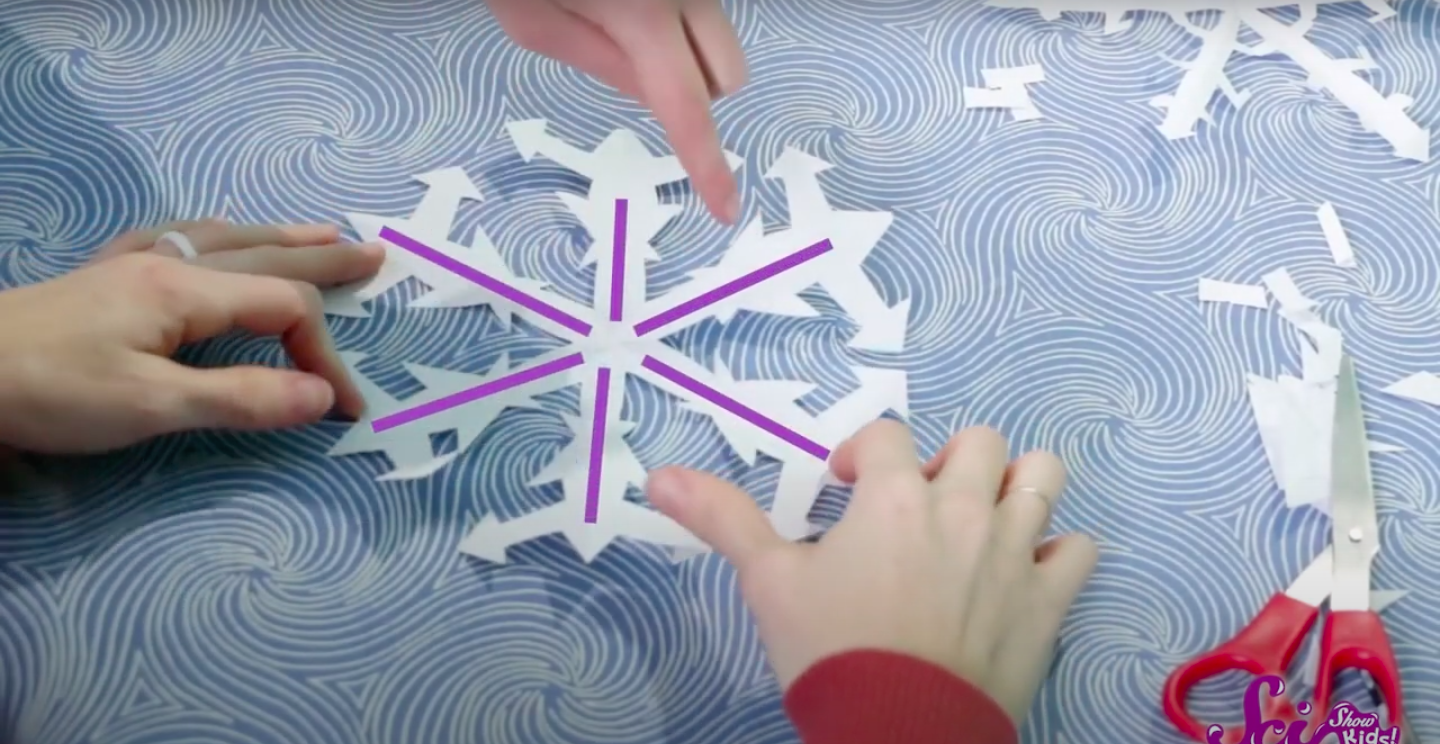
Step 11
Use your ruler and protractor to measure and write down the angles between the main points of each snowflake.
Step 12
Place the two snowflakes side by side and compare their patterns and symmetry to spot similarities and differences.
Step 13
Decorate your favorite snowflake with coloring materials or glitter glue to add winter sparkle.
Step 14
Attach tape or string to your snowflakes and hang them in a window or on a wall to make a winter display.
Step 15
Share your finished snowflake creations on DIY.org.
Final steps
You're almost there! Complete all the steps, bring your creation to life, post it, and conquer the challenge!

Help!?
What can we use instead of a protractor or glitter glue if we don't have them?
If you don't have a protractor, print a paper protractor or use the ruler plus the triangle folding creases from Steps 3–6 to estimate angles for Step 11, and for glitter glue in Step 13 use regular glue with loose glitter or coloring markers instead.
What should we do if the paper tears or the folds slip when cutting the folded triangle?
If layers shift or tear during the cutting in Step 7, re-crease the diagonal and subsequent folds from Steps 3–6, hold the stack firmly near the point or secure with a paperclip, and cut slowly with sharp or safety scissors to avoid jagged edges when you unfold in Step 9.
How can I adapt the challenge for younger or older kids?
For younger children, pre-fold the square to the layered triangle (Steps 2–6) and let them draw and cut large simple shapes with blunt safety scissors under supervision, while older kids can create intricate edge patterns, use the ruler and protractor in Step 11 to record precise angles, and compare symmetry in Step 12.
How can we extend or personalize our snowflake display beyond hanging them in a window?
Extend the activity by making snowflakes in different sizes and colored papers (Steps 1–10), laminating or reinforcing them with clear tape for durability, arranging them by measured angles and symmetry from Step 11, and attaching string plus LED fairy lights to create a layered mobile or illuminated winter display (Step 14).
Watch videos on how to make paper snowflakes (The Snowflake Challenge)
Blippi's Christmas Special: Snowflake Scavenger Hunt! | Educational Videos for Kids
4 Videos

Blippi's Christmas Special: Snowflake Scavenger Hunt! | Educational Videos for Kids
How To Do A Basic Snowflake Drawing
How To Make A Snowflake Easy Origami Tutorial Step By Step Bookmarks | スノーフレークの折り紙 簡単な作り方
ACTIVITIES CORNER: Snowflakes | Britannica Kids
Facts about paper folding and symmetry for kids
✂️ Folding a circle of paper into sixths (60° wedges) makes six-fold symmetry, which matches the hexagonal symmetry of most snow crystals.
❄️ Scientists have never documented two identical natural snow crystals — each one grows uniquely as it falls through changing air conditions.
🧊 Every snow crystal starts on a microscopic particle and grows as water vapor freezes onto it, so even tiny changes in temperature alter the design.
🎨 Repeating simple cuts can create intricate, repeating patterns that look like tiny fractals — a great way to explore pattern and scale.
🧭 You can measure the angles in your unfolded paper snowflake with a protractor — many arms meet at 60° or multiples of 60° in hexagonal designs.
How do you do The Snowflake Challenge?
What materials do I need for The Snowflake Challenge?
What ages is The Snowflake Challenge suitable for?
What are the benefits of doing The Snowflake Challenge?


One subscription, many ways to play and learn.
Only $6.99 after trial. No credit card required