Take a photo of the horizon at sunset
Take a safe sunset photo of the horizon using a camera or phone, practice framing, steady hands, and notice colors changing as light fades.


Step-by-step guide to take a safe sunset photo of the horizon
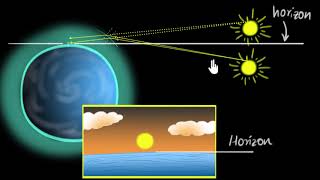
Does the sun always rise in the east?
Step 1
Choose a safe open spot with a clear view of the horizon and no tall buildings or trees blocking the sunset.
Step 2
Look up today’s sunset time on a clock or phone so you know when to be ready.
Step 3
Collect your camera or phone and have it near you.
Step 4
Put on your jacket or grab your blanket so you stay comfy while you wait.
Step 5
Walk to your chosen spot slowly and carefully.
Step 6
Set up your tripod or place your phone on the stack of books so it sits steady.
Step 7
Frame the shot by placing the horizon on the upper third or lower third of the screen for a cool composition.
Step 8
Brace your arms against your body or rest them on something solid to keep the camera steady.
Step 9
Tap the screen to focus on the horizon so the sky and sunset look sharp.
Step 10
Take a photo now and then take another photo every 2–3 minutes for about 10 minutes to capture how the colors change.
Step 11
Look through your photos and pick your favorite picture that shows the sunset best.
Step 12
Share your finished sunset horizon photo on DIY.org
Help!?
What can we use instead of a tripod if we don't have one?
If you don't have a tripod, use the stack of books, a folded jacket or blanket, a heavy water bottle, or a stable wall as a steady base for your phone as described in the 'set up your tripod or place your phone on the stack of books' step.
My sunset photos come out blurry—what should we check or change?
If photos are blurry, follow the instructions to brace your arms against your body or rest the camera on the books/tripod, tap the screen to focus on the horizon, and use a 2–3 second timer or burst mode to avoid movement when you press the shutter.
How can we change the activity for a preschooler versus a teen?
For preschoolers, an adult should pick a safe open spot and hold the phone while the child taps the screen and presses the shutter, whereas teens can set up the tripod, frame the horizon on the upper or lower third themselves, and take photos every 2–3 minutes for about 10 minutes.
How can we make the sunset activity more creative or longer-lasting?
Extend the activity by using the series of photos taken every 2–3 minutes to make a time-lapse or GIF, add a silhouette foreground during one shot, and edit favorite images before sharing your finished sunset horizon photo on DIY.org.
Watch videos on how to take a safe sunset photo of the horizon
TIME LAPSE :: Beautiful Ocean Sunrises & Sunsets (1080p FULL HD)
4 Videos

TIME LAPSE :: Beautiful Ocean Sunrises & Sunsets (1080p FULL HD)

Why Sun Appears Red During Sunrise and Sunset

These EASY Sunrise Tips Will Change EVERYTHING | Beginner Landscape Photography Tutorial
Advanced sunrise & delayed sunset
Facts about photography for kids
🌅 Sunsets look red and orange because the atmosphere scatters blue light so the longer red and orange wavelengths reach your eyes.
📷 The "golden hour"—roughly the hour after sunrise and the hour before sunset—gives soft, warm light that makes photos glow.
🎯 Placing the horizon on the top or bottom third of a picture (the rule of thirds) usually makes landscape photos more balanced and interesting.
🤳 Many phones use computational photography to blend several images into one brighter, sharper sunset photo.
🧘 When light fades cameras use slower shutter speeds—steady hands, tucked elbows, or a small tripod help keep sunset shots from blurring.
How do I help my child take a safe sunset photo of the horizon?
What materials do I need to take a sunset horizon photo with a child?
What ages is taking sunset horizon photos suitable for?
What are the benefits of taking sunset horizon photos with children?
