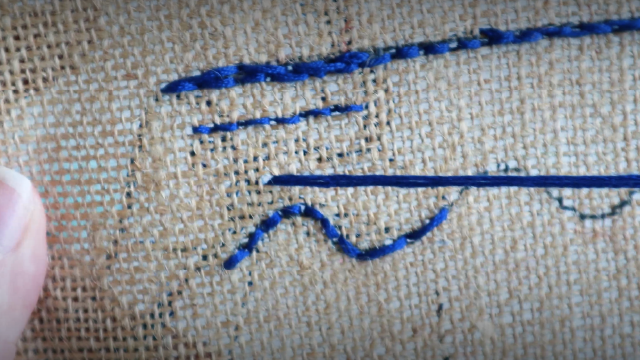
Stitch lines of different thickness'
Sew sample fabric strips showing lines of different thickness using various threads and stitch types, practicing hand-stitching and comparing textures and visual effects.


Step-by-step guide to stitch lines of different thickness
Step 1
Lay one fabric strip flat on a clean table and smooth out any wrinkles so it’s ready to sew.
Step 2
Place the fabric strip inside the embroidery hoop so the area you want to stitch sits over the hole.
Step 3
Tighten the hoop screw so the fabric is pulled taut like a drumhead.
Step 4
Use the ruler and fabric marker to draw two straight parallel lines across the fabric about 1–1.5 cm apart.
Step 5
Cut a 50 cm length of thin sewing thread with the scissors.
Step 6
Thread the thin sewing thread through the needle eye.
Step 7
Tie a small knot at the end of the thin thread so your stitches won’t pull out.
Step 8
Sew a neat running stitch along the top drawn line from one end to the other.
Step 9
Make a small knot to secure the thin thread at the back and trim the extra tail with scissors.
Step 10
Cut a 100 cm length of thick yarn with the scissors.
Step 11
Thread the thick yarn through the needle eye so you can stitch the thicker line.
Step 12
Tie a small knot at the end of the yarn to anchor your stitches.
Step 13
Fill the bottom drawn line with satin stitches (small close stitches side by side) to make a thick solid textured line.
Step 14
Secure the yarn with a knot at the back and trim the excess yarn with scissors.
Step 15
Take a photo or write about your stitched fabric showing the thin and thick lines and share your finished creation on DIY.org.
Help!?
What can we use instead of an embroidery hoop or fabric marker if we don’t have them?
If you don’t have an embroidery hoop, stretch and tape the fabric over a small picture frame or make two stacked cardboard rings to mimic the hoop and use tailor’s chalk or a pencil instead of the fabric marker to draw the parallel lines for the 'Place the fabric strip inside the embroidery hoop' and marking steps.
My satin stitches look uneven or the fabric puckers — what should I check or fix?
Check that the fabric is pulled taut by retightening the hoop screw so it’s 'pulled taut like a drumhead,' use shorter lengths of thick yarn to avoid tangling, and make smaller, closer satin stitches as you 'Fill the bottom drawn line with satin stitches' to prevent puckering.
How can I adapt this stitching activity for younger children or older kids?
For younger children use a blunt plastic needle, thicker yarn, pre-drawn wider lines (2–3 cm) and focus on the 'Sew a neat running stitch' step, while older kids can work with fine thin sewing thread, tighter 1–1.5 cm lines, and try more complex satin-fill textures with the 100 cm yarn.
What are some ways to personalize or extend the stitched fabric project after finishing the two lines?
Personalize by using multiple colors of thin sewing thread and thick yarn, add beads or sequins sewn along the satin stitch before you 'Secure the yarn with a knot at the back,' embroider a small motif or name around the lines, and then take a photo to share your finished creation on DIY.org.
Watch videos on how to stitch lines of different thickness
Learn to Sew with Debbie Shore, Kids! Lesson 1
4 Videos
Learn to Sew with Debbie Shore, Kids! Lesson 1
Learn to sew, Kids! Teach your children to sew with Debbie Shore
Basic Stitching For Kids
Sewing Tutorial-How to do a basic running stitch.
Facts about hand-sewing and embroidery
🧵 Most embroidery floss comes as six cotton strands you can split to make thinner or thicker lines.
📏 Threads are measured with units like denier or tex — higher numbers usually mean a thicker thread.
✨ A dense satin stitch makes a shiny, solid-looking line, while backstitch creates a thin, precise outline.
🇯🇵 Sashiko is a Japanese running-stitch tradition that makes bold textured lines and also strengthens fabric.
🔬 Needle size changes stitch appearance too — larger needles make bigger holes and can alter texture and thickness.
How do you do the activity of stitching lines of different thickness?
What materials do I need to stitch lines of different thickness?
What ages is this stitching activity suitable for?
What are the benefits of stitching lines of different thickness?
