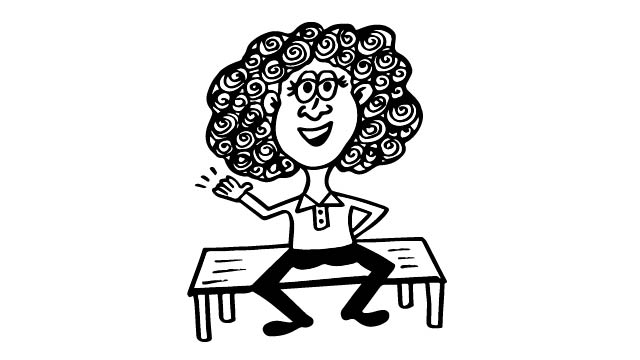
Sitting Cartoon
Draw and color a sitting cartoon character, then create a simple paper puppet to pose and experiment with posture, expression, and storytelling.


Step-by-step guide to draw and make a sitting cartoon character and paper puppet
Step 1
Gather all the materials you need for your sitting cartoon and keep them on your table.
Step 2
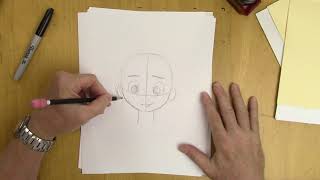
Lightly sketch the basic shapes of a sitting character using an oval for the head a shape for the torso and bent lines for the legs.
Step 3
Draw a simple face on the head with eyes a nose and a mouth to show your character's expression.
Step 4
Add clothes hair and small details like shoes or a hat to give your character personality.
Step 5
Trace over the sketch lines you like best with a darker pencil or marker to make the drawing clear.
Step 6
Color your sitting cartoon using your colouring materials.
Step 7
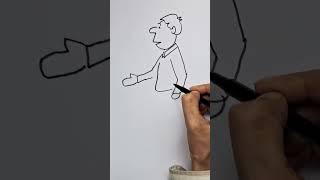
On a new sheet draw separate cut-out pieces for a puppet: a torso a head two arms and two legs.
Step 8
Color the cut-out puppet pieces so they match your sitting cartoon.
Step 9
Carefully cut out each puppet piece using scissors.
Step 10
Attach the head arms and legs to the torso using small strips of folded tape or glue so the parts can move.
Step 11
Pose your puppet in different sitting positions to explore posture and balance.
Step 12
Tilt or turn the puppet's head and move the arms to practice different facial expressions and body language.
Step 13
Use your puppet to act out a short story by moving it through a beginning middle and end.
Step 14
Share your finished sitting cartoon and puppet on DIY.org
Help!?
What can we use if we don't have a darker pencil or marker to trace the final lines?
Use a soft 2B pencil, dark crayon, or fine-tip pen to trace over the sketch lines when you don't have a darker pencil or marker.
My puppet limbs won't move smoothly or keep falling off — how can I fix that?
Make movable joints by replacing or reinforcing the small strips of folded tape with paper brads (split pins) through the head, arms, and legs into the torso or by putting folded tape on both front and back of each joint and trimming excess paper so the parts can move freely and stay attached.
How can this activity be adapted for different ages?
For preschoolers, pre-sketch the oval head and torso and pre-cut the puppet pieces so they just color and stick them with help; for elementary kids, let them sketch, cut, and add simple clothing and expressions; and for older kids, challenge them to add detailed hair, shading, brads for joints, and a longer beginning-middle-end puppet story.
How can we extend or personalize the sitting cartoon and puppet beyond the basic activity?
Personalize by gluing fabric scraps or yarn for hair when adding clothes and hair, give the puppet removable paper outfits, build a small cardboard chair to practice posture and balance, and film a stop-motion of the puppet acting out a longer beginning–middle–end story to share on DIY.org.
Watch videos on how to draw, color, and make a sitting cartoon paper puppet
Easy Pencil Drawings For Kids/ Cartoon Drawing Step by Step/ How to Draw Cartoon Characters
4 Videos

Easy Pencil Drawings For Kids/ Cartoon Drawing Step by Step/ How to Draw Cartoon Characters
How to Draw Children (Cartoons) - Easy to Follow Tutorial

How to draw Simple Cartoon Characters step by step for Beginners | Tips and Tricks
Draw a cartoon character easy for beginners
Facts about cartoon drawing and paper puppetry for kids
🎨 The word "cartoon" originally meant a full-size preparatory drawing for a painting or tapestry — not a funny picture!
⏱️ Artists often do super-quick 30-second gesture drawings to capture a pose's action and feeling.
✂️ Paper dolls were one of the first mass-produced children's toys in the 1800s and inspired lots of paper puppets.
🎭 Puppets have been used for storytelling for thousands of years, from ancient Egypt to modern stages.
👀 Cartoon characters often get big heads and eyes so feelings and expressions read instantly.
How do I do the Sitting Cartoon activity with my child?
What materials do I need for a Sitting Cartoon paper puppet activity?
What ages is the Sitting Cartoon activity suitable for?
What are the benefits of making Sitting Cartoon puppets?
