Show Your Restaurant on Scratch
Create an interactive Scratch project that showcases your restaurant, designing sprites, a digital menu, animations, and simple code to share your restaurant story.

Step-by-step guide to Show Your Restaurant on Scratch
Step 1
Open Scratch and start a new project.
Step 2
Pick a fun restaurant name and write it clearly on your paper.
Step 3
Sketch your restaurant layout on the paper so you know where tables counter and kitchen will go.
Step 4
Write three menu items and a one sentence description for each on your paper.
Step 5
In Scratch choose or draw a backdrop that looks like your restaurant interior.
Step 6
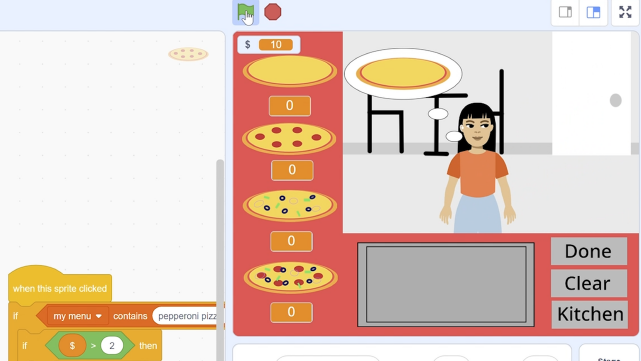
Create a new sprite for your restaurant owner or logo using the Paint Editor or by uploading an image.
Step 7
Create a food sprite for each menu item by painting or uploading pictures.
Step 8
Add at least two costumes to each food sprite so they can animate when switched.
Step 9
Add code to a food sprite so that when it is clicked it switches costumes to animate and says the item name and description.
Step 10
Make a menu sprite with buttons that broadcast messages when clicked to show the price or confirm an order.
Step 11
Add a sound to at least one sprite from the Sounds tab or by uploading a short audio clip.
Step 12
Click the green flag and test every button animation sound and broadcast to make sure they work.
Step 13
Create a title card or sprite that tells players how to use your restaurant project and add your name for credits.
Step 14
Save your Scratch project and write a short project description that tells your restaurant story and how to play.
Step 15
Share your finished restaurant project on DIY.org.
Final steps
You're almost there! Complete all the steps, bring your creation to life, post it, and conquer the challenge!

Help!?
What can we use if we don't have a camera, printer, or microphone to upload images or audio as in the instructions?
Use Scratch's Paint Editor to draw the owner and food sprites instead of uploading images, choose or record simple clips from the Sounds tab instead of uploading a short audio clip, and sketch your restaurant layout and menu on plain paper as the instructions suggest.
Why doesn't my food sprite animate or say its description when clicked and how do I fix it?
Make sure the food sprite actually has at least two costumes and that you attached a 'when this sprite clicked' block to a 'next costume' or 'switch costume to' block plus a 'say' block, and verify any menu button broadcasts match the 'when I receive' handlers you used.
How can I adapt the activity for younger children or make it more challenging for older kids?
For younger kids, simplify to one backdrop, two food sprites with pre-drawn costumes and large menu buttons with adult help in the Paint Editor, while older kids can add variables for prices, use lists or cloning to manage multiple orders, and create more complex broadcast scripts and a longer project description.
What are some easy ways to extend or personalize our Scratch restaurant project after the basic steps are done?
Add a price variable that updates when menu buttons broadcast an order, record a short owner greeting or jingle in the Sounds tab, create extra costumes for richer food animations, and write a fun title card story with your name before saving and sharing on DIY.org.
Watch videos on how to Show Your Restaurant on Scratch
Create your own BAKERY GAME in scratch! P.2 Add-ons!
4 Videos

Create your own BAKERY GAME in scratch! P.2 Add-ons!
EASY BEGINNER TUTORIAL: Make Your Own BAKERY GAME on Scratch!
How to make a Menu System In Scratch | Scratch Tutorial!
Scratch Basics - A Beginners Guide to Scratch
Facts about Scratch programming and digital storytelling
✨ Simple tricks like changing a sprite's costume, gliding, or broadcasting messages can create lively restaurant scenes without advanced code.
🖼️ A 'sprite' is a 2D graphic used in games; in Scratch, each sprite can have its own costumes and scripts to animate and react.
📋 Menus organize dishes by categories; in a Scratch project you can build a clickable digital menu that shows ingredients, prices, or triggers animations.
🎮 Scratch was created by the MIT Media Lab and lets kids make interactive stories, games, and animations by snapping code blocks together.
🍽️ The word 'restaurant' comes from the French for 'to restore'—early establishments sold restorative soups called 'restaurants'.
How do I create an interactive Scratch project to showcase my restaurant?
What materials do I need for a Scratch restaurant project?
What ages is the Scratch restaurant project suitable for?
What are the benefits of making a Scratch project that shows your restaurant?


One subscription, many ways to play and learn.
Only $6.99 after trial. No credit card required