Sew from a pattern
Use a simple paper pattern to cut fabric and sew a small drawstring bag, learning measuring, pinning, stitching, and following step-by-step instructions.


Step-by-step guide to sew a drawstring bag from a pattern
Learn to Sew with Debbie Shore, Kids! Lesson 1
Step 1
Clear a flat workspace and lay out all your materials so everything is easy to reach.
Step 2
Fold the fabric in half with the right sides facing each other and smooth out any wrinkles.
Step 3
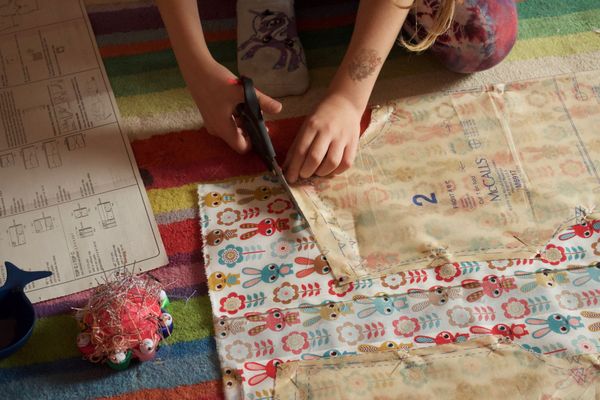
Place the paper pattern on the folded fabric and pin it through both layers so the pattern stays put.
Step 4
Trace around the pattern with the fabric marker and add a 1 cm seam allowance all the way around.
Step 5
Cut the fabric on the traced outer line through both layers to create your bag shape.
Step 6
Unpin the paper pattern and unfold the fabric so you have the cut rectangle with right sides together.
Step 7
Align the side edges and pin the sides 1 cm from the raw edge leaving the top 3 cm unpinned on both sides.
Step 8
Sew the two side seams with a 1 cm seam allowance from the bottom up stopping 3 cm below the top edge on both sides.
Step 9
Turn the bag right-side-out through the top opening so the seams are hidden inside.
Step 10
Fold the top edge down 1.5 cm and then fold another 1.5 cm to make a casing and pin the folded edge all the way around.
Step 11
Sew around the folded top edge near the lower fold and leave a 2 cm gap to insert the drawstring.
Step 12
Attach a safety pin to one end of the cord and push it through the casing until it comes out the gap.
Step 13
Tie the two ends of the cord together in a knot and trim any extra cord so the drawstring works smoothly.
Step 14
Share a photo of your finished drawstring bag on DIY.org.
Help!?
What can I use instead of a fabric marker, paper pattern, or cord if I can't find them?
Use tailor's chalk or a pencil instead of a fabric marker, cut a cardboard template from a printed shape as your paper pattern for step 3–4, and substitute a shoelace or thin ribbon for the cord in step 12.
My seams are uneven or the fabric shifted when I sewed the side seams — how do I fix that?
If the fabric shifts while pinning, tracing, cutting, or sewing the 1 cm side seams in steps 3–9, baste the sides by hand first, add more pins or clips, press the edges with an iron, and sew slowly to keep the raw edges aligned.
How can I adapt this project for different ages?
For younger children, have an adult pre-cut the fabric (after step 5) and do the sewing (step 9) while the child pins (step 7), threads the safety pin and cord through the casing (step 12), and ties the knot (step 13), and for older kids let them add a lining or pocket before pinning the sides (step 8) and experiment with decorative topstitching.
How can we personalize or upgrade the bag?
Personalize the bag by appliqueing or embroidering a design before folding the top edge (step 10), adding a fabric lining and an inner pocket when the rectangle is unfolded after step 6, or swapping the cord for a beaded ribbon and adding toggles after step 12 for an adjustable drawstring.
Watch videos on how to sew a drawstring bag from a pattern
Simple Kids Apron Sewing Pattern - Step by Step Tutorial
4 Videos
Simple Kids Apron Sewing Pattern - Step by Step Tutorial
How to Sew by Hand for BEGINNERS!

Learn to Sew an EASY Beginners 10 Minute Skirt Tutorial - Newborn, Babies and Girls Sewing Pattern

How to Sew an Easy Fabric Purse + Tips on Teaching Kids to Sew
Facts about basic sewing for kids
🪡 The oldest known sewing needles are about 40,000 years old and were made from bone by early humans.
✂️ A paper sewing pattern turns flat shapes into 3D pieces so tailors can cut identical parts every time.
🧵 Beginners can make a sturdy bag with just a running stitch and a backstitch—no machine needed!
🎒 Drawstring pouches have been used for centuries to carry coins, tools, and small treasures.
📏 "Measure twice, cut once" is a classic sewing rule that helps avoid wasting fabric.
How do I teach my child to sew a small drawstring bag from a simple paper pattern?
What materials do I need to sew a small drawstring bag with my child?
What ages is sewing a drawstring bag from a pattern suitable for?
What safety tips and fun variations can we try when making a drawstring bag?
