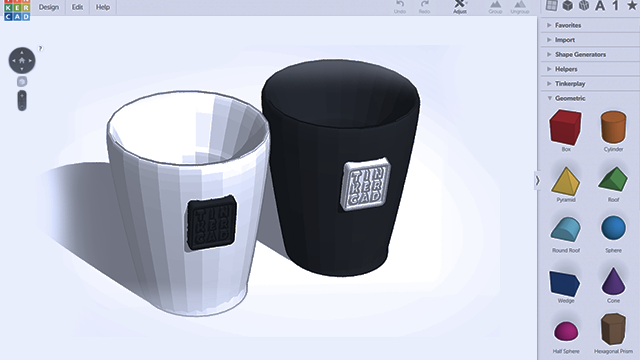
Recreate the 3D Coffee Mug With Your DIY Name
Create a 3D coffee mug model from cardboard or air-dry clay, attach raised DIY name letters, then paint and decorate safely.


Step-by-step guide to recreate a 3D coffee mug with your DIY name
Step 1
Choose whether you will build your mug from cardboard or from air dry clay.
Step 2
Cover your work surface with scrap paper to keep it clean.
Step 3
If you chose cardboard draw a rectangle for the mug body a circle for the base and a handle shape on the cardboard using your pencil and ruler.
Step 4
If you chose cardboard cut out the shapes carefully with scissors and ask an adult to help if you need the craft knife.
Step 5
If you chose cardboard roll the rectangle into a tube and glue the seam to form the mug body.
Step 6
If you chose cardboard glue the circle inside the bottom of the tube to close the base and hold it until it stays put.
Step 7
If you chose clay roll and shape the clay into a smooth cylinder to make the mug body.
Step 8
If you chose clay roll a coil for the handle shape it and attach it to the mug body by pressing and smoothing the joints with a toothpick or a little water.
Step 9
Make raised letters for your DIY name by cutting letter shapes from cardboard or by shaping letters from clay.
Step 10
Attach the raised letters to the mug with craft glue for cardboard or by pressing them carefully onto the clay mug.
Step 11
Let the glue or clay dry completely until the mug is hard enough to hold without changing shape.
Step 12
Lightly sand any rough edges with fine grit sandpaper and wipe away dust.
Step 13
Paint a base color on your mug and let it dry fully.
Step 14
Paint your name letters and add fun decorations then let everything dry completely.
Step 15
Share a photo of your finished 3D mug with your DIY name on DIY.org so everyone can see your creation.
Final steps
You're almost there! Complete all the steps, bring your creation to life, post it, and conquer the challenge!

Help!?
What can we use if we don't have air-dry clay, craft glue, or fine-grit sandpaper?
Use oven-bake clay or sturdy recycled cardboard for the mug body instead of air-dry clay, swap craft glue for white school glue or a hot-glue gun when gluing the cardboard seam and raised letters, and smooth rough edges with a nail file or emery board in place of fine-grit sandpaper.
My mug seam or handle keeps coming apart — what should we try?
For cardboard, add extra glue along the seam, hold or clamp the rolled tube with a clothespin until the glue sets, and for clay press and smooth the handle joints with a toothpick and a little water and allow the clay to dry completely before sanding or painting.
How can we adapt this activity for different age groups?
For younger kids, have an adult pre-cut the rectangle, circle, and handle and provide pre-made letter cutouts to glue on, while older kids can roll and shape the clay cylinder, form coil handles themselves, carve textures before drying, and use finer paints or sealants for a polished finish.
How can we enhance or personalize the mug beyond painting our name?
After the base color dries, add textured decorations like wrapped twine or stamped patterns before painting, glue on small embellishments or glitter to the raised letters, and finish with a clear craft varnish or waterproof sealant so you can proudly share a photo on DIY.org.
Watch videos on how to recreate a 3D coffee mug with your DIY name
👑 Stampin' Up! Coffee Mug 3D Gift Idea
4 Videos

👑 Stampin' Up! Coffee Mug 3D Gift Idea
DIY paper coffee mug / Paper Crafts For School / Easy origami paper coffee mug / Origami coffee cup
DIY Paper Coffee Mug: Fun Origami Craft for School Projects! ☕✨
Easy Handprint Mug Craft for kids | Gift Ideas | DIY Arts and Imagination | Miss Jessica's World
Facts about cardboard and air-dry clay crafts for kids
☕ An average coffee mug holds about 300–350 ml — just the right size for one cozy drink.
🎨 Acrylic paint dries quickly and bonds well to clay and cardboard, making bright, kid-friendly decorations easy.
🌬️ Air-dry clay hardens without baking by losing moisture; thin pieces can dry in ~24 hours while thick parts take longer.
🧱 Corrugated cardboard was invented in the mid-1800s and is super strong yet light — perfect for DIY models.
🔤 Raised letters turn a mug into a tactile name tag — touching letter shapes helps kids learn spelling and letter recognition.
How do you make a 3D coffee mug with your DIY name?
What materials do I need for a 3D coffee mug craft?
What ages is this 3D coffee mug activity suitable for?
What are the benefits and safety tips for making a DIY 3D coffee mug?


One subscription, many ways to play and learn.
Only $6.99 after trial. No credit card required