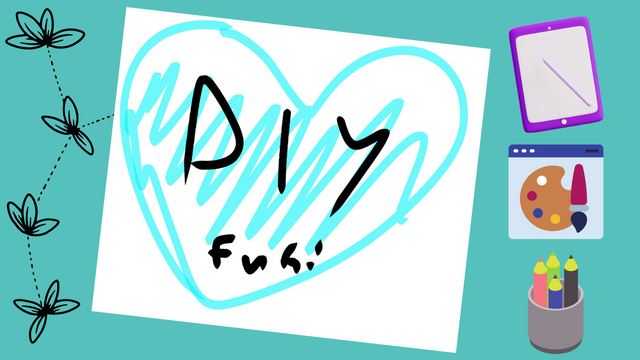
Re-create the DIY Logo in Your Style w/ Dumbkittyproductions
Design and create your own version of the DIY Dumbkittyproductions logo using paper, markers, paint, and simple stencils to practice creativity and design.


Step-by-step guide to Re-create the DIY Logo in Your Style w/ Dumbkittyproductions
Step 1
Gather all materials and set them on a clean flat table.
Step 2
Look at the reference logo for one minute to get ideas.
Step 3
Pick three things from the logo you like and decide if you will copy or change them.
Step 4
Use your ruler and pencil to draw a light border to decide the size of your logo.
Step 5
Lightly sketch the main shapes of your logo design with your pencil.
Step 6
Trace the simple shapes you need onto scrap paper to make stencils.
Step 7
Cut out your stencils from the scrap paper using scissors with adult help.
Step 8
Place one stencil on your paper and tape it down so it does not move.
Step 9
Fill the taped stencil area with paint or color using your chosen colors.
Step 10
Carefully remove the stencil from the paper.
Step 11
Let any paint dry completely before the next step.
Step 12
Add outlines details and your signature with markers to finish your logo.
Step 13
Share your finished creation on DIY.org
Help!?
What can we use instead of paint, tape, or scissors if we don't have them?
Use markers, colored pencils, or crayons instead of paint, hold stencils down with a heavy book or paperweight if you don't have tape, and cut stencils from sturdy cardboard like a cereal box or ask an adult to help with scissors.
My paint keeps bleeding under the stencil—how do I fix that?
If paint bleeds under a stencil from the 'Place one stencil and tape it down' step, press all edges firmly with more tape, blot the paint through the stencil instead of brushing to use thinner layers, and wait for paint to dry completely before removing the stencil.
How can I adapt the activity for a younger child or an older kid?
For younger kids, skip the ruler and light border step and give pre-cut stencils with washable finger paint, while older kids can use the ruler and pencil for precise borders, make layered stencils, cut carefully with adult-supervised scissors, and add detailed marker outlines and signature.
How can we make the finished logo more unique or display-worthy?
After paint dries, personalize by adding texture like glued fabric or glitter, create layered multicolor effects with extra stencils, finish with bold marker outlines and your signature from the final step, and mount the piece on cardboard to display or photograph for DIY.org.
Watch videos on how to Re-create the DIY Logo in Your Style w/ Dumbkittyproductions
How to Make Your Own LOGO with Canva (easy step-by-step tutorial)
4 Videos
How to Make Your Own LOGO with Canva (easy step-by-step tutorial)
How to Design a Logo - From Start to Finish.
How to Make Logo in Canva | Without TEMPLATE | From Scratch😲

How to Make a FREE Logo in 5 Minutes | 3 Simple Steps
Facts about logo design and paper crafts for kids
🎨 Simple logos are easier to remember — many famous brands stick to 2–3 colors and basic shapes for instant recognition.
✂️ Stencils let you repeat a shape perfectly, which is why artists and crafters use them for fast, consistent designs.
🖍️ Markers and paint are super forgiving for kids: bold lines and bright colors make a logo readable even from far away.
🔤 Typography can change a logo’s personality — the same word looks playful in a rounded font and serious in a sharp one.
♻️ DIY logo projects often use recycled or upcycled materials, making creativity kinder to the planet.
How do I recreate the DIY Dumbkittyproductions logo with my child?
What materials do I need to design my own Dumbkittyproductions-style logo?
What ages is the DIY logo design activity suitable for?
What are some fun variations or extensions of this logo design activity?
